1. Ro-ràdh
This manual provides instructions for the installation, operation, and maintenance of the Loddery Xenon HID Ballast Headlight Control Unit with Igniter and D2S Bulb. Please read this manual thoroughly before installation and use to ensure proper function and safety.
2. Fiosrachadh Sàbhailteachd
RABHADH: Voltage. Risk of Electric Shock.
- Dì-cheangail bataraidh a’ charbaid an-còmhnaidh mus dèan thu obair dealain sam bith.
- Bidh siostaman HID ag obair aig fuaimean glè àrdtages. Exercise extreme caution during installation and handling.
- Do not open the ballast unit. Internal components are not user-serviceable and contain high voltage.
- Dèan cinnteach gu bheil a h-uile ceangal tèarainte agus air a insaladh gu ceart gus casg a chur air cuairtean goirid agus taiseachd bho bhith a’ dol a-steach.
- Bu chòir do theicneòlaiche teisteanasach an stàladh a dhèanamh gu h-iomchaidh.
3. Pasgan-susbaint
Tha na co-phàirtean a leanas anns a’ phacaid:
- 1 x Metal Ballast (Xenon HID Ballast Headlight Control Unit)
- 1 x D2S Bulb
- 1 x Igniter (typically integrated with the bulb assembly or ballast connection)
- 1 x Interconnection Cord (wiring harness)

Dealbh 1: Thairisview of the Loddery Xenon HID Ballast, Igniter, D2S Bulb, and Interconnection Cord components included in the package.

Ìomhaigh 2: Mion-fhiosrachadh view showing the Xenon HID Ballast, the D2S bulb, and the igniter unit with its wiring.
4. Setup agus Stàladh
This kit is designed for direct replacement. No programming or coding is required for the vehicle.
4.1 Liosta sgrùdaidh ro-stàlaidh
- Dèan cinnteach gu bheil an carbad dheth agus gu bheil am bataraidh air a dhì-cheangal.
- Verify that the replacement part numbers match the original components (OE part numbers: Ballast: 2847489904, 2847489907, 284748991A, 284748991B; Bulb: 26297-89902, 26297-9B91A, 26297-9F510).
- Gather necessary tools (e.g., screwdrivers, wrenches, gloves).
4.2 Ceumannan stàlaidh
- Faigh cothrom air Co-chruinneachadh a’ Chinn-solais: Depending on your vehicle model, you may need to remove the bumper, fender liner, or other components to gain access to the headlight assembly. Refer to your vehicle's service manual for specific instructions.
- Thoir air falbh Seann Cho-phàirtean:
- Carefully disconnect the electrical connectors from the existing ballast and bulb.
- Unmount the old ballast unit.
- Remove the old D2S bulb from its housing. Avoid touching the glass of the bulb with bare hands.
- Install New D2S Bulb:
- Insert the new D2S bulb into the headlight housing. Ensure it is seated correctly and securely.
- Connect the igniter to the D2S bulb.
- Suidheachadh Ballast Ùr:
- Secure the new ballast unit in the designated location. The ballast is constructed from premium ABS plastic for durability and heat dissipation.
- Connect the interconnection cord to the ballast.

Image 3: Close-up of the Xenon HID Ballast showing its main connector and mounting points.
- Ceangal Wiring:
- Connect the igniter assembly (bulb and igniter) to the ballast.
- Connect the vehicle's main power connector to the ballast. Ensure all connections are firm and properly seated.
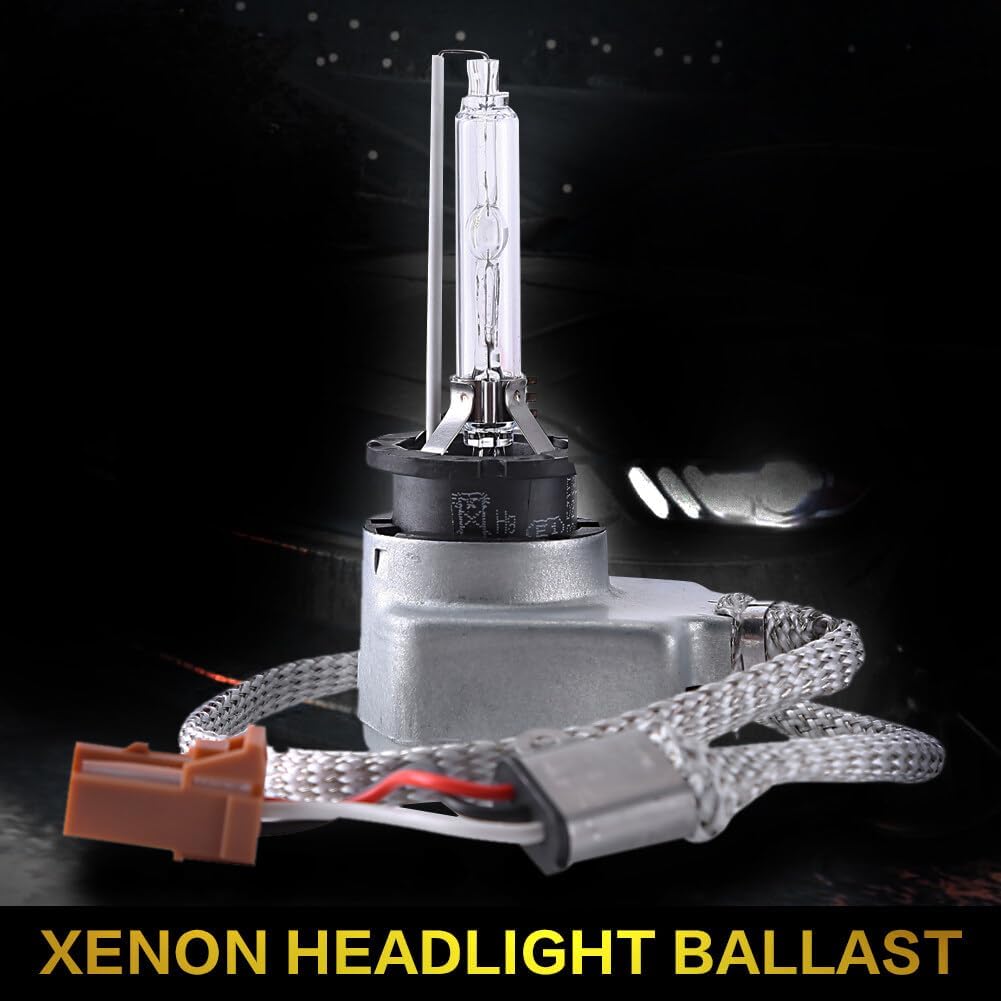
Image 4: Illustration of the ballast, D2S bulb, and igniter connected via wiring, ready for installation.
- Gnìomhachd deuchainn: Before reassembling the vehicle, reconnect the battery and test the headlight function. Ensure both low beam and high beam (if applicable) operate correctly.
- Ath-thionndaidh: Once functionality is confirmed, reassemble any removed vehicle components.
5. Obrachadh
The Loddery Xenon HID Ballast Headlight Control Unit operates automatically with your vehicle's headlight system. When the headlights are activated, the ballast provides the necessary high voltage to ignite the D2S Xenon bulb, then regulates the current to maintain stable light output.
- Fast Startup: The built-in high-pressure bag accelerates current conduction for quick ignition.
- Coileanadh seasmhach: The ballast regulates power to ensure consistent light output from the HID bulb.
6. Cumail suas
The Loddery Xenon HID Ballast and D2S Bulb are designed for long-term, maintenance-free operation. However, periodic checks can help ensure optimal performance.
- Sgrùdadh lèirsinneach: Periodically inspect the wiring and connectors for any signs of wear, corrosion, or damage.
- Glaineachd: Keep the exterior of the ballast and headlight assembly clean from dirt and debris.
- Ath-chur bulb: If a D2S bulb fails, replace it with a compatible D2S Xenon HID bulb. Always replace bulbs in pairs for consistent light output.
- Dìon Ballast: The internal waterproof circuit board protects against oxidation and aging, requiring no user maintenance.
7. A ’dèanamh trioblaid
If you experience issues with your Loddery Xenon HID Headlight system, refer to the following common problems and solutions:
| Trioblaid | Adhbhar a dh’fhaodadh a bhith ann | Fuasgladh |
|---|---|---|
| Chan eil headlight a 'tionndadh air. |
|
|
| Headlight flickers or turns off intermittently. |
|
|
| Headlight color appears incorrect or inconsistent. |
|
|
If troubleshooting steps do not resolve the issue, contact Loddery customer support or a qualified automotive technician.
8. Sònrachaidhean
| Feart | Mion-fhiosrachadh |
|---|---|
| Ainm toraidh | Xenon HID Ballast Headlight Control Unit with Igniter & D2S Bulb |
| Brand | Loddery |
| Modail Àireamh | QA1027X-5974-1805079803 |
| Stuth | ABS Plastic (Ballast) |
| OE Part Numbers (Ballast) | 2847489904, 2847489907, 284748991A, 284748991B |
| OE Part Numbers (Bulb) | 26297-89902, 26297-9B91A, 26297-9F510 |
| Voltage | 838 Volts (Ag Obrachadh) |
| Cuideam nì | 15.2 unnsa (timcheall air 431g) |
| Meudan toraidh | 7.48 x 5.51 x 2.76 òirleach (timcheall air 19 x 14 x 7 cm) |
| Feartan sònraichte | Built-in High-Pressure Bag, Internal Waterproof Circuit Board |
| Co-phàirtean air an toirt a-steach | Ballast, D2S Bulb, Igniter, Interconnection Cord |
| Seòrsa Fit | Suidheachadh sònraichte càr |
9. Co-chòrdalachd charbadan
This Xenon HID Ballast Headlight Control Unit with Igniter & D2S Bulb is compatible with various Nissan and Infiniti models. Please verify OE part numbers before purchase.
Compatible Nissan Models:
- Nissan 350Z Coupe (2003-2009)
- Nissan 350ZR Roadster (2003-2009)
- Nissan Altima (2007-2010)
- Nissan Maxima (2004-2010)
- Nissan Murano (2003-2010)
- Nissan Rogue (2008-2010)
Compatible Infiniti Models:
- Infiniti G35 Coupe (2003-2007)
- Infiniti G35 Sedan (2005-2006)
- Infiniti G37 Sedan (2007-2010)
- Infiniti M35 (2003-2009)
- Infiniti M45 (2003-2009)
- Infiniti FX35 (2003-2008)
- Infiniti FX45 (2003-2008)
- Infiniti QX (2004-2010)
- Infiniti Q40, Q50 Sedan ONLY (2005-2014)
- Infiniti Q60 Coupe ONLY (2003-2013)
- Infiniti Q70 (2005-2014)
- Infiniti QX60 (2012-2014)
- Infiniti QX56, QX70, QX80 (2004-2014)
10. Barantas agus Taic
For warranty information or technical support, please refer to the seller's policy or contact Loddery customer service through the platform where the product was purchased. Keep your purchase receipt for warranty claims.