1. Ro-ràdh
Thank you for choosing the KEENSTAR 20Bar Espresso Machine. This manual provides essential information for the safe operation, maintenance, and troubleshooting of your new espresso machine. Please read it thoroughly before first use and keep it for future reference.
2. Stiùireadh Sàbhailteachd Cudromach
- Leugh a h-uile stiùireadh mus cleachd thu an inneal.
- Na cuir suathadh air uachdar teth. Cleachd làmhan no snaidhmeannan.
- Gus dìon an aghaidh teine, clisgeadh dealain, agus dochann do dhaoine, na bogadh corda, plugaichean no inneal ann an uisge no leaghan eile.
- Tha feum air sùil gheur nuair a bhios clann a’ cleachdadh inneal sam bith no faisg air làimh.
- Unplug bhon ionad nuair nach eilear ga chleachdadh agus mus glanadh thu. Leig le fuarachadh mus cuir thu air no a 'toirt dheth pàirtean, agus mus glan thu an inneal.
- Na obraich inneal sam bith le sreang no pluga millte no às deidh don inneal a dhol ceàrr, no a bhith air a mhilleadh ann an dòigh sam bith.
- Faodaidh cleachdadh ceanglachan accessory nach eil air a mholadh le neach-dèanamh an inneil teine, clisgeadh dealain no dochann do dhaoine adhbhrachadh.
- Na cleachd a-muigh.
- Na leig leis an t-sreang crochadh thairis air oir a’ bhùird no a’ chunntair, no suathadh air uachdar teth.
- Na cuir air no faisg air inneal losgaidh gas no dealain teth, no ann an àmhainn teas.
- Cuir am pluga ris an inneal an-còmhnaidh an toiseach, agus an uairsin cuir am pluga a-steach don t-socaid balla. Gus a dhì-cheangal, tionndaidh smachd sam bith gu "dheth", agus an uairsin thoir am pluga a-mach às an t-socaid balla.
- Na cleachd inneal airson cleachdadh eile a tha san amharc.
- Exercise extreme caution when disposing of hot steam.
- Tha an inneal seo airson cleachdadh dachaigh a-mhàin.
3. Pasgan-susbaint
Thoir sùil air susbaint a’ phacaid nuair a dh’fhosglas tu am bogsa gus dèanamh cinnteach gu bheil a h-uile nì an làthair agus gun mhilleadh.
Ìomhaigh: All components included in the KEENSTAR 20Bar Espresso Machine package. This includes the main unit, portafilter with handle, single and double shot filters, coffee spoon with tamper, and a removable drip tray. The water tank and steam nozzle are also visible.
- KEENSTAR 20Bar Espresso Machine Main Unit
- Làimhseachadh Portafilter
- 1-Shot Filter Basket
- 2-Shot Filter Basket
- Coffee Spoon with Tamper
- Tray drip a ghabhas toirt air falbh
- Leabhar-làimhe cleachdaiche
4. Toradh thallview
Familiarize yourself with the various parts of your espresso machine.

Ìomhaigh: Aghaidh view of the KEENSTAR 20Bar Espresso Machine, showcasing its sleek stainless steel design and key operational areas.
- Tanca uisge: Detachable, 1.1 Liter capacity. Located at the back of the machine.
- Pannal Smachd: Intuitive touch screen for selecting brew options (Espresso, Americano, Espresso Cool, Steam, ON/OFF, 2X Espresso).
- Criathrag-làimhe: A’ cumail cofaidh talmhainn airson grùdadh.
- Slat-smùide: For frothing milk for lattes and cappuccinos. Features a 360-degree rotation.
- Trèana drip: A ghabhas toirt air falbh airson glanadh furasta.
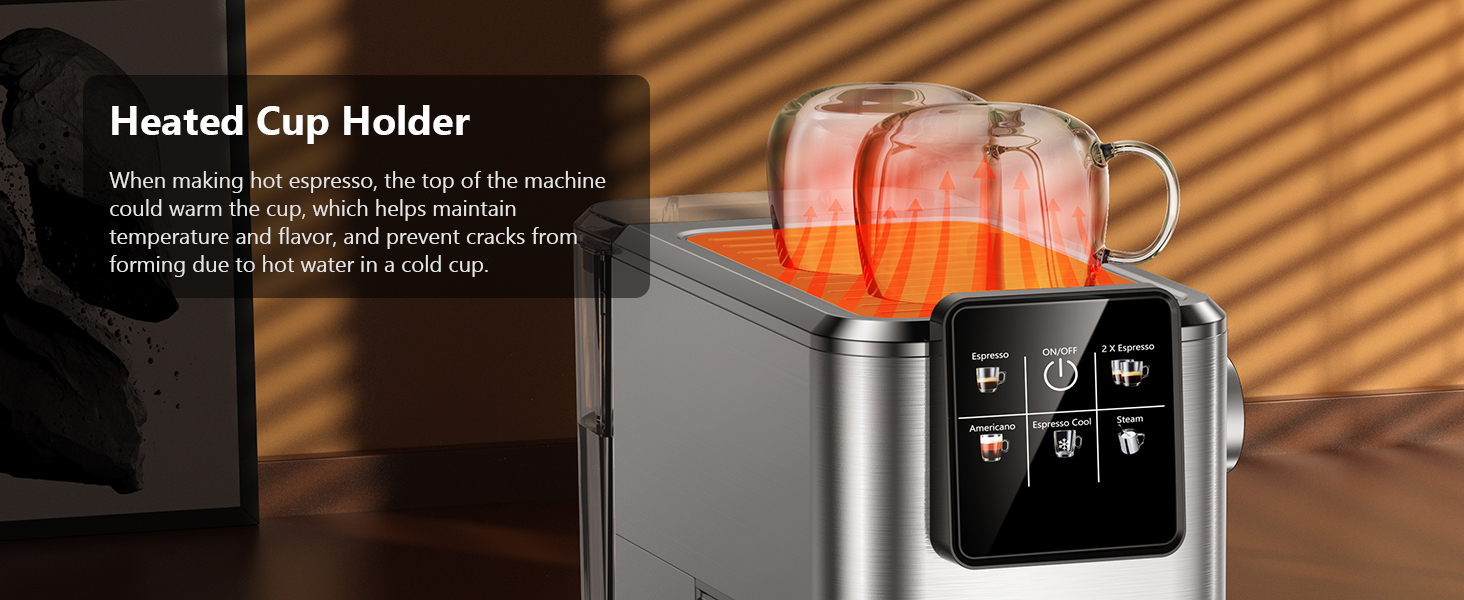
- Heated Cup Holder: Located on top of the machine to warm cups, maintaining coffee temperature.
5. Suidhich
5.1 Initial Use and Priming
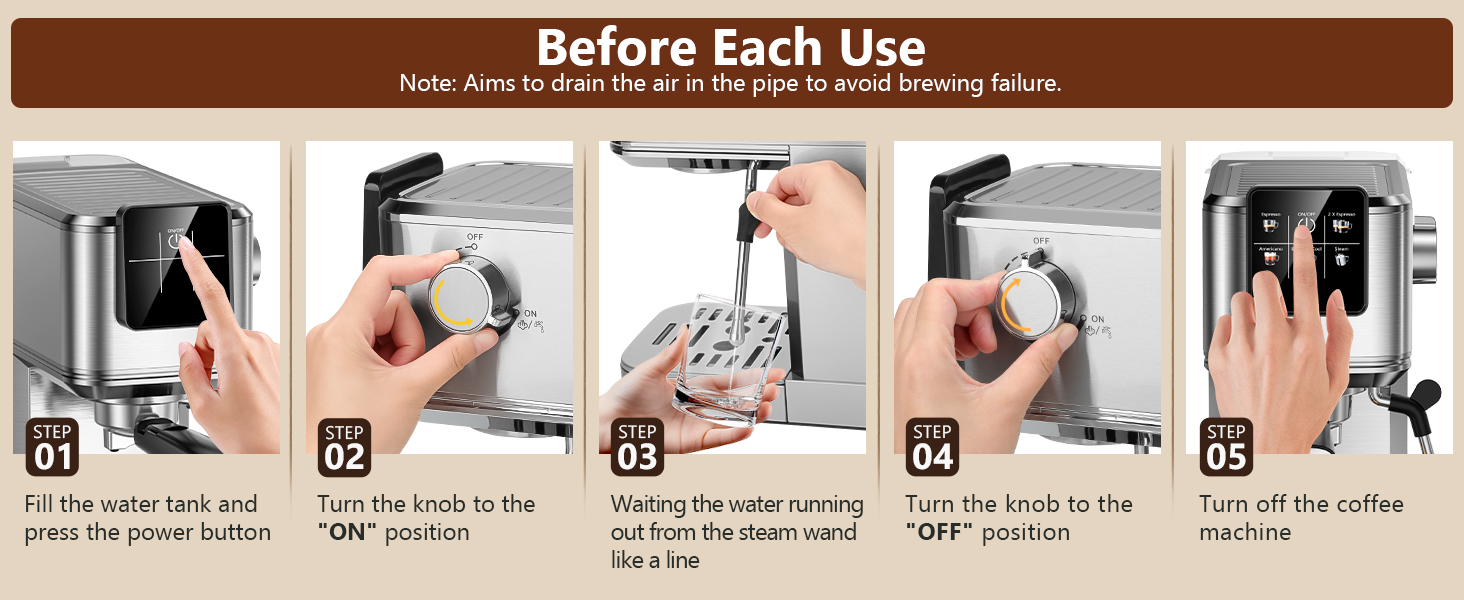
Before first use, or if the machine has not been used for a long time, it is essential to prime the system to ensure proper operation and remove any air from the pipes.
- Fill the water tank with fresh water and place it back into the machine. Ensure the tank cover is properly closed.
- Plug the machine into a power outlet. The ON/OFF button on the touch screen will illuminate.
- Press the ON/OFF button to turn on the machine. The indicator lights will blink as the machine preheats.
- Once the indicator lights are steady, the machine is ready.
- Cuir cupa falamh fon t-slat smùide.
- Turn the steam knob to the "ON" position. Water will run out from the steam wand like a line. Let it run for about 10-15 seconds to purge air.
- Turn the steam knob to the "OFF" position.
- Press the ON/OFF button to turn off the machine. The machine is now primed and ready for use.

Ìomhaigh: Visual steps for priming the espresso machine before its first use or after a period of inactivity. This process drains air from the internal pipes.
5.2 lìonadh tanca uisge
The water tank has a maximum capacity of 1200ml. Do not exceed the maximum fill line to prevent overflow.
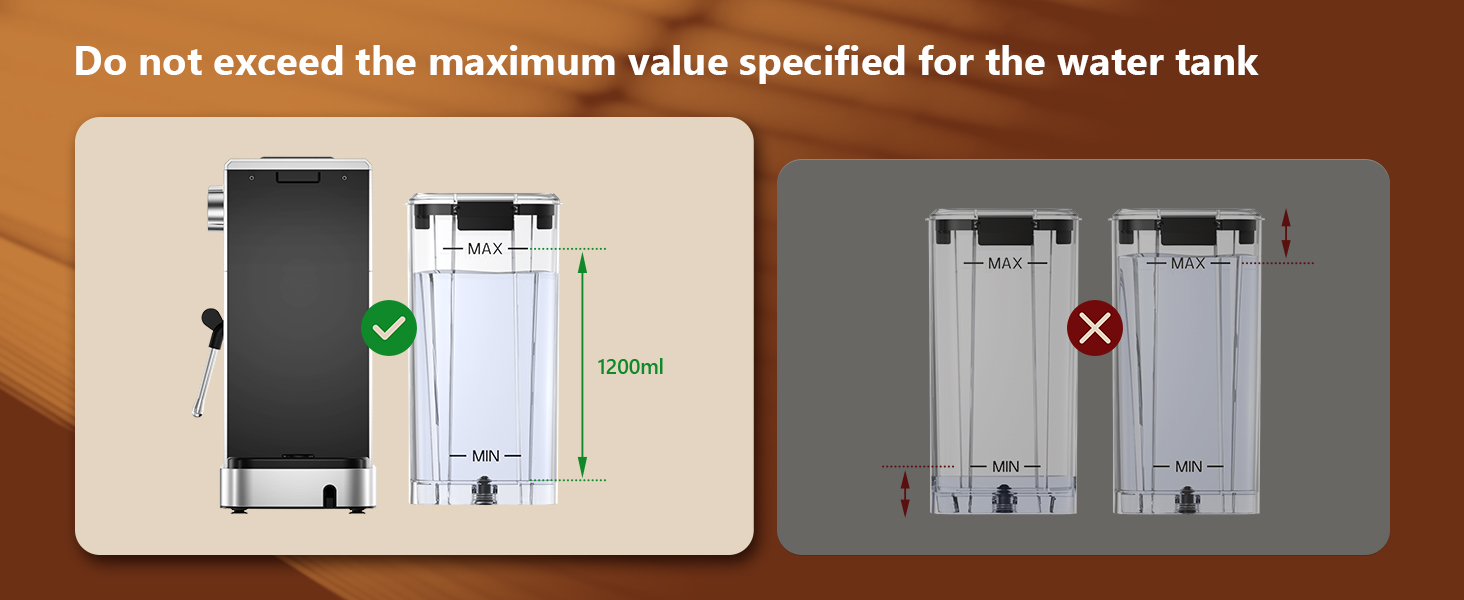
Ìomhaigh: Guidance on filling the water tank, indicating the 1200ml maximum fill level to avoid overfilling.
6. Stiùireadh Obrachaidh
6.1 Grùdaireachd Espresso
The machine features a 20-bar pressure system and pre-soak technology for rich espresso extraction.
- Ensure the steam knob is set to the "OFF" position before brewing coffee.
- Fill the water tank with fresh water and press the ON/OFF button to power on. Wait for the indicator to become steady, signifying preheating is complete.
- Select the appropriate filter basket (1-shot or 2-shot) and place it into the portafilter.
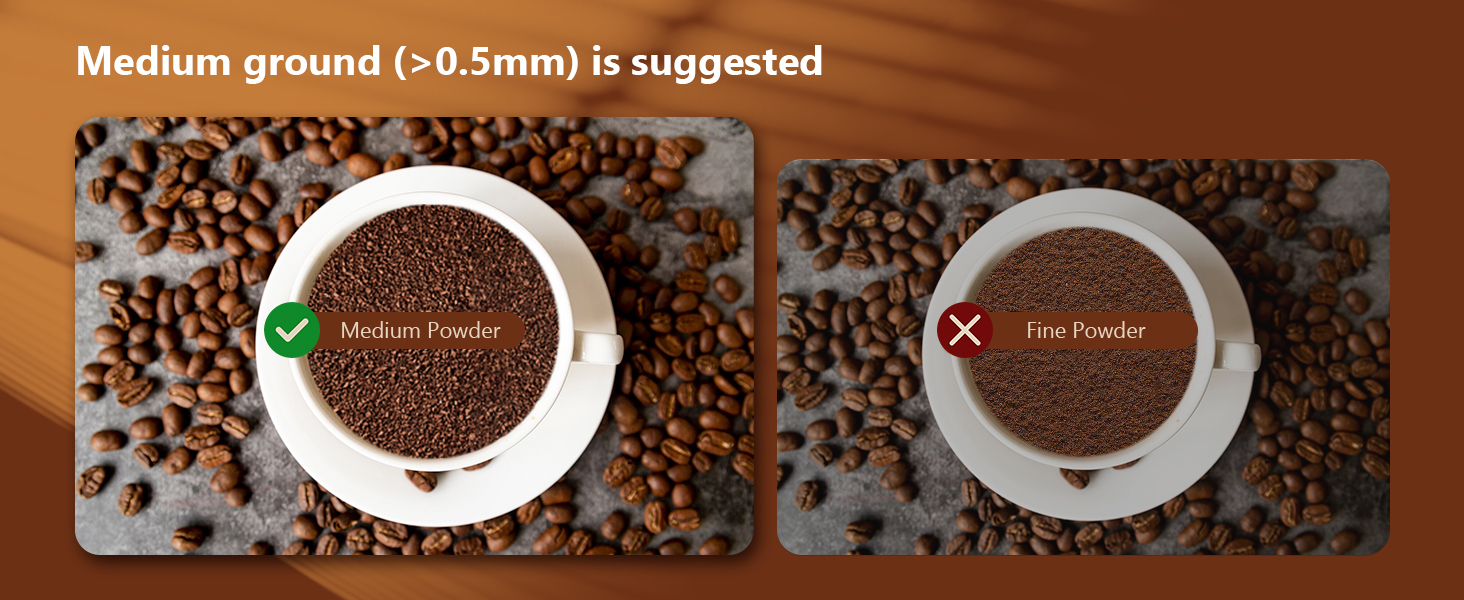
- Add ground coffee to the filter basket. Use medium ground coffee (greater than 0.5mm) for optimal results.
- Tamp the ground coffee firmly and evenly using the coffee tamper.
- Attach the portafilter to the machine, ensuring it is fully locked into place.
- Cuir do chupa (no do chupa) air an treidhe drip fon photafilter.
- Select "Espresso" for a single shot or "2 X Espresso" for a double shot on the touch screen. The machine will begin brewing.
- Cho luath ‘s a bhios am bruich deiseil, stadaidh an inneal gu fèin-ghluasadach.

Ìomhaigh: Step-by-step visual instructions for brewing espresso, from preparing the machine to the final extraction.
Ìomhaigh: Illustration demonstrating the correct way to lock the portafilter before brewing to prevent leaks and ensure proper extraction.

Ìomhaigh: Recommended coffee grind size (medium, >0.5mm) for optimal espresso extraction, contrasting it with fine ground coffee.
6.2 Making Cold Brew Espresso
This machine offers a rapid cold brew function, producing smooth cold brew in as little as 10 minutes.
- Ensure the water tank is filled with iced water for the cold brew function.
- Prepare the portafilter with ground coffee as described in Section 6.1.
- Attach the portafilter to the machine and place a cup underneath.
- Select "Espresso Cool" on the touch screen. The machine will begin the cold brew process.
- Enjoy your rapid cold brew espresso.

Ìomhaigh: The espresso machine preparing cold brew, emphasizing the requirement for iced water in the tank.
6.3 Bainne a’ Cùbhraidh
The powerful steam wand allows you to create creamy microfoam for lattes and cappuccinos.
- Fill the water tank with fresh water and press the ON/OFF button to power on.
- Press the "Steam" button on the touch screen to preheat the steam function. The indicator will blink during preheating and become steady when ready.
- After preheating, turn the steam knob to the "ON" position to release any remaining water in the pipe before frothing.
- Insert the steam nozzle approximately 1 inch into the surface of your milk.
- Gradually turn the steam knob to increase steam until the desired foam consistency is achieved.
- Once finished, turn the steam knob to the "OFF" position and clean the steam wand immediately.
Ìomhaigh: Visual instructions for frothing milk, detailing the steps from preheating to creating microfoam.
7. Cumail suas agus Glanadh
Bidh glanadh cunbhalach a’ dèanamh cinnteach gum mair an inneal espresso agad fad-beatha agus gum bi e ag obair gu math.
- Glanadh coitcheann: Sguab taobh a-muigh an inneil le sanasamp aodach. Na cleachd innealan-glanaidh no sgùrradairean sgrìobach.
- Trèana drip: The removable drip tray should be emptied and cleaned regularly.
- Basgaidean Portafilter agus Criathrag: Às dèidh gach cleachdaidh, thoir air falbh am portafilter agus tilg air falbh grùidean cofaidh a chaidh a chleachdadh. Sruthlaich am portafilter agus basgaid an criathrag fo uisge ruith.
- Slat-smùide: Dìreach an dèidh dhut bainne a chur a-mach, sguab an t-slat smùide le sanas.amp cloth to prevent milk residue from drying. Purge steam briefly to clear any internal blockages.
- Tanca uisge: Glan an tanca uisge bho àm gu àm le inneal-glanaidh tlàth agus nigh gu mionaideach e.
- Lùghdachadh: Depending on water hardness, descale the machine every 2-3 months. Follow the instructions provided with a suitable descaling solution.

Ìomhaigh: Important cleaning instruction: All accessories must be washed by hand and are not dishwasher safe.
8. A ’dèanamh trioblaid
Thoir sùil air an earrann seo airson cùisean cumanta agus na fuasglaidhean aca.
| Trioblaid | Adhbhar a dh’fhaodadh a bhith ann | Fuasgladh |
|---|---|---|
| Chan eil cofaidh a’ sgaoileadh / Sruth slaodach |
|
|
| Water leaks from portafilter edge |
|
|
| Chan eil an t-slat smùide a’ dèanamh smùid |
|
|
| Chan eil cofaidh teth gu leòr |
|
|
9. Sònrachaidhean
- Brand: KEENSTAR
- Ainm a' mhodail: JH-C5210
- Siostam Brùthaidh: 20 Bàrr
- Cumhachd: 1350W
- Comas tanca uisge: 1.1 liotairean (37oz)
- Meudan toraidh: 11.8"D x 12.6"W x 5.5"H
- Cuideam nì: 4.6 Punnd
- Stuth: Stàilinn nach meirg
- Feart sònraichte: Programmable, Touch Screen, Milk Frother, Hot & Rapid Cold Brew
- Seòrsa Cuir a-steach Cofaidh: Cofaidh talmhainn
- Seòrsa sìoltachain: Ath-chleachdadh
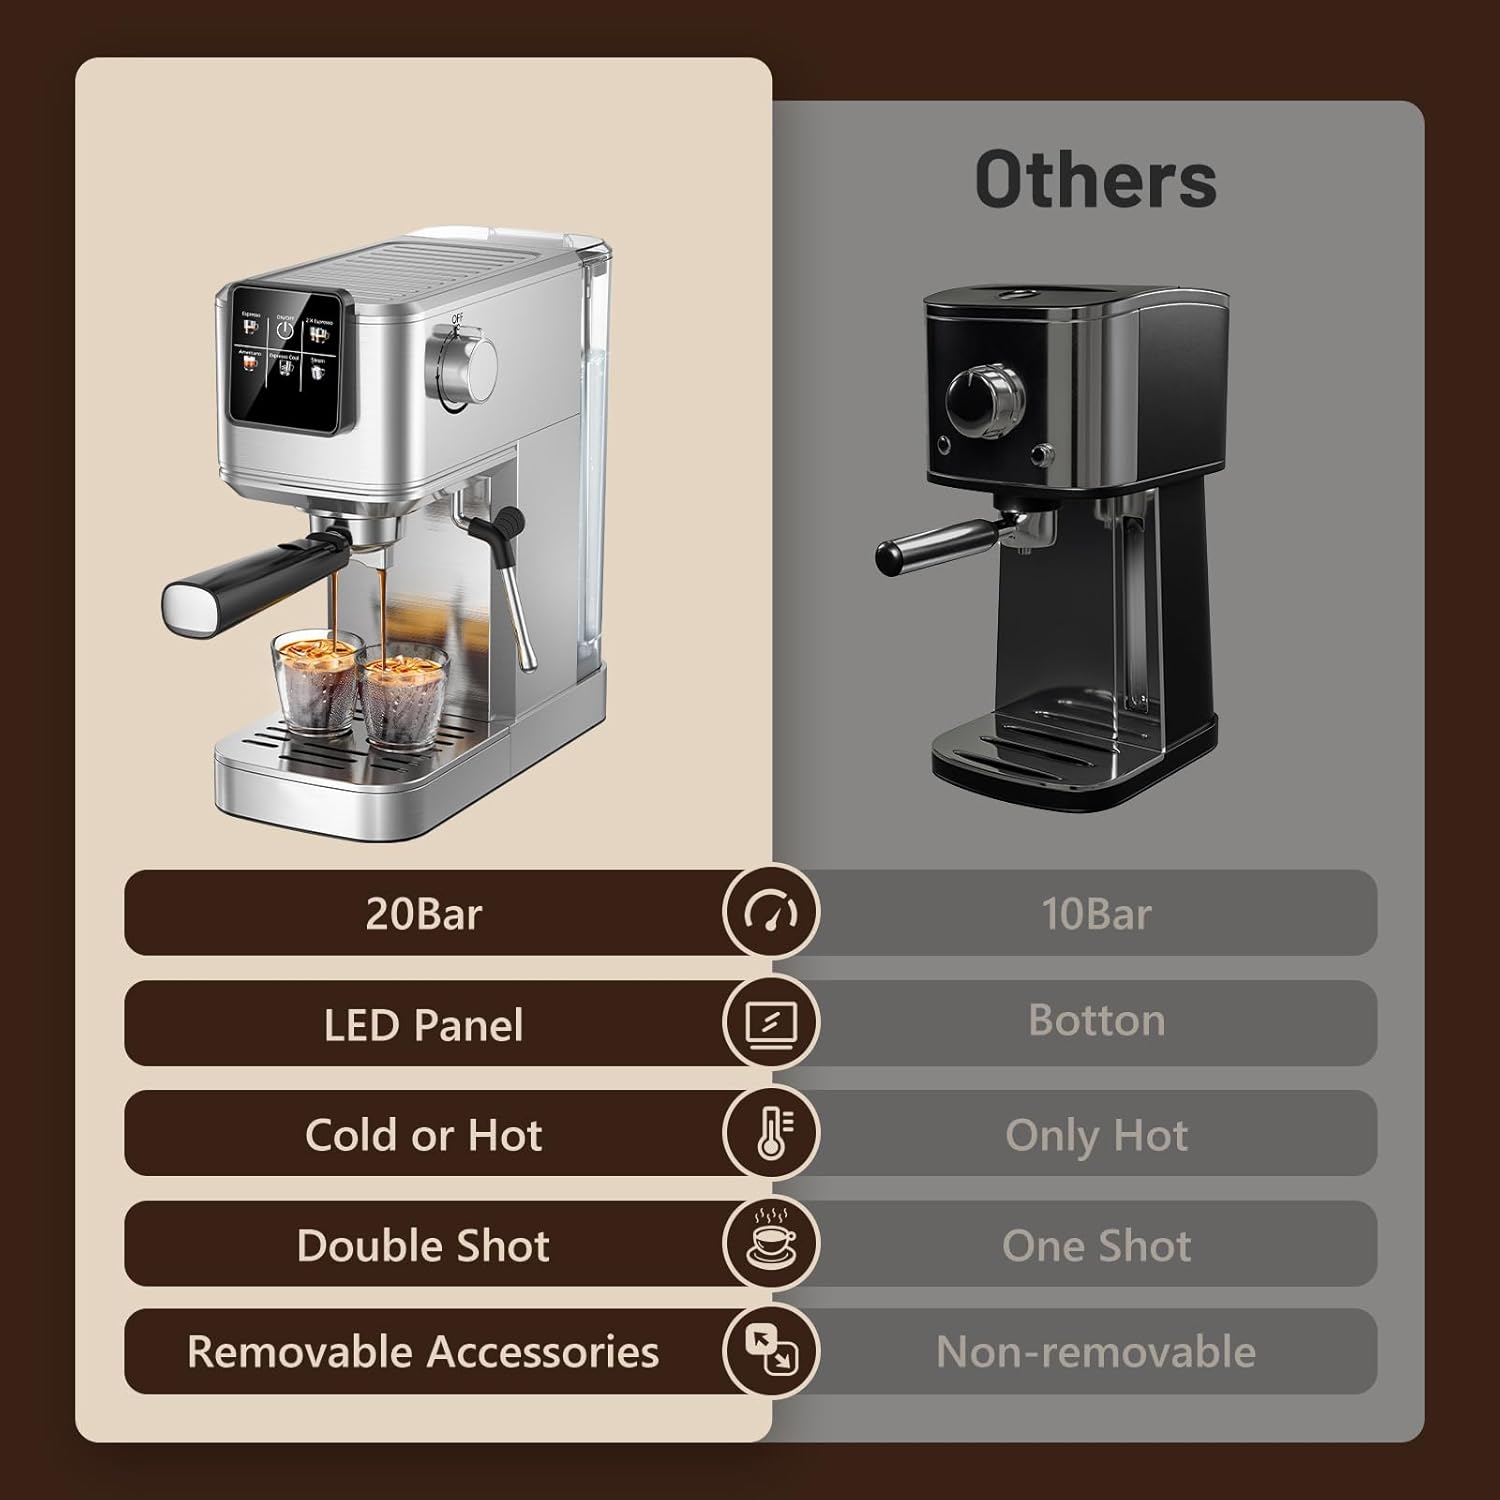
Ìomhaigh: Feature comparison of the KEENSTAR machine, emphasizing its 20Bar pressure, LED panel, and versatility for hot and cold beverages.

Ìomhaigh: Dimensions of the KEENSTAR espresso machine, indicating its compact size.
10. Barantas agus Taic
For warranty information or technical support, please refer to the contact details provided on the product packaging or visit the official KEENSTAR weblàrach. Cùm dearbhadh ceannach airson tagraidhean barantais sam bith.