1. Ro-ràdh
Thank you for choosing the Novodesk AZ5130 6-in-1 Automatic Vacuum Sealer Machine. This manual provides essential information for the safe and efficient operation, maintenance, and troubleshooting of your new appliance. Please read these instructions thoroughly before first use and retain them for future reference.

Image 1.1: The Novodesk AZ5130 Vacuum Sealer in operation, sealing food for preservation.
2. Stiùireadh Sàbhailteachd Cudromach
Nuair a bhios tu a’ cleachdadh innealan dealain, bu chòir ceumannan sàbhailteachd bunaiteach a leantainn gus an cunnart bho theine, clisgeadh dealain agus leòn do dhaoine a lughdachadh, a’ toirt a-steach na leanas:
- Leugh a h-uile stiùireadh mus cleachd thu an inneal seo.
- Do not operate the appliance with a damaged power cord or plug. If the cord or plug is damaged, contact customer support for assistance.
- Na cuir an inneal, an càball cumhachd, no am pluga ann an uisge no leaghan eile.
- Chan eilear an dùil an inneal seo a chleachdadh le daoine (a’ toirt a-steach clann) le comasan corporra, mothachaidh no inntinn nas lugha, no dìth eòlas agus eòlas, mura d’ fhuair iad stiùireadh no stiùireadh a thaobh cleachdadh an inneil le neach le uallach airson an sàbhailteachd. .
- Tha feum air sùil gheur nuair a bhios clann a’ cleachdadh inneal sam bith no faisg air làimh.
- Unplug bhon ionad nuair nach eilear ga chleachdadh agus mus glanadh thu. Leig le fuarachadh mus cuir thu air no a 'toirt dheth pàirtean, agus mus glan thu an inneal.
- Na cleachd ceanglachan nach eil an neach-dèanamh a’ moladh.
- Na cleachd a-muigh.
- Na cuir air no faisg air inneal losgaidh gas no dealain teth, no ann an àmhainn teas.
- Always ensure the lid is properly latched before operating.
- Use only vacuum sealer bags designed for vacuum sealing.
3. Pasgan-susbaint
Carefully unpack your Novodesk AZ5130 Vacuum Sealer and check that all items are present and in good condition. If any items are missing or damaged, please contact customer support.
- 1 x Novodesk AZ5130 Vacuum Sealer Machine
- Cord cumhachd 1 x
- 1 x Vacuum Hose (for external vacuuming)
- 2 x Sealing Foam Gaskets (replacement)
- 6 x Pre-cut Vacuum Bags (3.9" x 7.8")
- 6 x Pre-cut Vacuum Bags (7.8" x 11.8")

Image 3.1: All components included in the Novodesk AZ5130 Vacuum Sealer package.
4. Toradh thallview
Familiarize yourself with the various parts and functions of your vacuum sealer.

Image 4.1: Control panel and function buttons of the vacuum sealer.
Gnìomhan Pannal Smachd:
- Process Indicator Light: Illuminates to show operating status.
- Modh tioram: For vacuum sealing dry foods like nuts and grains.
- Modh Tais: For vacuum sealing foods with a small amount of liquid.
- Gnìomh Pulse: Allows manual control of the vacuum process, ideal for fragile foods.
- Seal Function: Seals bags without vacuuming.
- Cuir stad air a ’phutan: A 'cur stad air an obair làithreach.
Image 4.2: Internal components of the vacuum sealer.
Prìomh cho-phàirtean:
- Seòmar falamh: Àite far a bheilear a’ toirt a-mach èadhar às a’ bhaga.
- Silicone Strip: Helps create a tight seal.
- Stiall ròin: Heats to create the bag seal (4mm wide).
- Foam Seal Ring: Ensures proper vacuum.
- Cover Slaps: Prevents the vacuum bag from coming out of the vacuum chamber.
- External Sliding Cutter: Integrated cutter for custom bag sizes.
- External VAC Port: For connecting the vacuum hose to jars and containers.
5. Suidhich
Before first use, ensure the appliance is clean and dry. Place the vacuum sealer on a flat, stable surface.
Ceumannan rèiteachaidh tùsail:
- Connect the power cord to the appliance and then to a suitable electrical outlet.
- Prepare your vacuum bag with food, ensuring the open end is clean and dry. Leave at least 2-3 inches of space between the food and the top of the bag.
6. Stiùireadh Obrachaidh
6.1. Basic Vacuum Sealing (Dry & Moist Modes)
Follow these steps for standard vacuum sealing of food bags:
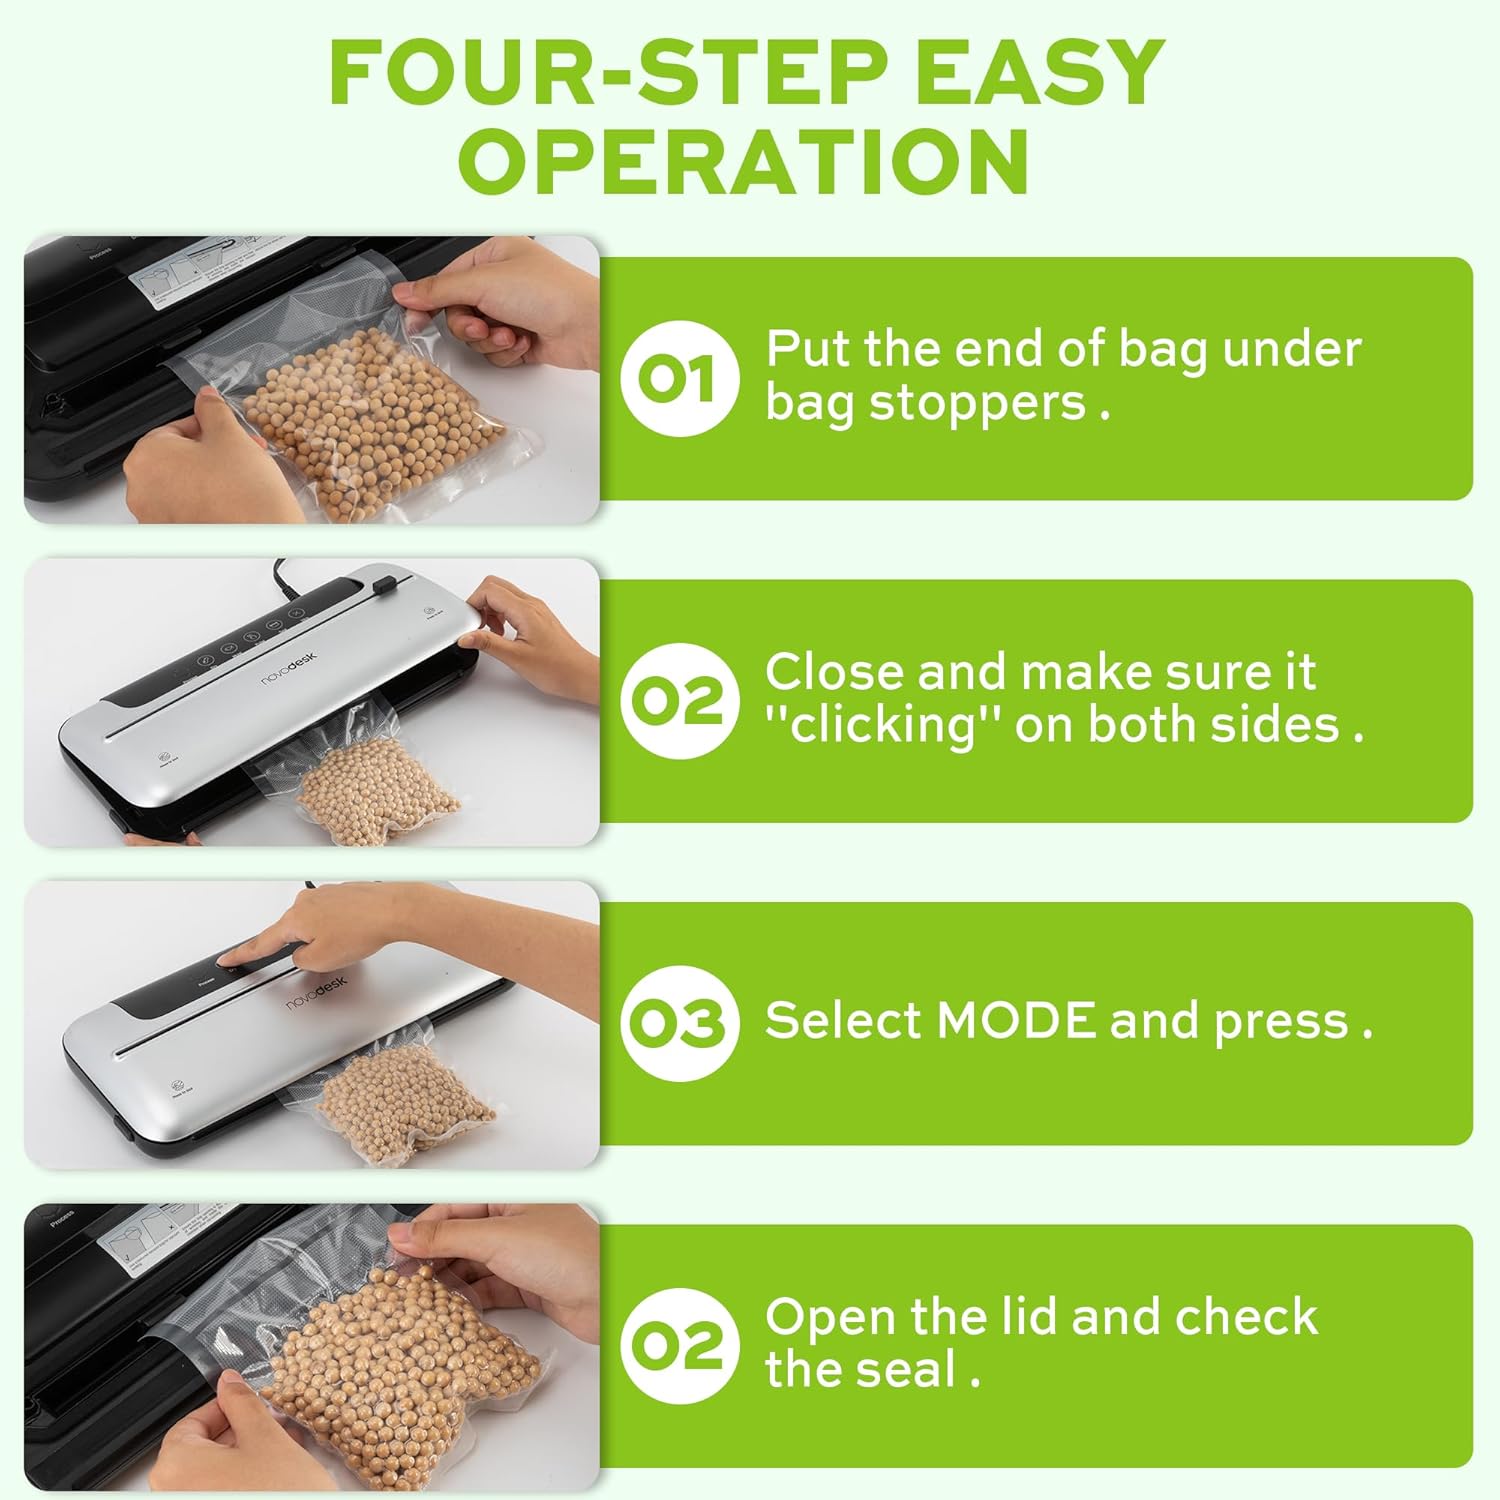
Image 6.1: Four-step easy operation for vacuum sealing.
- Ullaich am baga: Place the open end of the vacuum bag under the bag stoppers, ensuring it is flat and centered within the vacuum chamber.
- Dùin am mullach: Firmly close the lid of the vacuum sealer. Press down on both sides until you hear a "clicking" sound, indicating that the lid is securely latched.
- Tagh Modh: Choose the appropriate mode for your food:
- Brùth an tioram button for dry foods.
- Brùth an tais button for moist foods.
- Thoir sùil air an t-seula: Once the process is complete and the indicator light turns off, open the lid and remove the sealed bag. Inspect the seal to ensure it is airtight.
6.2. Gnìomh Cuisle
The Pulse function provides manual control over the vacuum process, which is ideal for delicate or fragile foods that could be crushed by full vacuum pressure.
- Follow steps 1 and 2 from "6.1. Basic Vacuum Sealing".
- Brùth agus cùm an Pulse button. The machine will begin to vacuum.
- Sgaoil an Pulse button when the desired vacuum level is reached.
- Brùth an Ròin putan gus am baga a dhùnadh.
- Open the lid and remove the sealed bag.
6.3. Seal Only Function
Use the Seal function to create a seal without vacuuming, useful for making custom-sized bags from a roll or resealing snack bags.
- Cuir ceann fosgailte a’ phoca air an stiall seulachaidh.
- Dùin am mullach gu daingeann gus an cliog e.
- Brùth an Ròin putan. Bidh an inneal a’ teasachadh agus a’ seulachadh a’ bhaga.
- Once the sealing process is complete, open the lid and remove the sealed bag.
6.4. External Vacuum Function (for Jars/Containers)
Your vacuum sealer includes an external vacuum hose for use with compatible vacuum-sealable jars, containers, and wine stoppers.

Image 6.2: Using the external vacuum system with various containers.
- Prepare your vacuum-sealable jar or container with food. Ensure the lid is properly placed.
- Insert one end of the vacuum hose into the external VAC port on the vacuum sealer.
- Insert the other end of the vacuum hose into the port on your vacuum-sealable jar or container.
- Close the lid of the vacuum sealer (no bag needed inside).
- Brùth an External VAC button (if available, otherwise use Dry/Moist mode to activate vacuum pump). The machine will begin to remove air from the container.
- Once the vacuum process is complete, remove the hose. The container should now be sealed.
6.5. Using the External Sliding Cutter
The integrated sliding cutter allows you to create custom-sized bags from a roll of vacuum sealer material.
- Place the vacuum bag roll across the cutting area.
- Slide the cutter blade across the bag material to achieve the desired length.
7. Cumail suas agus Glanadh
Nì glanadh is cumail suas cunbhalach cinnteach gum mair an inneal-seileachaidh falamh agad fad-beatha agus gum bi e ag obair gu math.
Stiùireadh glanaidh:
- Thoir a-mach an inneal an-còmhnaidh mus glanadh thu.
- Sguab taobh a-muigh an inneil le bog, damp aodach. Na cleachd luchd-glanaidh sgudail no solventan.
- Glan an seòmar falamh agus an raon stiall seulachaidh le sanasamp cloth. Ensure no food particles or liquids remain.
- The foam seal rings can be removed for cleaning if necessary. Wash with mild soap and water, rinse thoroughly, and allow to air dry completely before reinserting.
- Dèan cinnteach gu bheil a h-uile pàirt gu tur tioram mus stòraich no mus cleachd thu an inneal a-rithist.
Stòradh:
Store the vacuum sealer in a clean, dry place. For best results, store with the lid unlatched to prevent compression of the foam seal rings, which can affect sealing performance over time.
8. A ’dèanamh trioblaid
Ma thachras tu ri duilgheadasan leis an inneal-seileachaidh falamh agad, thoir sùil air na duilgheadasan agus na fuasglaidhean cumanta a leanas:
| Trioblaid | Adhbhar a dh’fhaodadh a bhith ann | Fuasgladh |
|---|---|---|
| Chan eil inneal a ’tionndadh air. | Gun solar cumhachd. | Check if the power cord is securely plugged into the outlet and the machine. Test the outlet with another appliance. |
| Bidh an inneal a’ falmhachadh ach chan eil e a’ seulachadh. | Sealing strip or foam gasket is dirty/damaged. Bag is not positioned correctly. | Clean the sealing strip and foam gaskets. Ensure the bag is flat and centered over the sealing strip. Replace gaskets if damaged. |
| Bidh an inneal a’ seulachadh ach chan eil e a’ falmhachadh. | Lid not properly latched. Foam gaskets are dirty or worn. Bag has holes or is not suitable. | Ensure the lid is firmly closed and latched on both sides. Clean or replace foam gaskets. Use proper vacuum sealer bags and check for damage. |
| Tha an falamh lag no neo-chunbhalach. | Foam gaskets are dirty or worn. Too much liquid in the bag (for Dry mode). | Clean or replace foam gaskets. Use Moist mode for foods with liquid, or pre-freeze liquids. |
| Bag melts during sealing. | Sealing time too long (unlikely for automatic models). | Ensure you are using appropriate vacuum sealer bags. If issue persists, contact customer support. |
If the problem persists after attempting these solutions, please contact Novodesk customer support for further assistance.
9. Sònrachaidhean
| Brand | Novodesk |
| Modail Àireamh | AZ5130 |
| Cumhachd / Wattage | 120 watt |
| Voltage | 120V |
| Stuth | Styrene acrylonitrile butadiene (ABS) |
| Cuideam nì | 980g (2.16 notaichean) |
| Dath | Airgideach |
| Modh obrachaidh | fèin-ghluasadach |
| Cumhachd suidse as àirde | 75KPa |
| Leud an stiall ròin | 4mm |
10. Barantas agus Taic
Novodesk products are manufactured to high-quality standards. For information regarding warranty coverage, product support, or to purchase replacement parts, please refer to the warranty card included with your product or visit the official Novodesk website. If you have any questions or require assistance, please contact Novodesk customer service.