
1. Toradh thallview
The Hemudu HD04W-001P Single Monitor Arm Mount Stand is designed to enhance your workspace by providing a stable and adjustable platform for your computer monitor. This stand supports most flat or curved screens ranging from 13 to 32 inches and can hold up to 77 lbs. It is compatible with VESA patterns 75x75mm and 100x100mm, offering full articulation for optimal viewing angles and improved ergonomics.

Dealbh 1.1: Aghaidh view of the Hemudu Single Monitor Arm Mount Stand with a monitor attached, showcasing its sleek design and desk integration.
2. Feartan toraidh
- Co-fhreagarrachd Uile-choitcheann: Fits most flat or curved computer screens from 13 to 32 inches, supporting monitors up to 77 lbs. Compatible with VESA patterns 75x75mm and 100x100mm.
- Full Articulation: Offers 360° rotation, -10° tilt down to +15° up, and ±50° swivel for ergonomic viewing.
- Àirde ri atharrachadh: Monitor height can be adjusted along the metal pole to achieve desired viewìrean.
- Togail làidir: Made from cold-rolled steel for secure and stable monitor support.
- Riaghladh càbaill: Integrated cable clip helps keep wires organized and frees up desktop space.
- Stàladh furasta: Designed for quick and straightforward setup, with all necessary accessories included.
3. Stiùireadh stàlaidh
3.1. Tagh do dhòigh-shuidheachaidh
The monitor arm supports two primary installation methods: C-clamp mounting for desk edges and grommet mounting for desks with existing cable holes. Ensure your desk thickness is suitable for the chosen method (maximum 2.9 inches).

Image 3.1: Illustration of C-clamp mounting (left) and Grommet mounting (right) options. Both methods secure the stand to the desk, with the C-clamp gripping the edge and the grommet method utilizing a pre-drilled hole.
3.2. A’ ceangal an sgrìn
Before attaching the monitor, ensure it is compatible with VESA patterns 75x75mm or 100x100mm. Secure the VESA plate to the back of your monitor using the provided screws. Then, slide the monitor with the attached VESA plate onto the arm's mounting head. Use the reinforcement knob to secure it firmly.

Image 3.2: Diagram showing VESA compatibility (100x100mm, 75x75mm, 50x50mm) and supported monitor sizes (13-32 inches) with a maximum capacity of 77 lbs.
3.3. Important Note on VESA Mounting
When mounting, ensure the distance 'H' (from the top VESA holes to the top edge of your monitor) is within the specified limits for your VESA pattern to ensure proper balance and stability. Refer to the diagram below.

Image 3.3: A guide illustrating how to measure the 'H' distance for VESA mounting and a table showing recommended 'H' values for 100x100, 75x75, and 50x50 VESA patterns. Also includes an ergonomic design comparison.
4. Obrachadh agus Atharrachaidhean
4.1. Atharrachadh Airde
The monitor arm allows for multiple height settings along the central pole. To adjust the height, loosen the reinforcement knob, slide the monitor to your desired level, and then tighten the knob securely. This helps achieve an ergonomic viewan suidheachadh.

Image 4.1: Visual representation of the four adjustable height levels (10", 11.4", 12.9", 14.3") on the monitor arm, allowing users to customize their screen position.
4.2. Atharrachadh Teilt
Adjust the monitor's vertical angle to reduce glare and optimize your viewing experience. The arm supports a tilt range from -10° (downward) to +15° (upward).
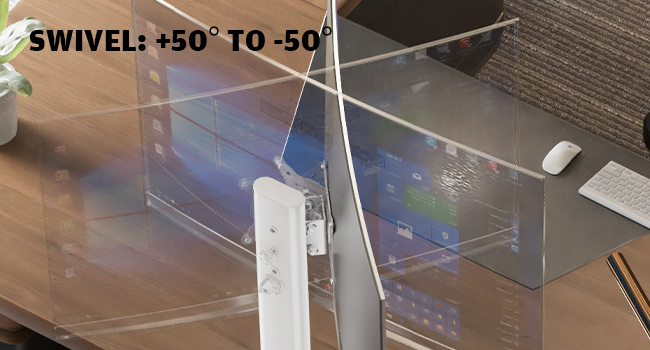
Image 4.2: A user adjusting the monitor's tilt, demonstrating the -10° to +15° tilt range for finding a comfortable viewceàrn ing.
4.3. Atharrachadh Cuairteachaidh
The monitor arm allows for a ±50° swivel, enabling you to share your screen with others or adjust its angle for different tasks without moving the entire stand.

Ìomhaigh 4.3: Os cionn-cinn view illustrating the ±50° swivel capability of the monitor arm, showing how the screen can be angled left or right.
4.4. Atharrachadh Rothlaidh
Rotate your monitor 360° to switch between landscape and portrait orientations. This is particularly useful for coding, document review, or specific graphic design tasks.

Image 4.4: Two monitors mounted on stands, demonstrating the 360° rotation feature, allowing screens to be used in both landscape and portrait modes.
5. Riaghladh càball
The monitor arm features an integrated cable clip on the pole. Route your monitor and power cables through this clip to keep them tidy and prevent clutter on your desk. This contributes to a cleaner and more organized workspace.

Image 5.1: A clean desk setup with a monitor mounted on the arm, highlighting how the stand helps improve desktop cleanliness and organization.
6. Sònrachaidhean
| Sònrachadh | Mion-fhiosrachadh |
|---|---|
| Modail Àireamh | HD04W-001P |
| Seòrsa stàladh | Goireas Bùird (C-clamp no Grommet) |
| Seòrsa gluasad | Rotate, Swivel, Tilt, Height Adjustable |
| Brand | Hemudu |
| Stuth | Alloy Steel |
| Dath | Geal |
| Innealan co-fhreagarrach | Monitor, Telebhisean |
| Minimum Supported Screen Size | 13 òirlich |
| Maximum Supported Screen Size | 32 òirlich |
| Comas cuideam as àirde | 77 lb |
| Co-fhreagarrachd VESA | 75x75mm, 100x100mm |
| Ceàrn Teilt | -10 ° gu +15 ° |
| Ceàrn swivel | ±50° |
| Cuairteachadh | 360° |
7. A ’dèanamh trioblaid
- Monitor is unstable/sags: Ensure all mounting screws are tightened, especially the reinforcement knob on the VESA plate. Verify your monitor's weight does not exceed the 77 lbs capacity.
- Duilgheadas ag atharrachadh àirde/claonadh/tionndaidh: Check if any adjustment knobs or screws are overtightened. Loosen slightly to allow movement, then retighten to secure the position.
- Stand is loose on the desk: Re-check the C-clamp or grommet mounting mechanism. Ensure it is securely fastened to the desk and the desk thickness is within the supported range.
- Cables are not staying in the clip: Ensure cables are properly routed and not excessively thick or numerous for the clip.
8. Bhidio Bathar Oifigeil
Video 8.1: An official product video demonstrating the features and installation process of the Hemudu HD04W-001P Monitor Arm Stand. This video provides a visual guide to setup, adjustments, and cable management.
9. Barantas agus Taic
The Hemudu HD04W-001P Monitor Arm Mount Stand comes with a Barantas 90-latha. For any support inquiries, technical assistance, or warranty claims, please refer to the contact information provided with your product packaging or visit the official Hemudu weblàrach.