
1. Toradh thallview
The Hemudu Dual Monitor Articulating Desk Mount Arm Stand (Model HD04W-001P) is designed to enhance your workspace by supporting two computer monitors in a vertical stack configuration. This stand provides ergonomic benefits, helps relieve strain on the neck, back, and shoulders, and optimizes desktop space. It is compatible with a wide range of monitors and offers versatile adjustability for a customized viewann an eòlas.
Prìomh fheartan:
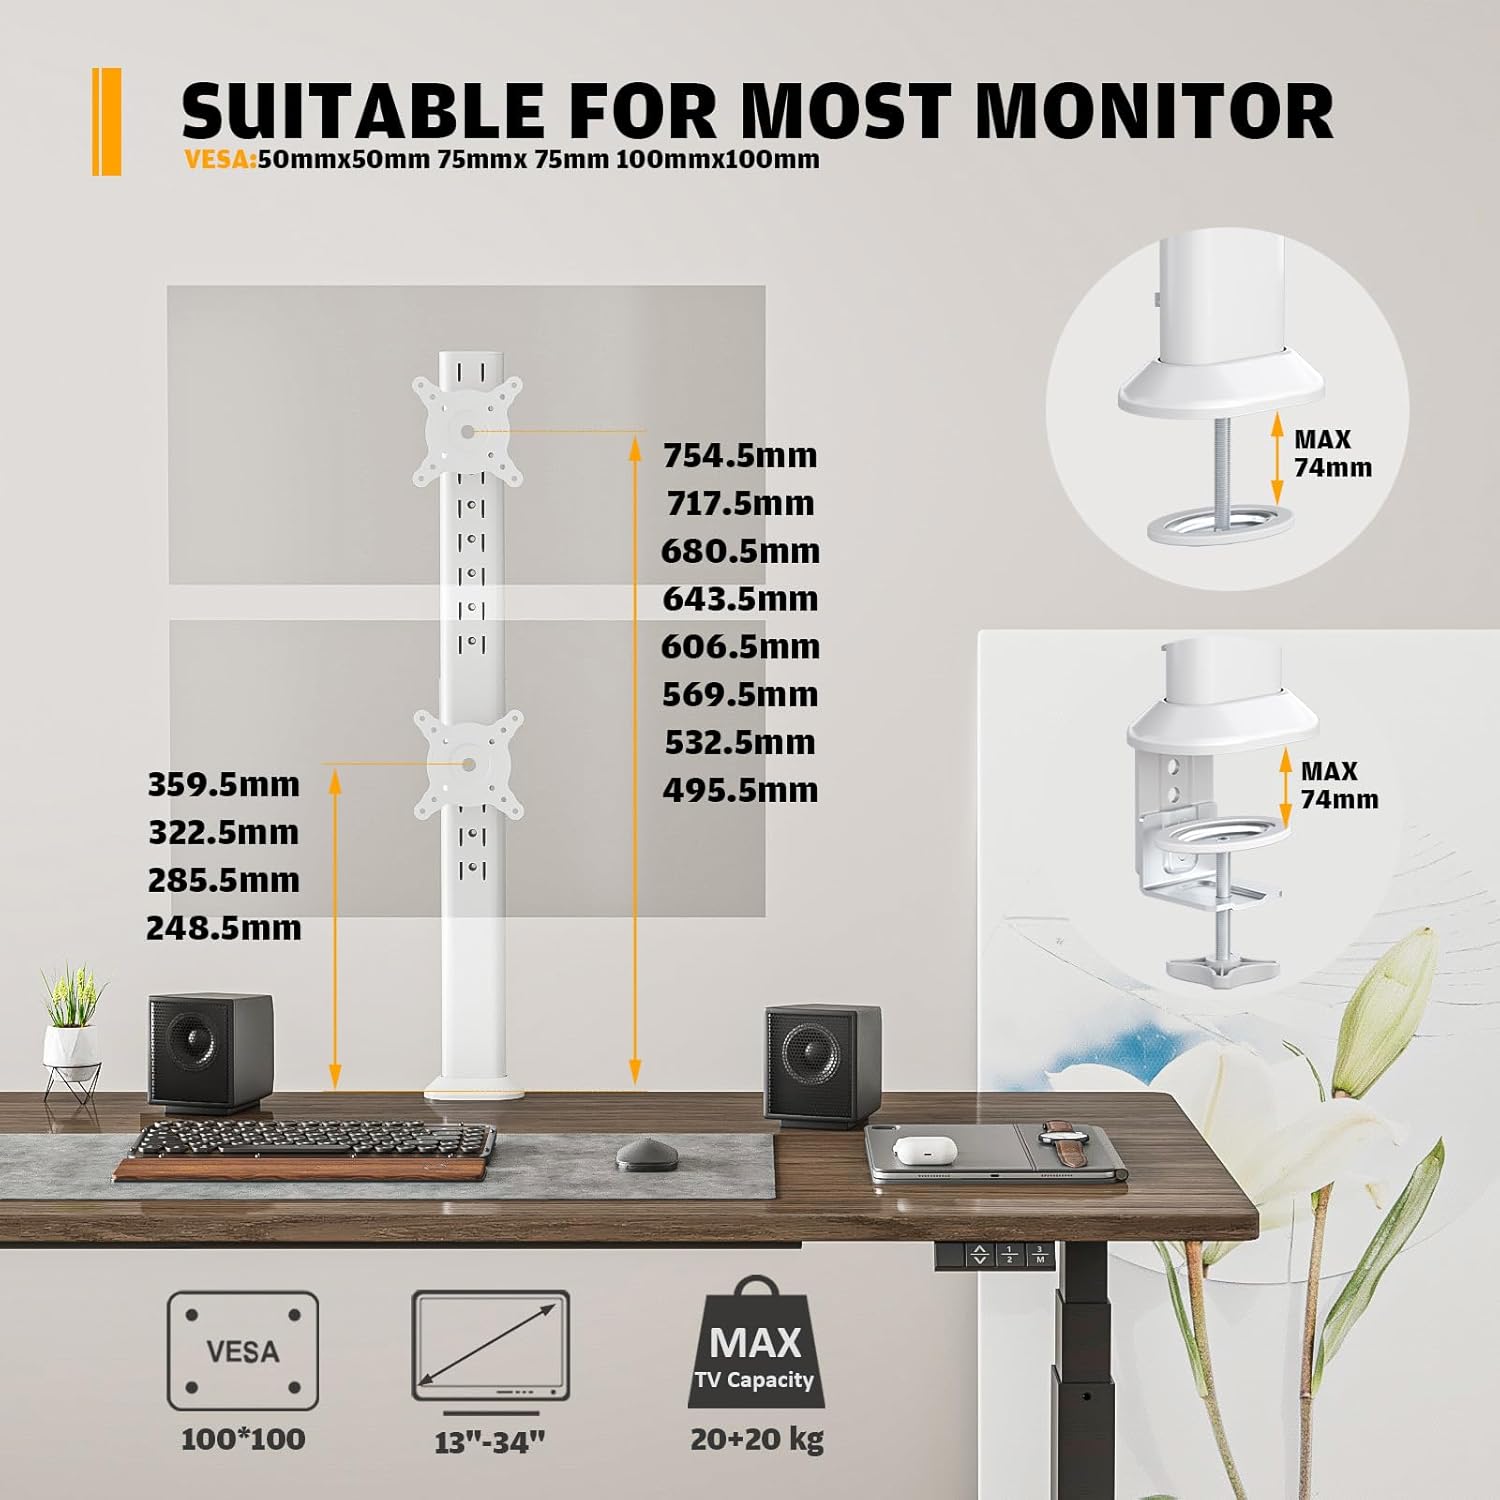
- Co-chòrdalachd sgrion: Supports two screens from 13 to 34 inches, each weighing up to 44 pounds (20 kg).
- Gèilleadh VESA: Compatible with VESA mounting patterns of 75x75mm and 100x100mm.
- Dealbhadh ergonomic: Allows monitors to be raised to an ergonomic height, reducing physical strain.
- Multifunction Adjustments: Offers -15° to +10° tilt, -50° to +50° swivel, 360° rotation, and 4+8 level height adjustments along the central pole.
- Roghainnean stàlaidh: Supports both C-clamp and grommet mounting methods.
- Riaghladh càbaill: Integrated detachable cable clips keep power and AV cables organized.
- Sàbhaladh àite: Holds two monitors on a single stand, freeing up valuable desktop space.

2. Fiosrachadh Sàbhailteachd
Please read all instructions carefully before installation and use. Failure to follow these instructions may result in property damage, serious injury, or death. If you do not understand these instructions, or have doubts about the safety of the installation, please contact customer support.
- Comas cuideam: Do not exceed the maximum weight capacity of 44 lbs (20 kg) per monitor. Overloading may cause instability and potential injury.
- Meud an sgrùdaidh: Ensure your monitors are within the supported size range of 13 to 34 inches.
- Co-fhreagarrachd VESA: Verify that your monitors have VESA mounting holes (75x75mm or 100x100mm) before installation.
- Tighead Deasg: Ensure your desk surface is strong enough to support the combined weight of the stand and monitors. For C-clamp installation, the desk thickness should be within the specified range (typically up to 2.9 inches or 74mm).
- Stàladh sàbhailte: Always ensure all screws and bolts are securely tightened before placing monitors on the stand.
- Riaghladh càbaill: Route cables carefully to prevent pinching or snagging, which could damage cables or cause monitors to fall.
- Clann is Peataichean: Keep children and pets away from the monitor stand during installation and adjustment.

3. Pasgan-susbaint
Please check the package contents against the list below to ensure all components are present and undamaged. If any parts are missing or damaged, please contact customer support.
- Prìomh Cho-chruinneachadh Pòla
- Monitor VESA Plates (x2)
- C-Clamp Seanadh
- Grommet Mount Components
- Criomagan Riaghlaidh Càball
- Hardware Kit (screws, washers, spacers for VESA mounting)
- Tools (Allen keys, wrench)
- Leabhar-làimhe stiùiridh
4. Setup agus Stàladh
The Hemudu Dual Monitor Arm Stand offers two primary installation methods: C-clamp and Grommet mounting. Choose the method best suited for your desk.
4.1 Choose Your Mounting Method

4.2 C-Clamp Installation (Method 1)
- Ceangail an C-clamp bonn gu bonn a’ phrìomh phòla.
- Cuir an C-cl an àiteamp air oir do dheasg.
- Dèan teannachadh air an C-clamp screw until the stand is securely fastened to the desk. Ensure the desk thickness does not exceed 74mm (2.9 inches).
4.3 Grommet Mounting (Method 2)
- If your desk has an existing grommet hole, remove its cover. If not, you may need to drill a hole (consult a professional if unsure).
- Assemble the grommet mount components to the main pole.
- Insert the pole through the grommet hole and secure it from underneath the desk using the provided plate and nut.
4.4 Attaching Monitors
- Attach the VESA plates to the back of your monitors using the appropriate screws, washers, and spacers from the hardware kit. Ensure the VESA pattern matches (75x75mm or 100x100mm).
- Slide the VESA plates with attached monitors onto the mounting brackets on the main pole.
- Secure the monitors to the brackets using the reinforcement knobs or screws as indicated in the diagram.

4.5 Stiùireadh Càbaill
Utilize the integrated cable management clips on the main pole to route and organize your monitor cables. This helps maintain a clean and clutter-free workspace.

4.6 Stiùireadh Bhidio Stàlaidh
For a visual guide on the installation process, please refer to the official product video below:
Video 1: Hemudu Dual Monitor Stand Installation Guide. This video demonstrates the various installation methods and features of the monitor arm stand.
5. Obrachadh agus Atharrachaidhean
The Hemudu Dual Monitor Arm Stand offers extensive adjustability to achieve your preferred viewing angles and ergonomic setup.
5.1 Atharrachadh àirde
The monitors can be adjusted vertically along the main pole. The stand features 4+8 level height adjustments, allowing you to position each monitor at an optimal height for your comfort.

5.2 Teilt Atharrachadh
Each monitor can be tilted from -15° to +10°. Use the reinforcement knob on the VESA plate to adjust the tilt angle and then tighten it to secure the position.

5.3 Atharrachadh Cuairteachaidh
Monitors can be swiveled -50° to +50° horizontally. This allows for flexible screen sharing or adjusting the viewceàrn ing gun an stand gu lèir a ghluasad.

5.4 Atharrachadh Rothlaidh
Monitors can be rotated 360° (portrait to landscape and vice versa) for different viewing orientations. Simply rotate the monitor to the desired position.
6. Cumail suas
Regular maintenance ensures the longevity and optimal performance of your Hemudu Dual Monitor Arm Stand.
- Glanadh: Sguab an stand le clò bog, damp clò. Seachain innealan-glanaidh sgrìobach no fuasglaidhean a dh’ fhaodadh milleadh a dhèanamh air a’ chrìochnachadh.
- Sgrùdadh Teannachd: Periodically check all screws and connections, especially the C-clamp/grommet mount and VESA plate screws, to ensure they remain tight. Re-tighten if necessary.
- Sgrùdadh càball: Regularly inspect cables for any signs of wear or damage. Replace damaged cables immediately.
7. A ’dèanamh trioblaid
If you encounter any issues with your monitor stand, refer to the following common problems and solutions:
7.1 Monitor Sagging or Not Holding Position
- Adhbhar: Tilt or swivel tension is too loose.
- Fuasgladh: Locate the reinforcement knobs or tension screws on the VESA plate and tighten them until the monitor holds its position securely.
7.2 Stand Feels Unstable
- Adhbhar: C-clamp or grommet mount is not sufficiently tightened, or desk surface is too thin/weak.
- Fuasgladh: Teannaich an C-cl a-rithistamp or grommet mount. Ensure your desk meets the minimum thickness and strength requirements. If using C-clamp, verify the desk thickness is within 74mm.
7.3 Duilgheadas ag atharrachadh àirde
- Adhbhar: Mounting brackets are too tight on the pole, or debris is obstructing movement.
- Fuasgladh: Loosen any screws that secure the mounting brackets to the pole slightly. Clean the pole and bracket channels if any obstruction is visible.
7.4 Monitors Not Aligned
- Adhbhar: Monitors are not positioned correctly on the VESA plates or the VESA plates are not at the same height on the pole.
- Fuasgladh: Adjust the height of each VESA plate independently along the pole. Ensure monitors are centered on their respective VESA plates.
8. Sònrachaidhean
| Feart | Sònrachadh |
|---|---|
| Modail Àireamh | HD04W-001P |
| Brand | Hemudu |
| Co-chòrdalachd Meud Monitor | 13 to 34 inches (per monitor) |
| Comas Cuideam | Up to 44 lbs (20 kg) per monitor |
| Co-fhreagarrachd VESA | 75x75mm, 100x100mm |
| Ceàrn Teilt | -15 ° gu +10 ° |
| Ceàrn swivel | -50 ° gu +50 ° |
| Cuairteachadh | 360° (Portrait/Landscape) |
| Atharrachadh àirde | 4+8 Level adjustments along the pole |
| Seòrsa stàladh | C-Clamp, Sliabh Grommet |
| C-Clamp Sgòthan Deasg | Max 2.9 inches (74mm) |
| Stuth | Alloy Steel |
| Dath | Geal |
9. Barantas agus Taic
Hemudu products are manufactured with quality and care. This product comes with a standard manufacturer's warranty against defects in materials and workmanship. For specific warranty details, please refer to the product packaging or contact our customer support.
Taic teachdaiche:
If you have any questions, require assistance with installation, or need to report a missing/damaged part, please contact Hemudu customer support through the retailer's platform or the official Hemudu website. Please have your product model number (HD04W-001P) and purchase information ready when contacting support.