1. Ro-ràdh
Tapadh leibh airson ceannachasing the MLWSHR Digital LED Alarm Clock Model 8808. This device combines a digital alarm clock with a thermo-hygrometer, offering dual alarms, snooze function, date and year display, 12/24 hour switch, weekday settings, Daylight Saving Time (DST) functionality, auto-dimmable display with three brightness levels, and a convenient 5V1A USB output for charging other devices. Please read this manual carefully to ensure proper use and maintenance of your new alarm clock.
2. Fiosrachadh Sàbhailteachd
- Cùm an inneal air falbh bho uisge agus àrainneachdan àrd taiseachd.
- Na cuir an inneal fo theodhachd anabarrach no fo sholas dìreach na grèine airson ùine mhòr.
- Use only the provided USB Type-C cable for power.
- Na feuch ri an inneal a thoirt às a chèile no a chàradh thu fhèin. Cuir fios gu taic luchd-cleachdaidh ma thachras cùisean.
- Ensure proper ventilation when using the USB output to charge other devices.
3. Pasgan-susbaint
- MLWSHR Digital LED Alarm Clock Model 8808
- Càball cumhachd USB Type-C
- Leabhar-làimhe cleachdaiche
4. Toradh thallview
Dèan eòlas ort fhèin air prìomh phàirtean agus smachdan do chloc-rabhaidh.
This image displays the front of the MLWSHR Digital LED Alarm Clock, highlighting the time display, weekday indicators, temperature in Celsius, humidity percentage, and dual alarm icons. It also points to the Daylight Saving Time (DST) indicator.

This image illustrates the side and back of the alarm clock, detailing the USB Type-C input for primary power, the battery compartment for 3x AAA backup batteries (not included), and the USB-A output (5V1A) for charging other devices. It also shows the control buttons located on the top edge.
Smachdan:
- Putan SET: A’ dol a-steach do mhodh suidheachaidh airson ùine, ceann-latha agus innealan-rabhaidh.
- Putan SUAS (+): Increases values during setting, adjusts brightness.
- Putan SÌOS (-): Decreases values during setting, adjusts brightness.
- Putan SNOOZE/SOLUIS: Activates snooze, adjusts display brightness.
- Putan ALARM 1: Activates/deactivates Alarm 1, enters Alarm 1 setting.
- Putan ALARM 2: Activates/deactivates Alarm 2, enters Alarm 2 setting.
- 12/24HR Button: Switches between 12-hour and 24-hour time formats.
- °C/°F Putan: Bidh e ag atharrachadh eadar taisbeanadh teòthachd Celsius agus Fahrenheit.
5. Suidhich
5.1 Solar cumhachd
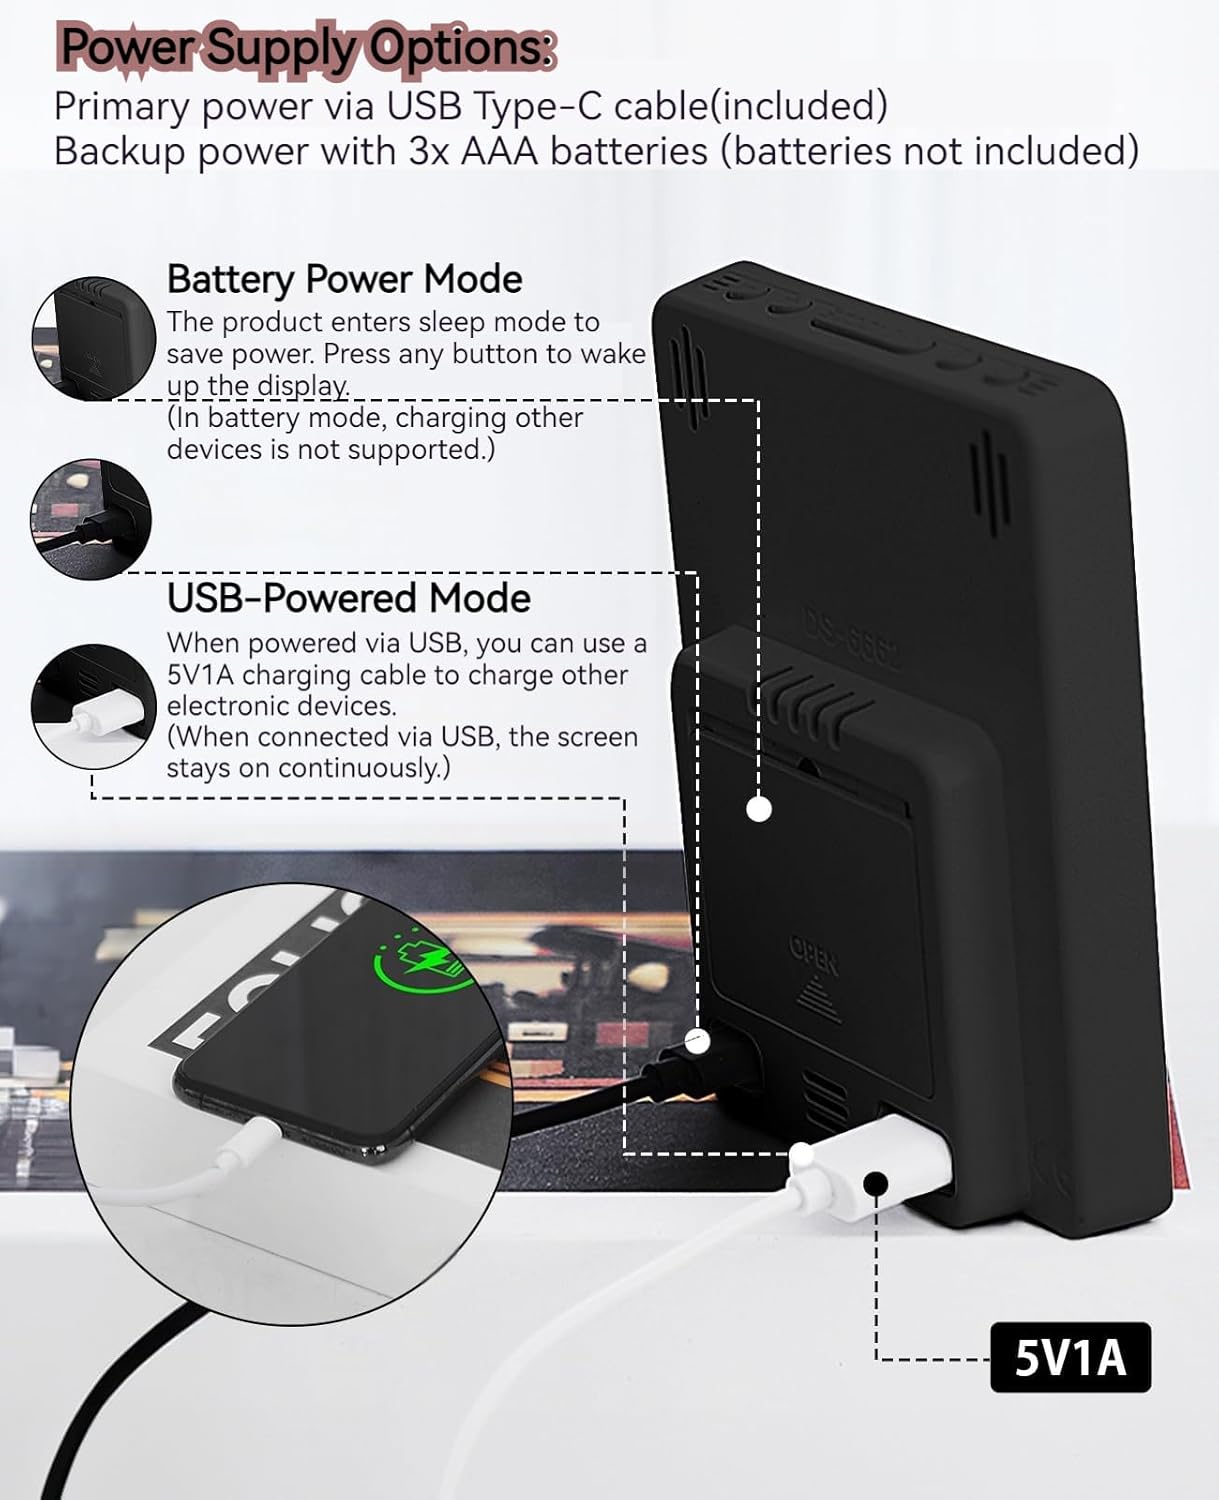
The MLWSHR Digital LED Alarm Clock can be powered in two ways:
- Primary Power (USB Type-C): Connect the provided USB Type-C cable to the clock's input port and plug the other end into a 5V1A USB power adapter (not included). When powered via USB, the display will remain continuously on.
- Backup Power (3x AAA Batteries): Insert 3 AAA batteries (not included) into the battery compartment on the back of the clock. In battery-only mode, the display will enter sleep mode to conserve power. Press any button to temporarily activate the display. Note that the USB output for charging other devices is not supported when operating on battery power alone.
5.2 Suidheachadh Tùsail Ùine is Ceann-latha
After connecting power, the clock will typically display a default time. To set the correct time and date:
- Brùth agus cùm an SET brùth air a’ phutan airson 3 diogan gus modh suidheachadh ùine a ruighinn. Bidh na figearan uair a’ priobadh.
- Cleachd an UP (+) or LAOIDH (-) putanan gus an uair a rèiteachadh.
- Brùth SET a-rithist gus an uair a dhearbhadh agus gluasad gu suidheachadh nam mionaidean. Bidh na figearan mionaidean a’ priobadh.
- Cleachd an UP (+) or LAOIDH (-) putanan gus na geàrr-chunntasan atharrachadh.
- Lean air adhart a 'bruthadh SET to cycle through and set the Year, Month, and Day using the UP (+) or LAOIDH (-) buttons for adjustment.
- After setting the Day, press SET aon uair mu dheireadh gus am modh suidheachaidh fhàgail.
6. Stiùireadh Obrachaidh
6.1 Suidse Cruth 12/24 Uair
Brùth an 12/24 HR button to toggle between 12-hour (with AM/PM indicator) and 24-hour time formats.
This video demonstrates various features of the MLWSHR Digital LED Alarm Clock, including the time, temperature, humidity, weekday display, auto/manual brightness adjustment, 12/24 hour switch, and the easy-to-use buttons and USB-C input/USB-A output.
6.2 A’ suidheachadh innealan-rabhaidh (Alarm 1 & Alarm 2)
The clock features two independent alarms. Each alarm can be set for specific days of the week (Monday-Friday, Monday-Saturday, or Monday-Sunday).

This image illustrates the dual alarm functionality, showing how each alarm can be customized to ring on specific days of the week: Monday to Friday, Monday to Saturday, or every day. It highlights the alarm icons and weekday indicators on the display.
- Brùth an Alarm 1 or Alarm 2 button to select the desired alarm. The alarm icon will appear on the display.
- Press and hold the selected ALARM button for 3 seconds to enter alarm setting mode. The hour digits will flash.
- Cleachd an UP (+) or LAOIDH (-) putanan gus an uair rabhaidh atharrachadh.
- Brùth an ALARM putan a-rithist gus an uair a dhearbhadh agus gluasad gu suidheachadh mionaidean.
- Cleachd an UP (+) or LAOIDH (-) putanan gus mionaidean an rabhaidh atharrachadh.
- Brùth an ALARM button again to set the alarm frequency (e.g., Mon-Fri, Mon-Sat, Mon-Sun). Use UP (+) or LAOIDH (-) a thaghadh.
- Brùth an ALARM button one last time to exit alarm setting mode.
- To turn an alarm ON or OFF, simply press the corresponding Alarm 1 or Alarm 2 button briefly. The alarm icon will appear (ON) or disappear (OFF) from the display.
6.3 Gnìomh Snooze
When an alarm sounds, you can activate the snooze function for a temporary delay.

This image shows the clock's snooze button and how it functions. When the alarm rings, a brief press of the snooze button will delay the alarm for 5 minutes. Holding the button for more than two seconds will turn off the alarm for that day.
- Nuair a chluinneas an inneal-rabhaidh, brùth air an iuchair SNOOZE / SOLAS button briefly. The alarm will pause and ring again after 5 minutes.
- To turn off the alarm for the current day, press and hold the SNOOZE / SOLAS button for more than 2 seconds, or press any other button (except SNOOZE / SOLAS).
6.4 Atharrachadh soilleireachd
The clock features an auto-dimmable display and three manual brightness levels.
- Auto Dimmable: The built-in light sensor automatically adjusts the display brightness based on ambient light conditions. This is the default setting.
- Soilleireachd làimhe: Brùth goirid air an SNOOZE / SOLAS button to cycle through 3 manual brightness levels (L-01, L-02, L-03).
- To return to auto-dimmable mode, continue pressing the SNOOZE / SOLAS button until 'L-AU' appears on the display.
6.5 Thermometer & Hygrometer
The clock displays indoor temperature and humidity levels.

This image highlights the temperature and humidity readings on the clock's display. It also provides guidance on ideal humidity levels and suggests actions (humidifier/dehumidifier) if levels are too low or too high. The temperature detection range is 23°F to 122°F (-5°C to 50°C) with an error margin of ±2°F.
- Atharrachadh Aonad Teothachd: Brùth an ° C / ° F button to switch between Celsius and Fahrenheit temperature display.
- The temperature range is 23°F to 122°F (-5°C to 50°C) with an error margin of ±2°F.
- The humidity measurement error is within ±5%.
6.6 USB Power Output (5V1A)
The clock features a USB-A output port (5V1A) that can be used to charge other electronic devices.

This image demonstrates the use of the clock's USB-A output port to charge a smartphone. The clock provides a 5V1A output, making it a convenient charging station. This feature is only available when the clock is powered via its USB Type-C input.
- Connect your device's charging cable to the USB-A output port on the back of the alarm clock.
- Ensure the alarm clock is powered via its USB Type-C input for this feature to function. The USB output is not active when the clock is running on battery power alone.
6.7 Àm Sàbhalaidh Solais an Latha (DST)
The clock supports Daylight Saving Time adjustment.
- To activate or deactivate DST, press and hold the DST button (if available, or refer to the SET button sequence for DST in specific models). The DST indicator will appear or disappear.
7. Cumail suas
- Glan an gleoc le clò bog, tioram. Na cleachd innealan-glanaidh sgrìobach no fuasglaidhean.
- If the clock will not be used for an extended period, remove the AAA batteries to prevent leakage.
- Keep the USB ports free from dust and debris.
8. A ’dèanamh trioblaid
| Trioblaid | Adhbhar a dh’fhaodadh a bhith ann | Fuasgladh |
|---|---|---|
| Display is off or intermittent. | Running on battery power in sleep mode, or no power. | Press any button to activate display in battery mode. Connect USB Type-C cable for continuous display. Check USB power source. |
| USB output not charging devices. | Clock is running on battery power, or USB cable is faulty. | Ensure the clock is connected to primary USB Type-C power. Try a different USB cable. |
| Chan eil an inneal-rabhaidh a’ fuaimeachadh. | Chan eil an inneal-rabhaidh air a ghnìomhachadh no air a shuidheachadh gu ceàrr. | Check if the alarm icon is displayed. Re-set the alarm time and frequency. |
| Tha an leughadh teòthachd mì-cheart. | Environmental factors or sensor error. | Allow time for the sensor to stabilize. Ensure the clock is not near heat sources or vents. Note the ±2°F error margin. |
| Cannot set time/date. | Not in setting mode, or buttons are unresponsive. | Press and hold the SET button for 3 seconds. Ensure the clock has stable power. |
9. Sònrachaidhean
- Brand: MLWSHR
- Àireamh Modail: 8808
- Seòrsa taisbeanaidh: LED
- Stòr cumhachd: USB Type-C (5V1A) / 3x AAA Batteries (backup)
- Meudan toraidh: 3.54"L x 4.72"À
- Feartan: Dual Alarms, Snooze, Thermo-Hygrometer, Date & Year Display, 12/24 Hour Switch, Weekdays, DST, Auto Dimmable (3 levels), USB Output (5V1A)
- Stuth: Plastaig càirdeil don àrainneachd
- Cleachdadh a-staigh/a-muigh: A-staigh
10. Barantas & Taic
The MLWSHR Digital LED Alarm Clock Model 8808 comes with a Barantas 2-bliadhna bho cheann-latha a’ cheannaich. Tha am barantas seo a’ còmhdach lochdan saothrachaidh agus mì-ghnìomhachd fo chleachdadh àbhaisteach.
For technical support, warranty claims, or any questions regarding your product, please contact MLWSHR customer service through the retailer's platform or visit our official website for contact information. Please have your purchase receipt and model number ready when contacting support.