SINOTIMER TM919TK
SINOTIMER TM919TK Astronomical Time Switch User Manual
Leathan Voltage 85-265Vac Astronomical Time Switch for Automatic Calculation of Sunrise and Sunset
1. Ro-ràdh
The SINOTIMER TM919TK is an advanced astronomical time switch designed for automatic control of electrical loads based on sunrise and sunset times. It eliminates the need for manual adjustments to account for seasonal changes, providing precise and energy-efficient operation. This device features a wide voltage input range (85-265Vac) and a robust 16A, 3200 Watts capacity, making it suitable for various applications. Its replaceable battery design ensures long-term reliability.
2. Fiosrachadh Sàbhailteachd
Leugh agus tuig a h-uile stiùireadh sàbhailteachd mus stàlaich thu agus mus obraich thu e. Dh’ fhaodadh fàilligeadh ann a bhith a’ leantainn nan stiùiridhean seo clisgeadh dealain, teine no dochann dona adhbhrachadh.
- Cha bu chòir ach dealanach teisteanasach an stàladh a dhèanamh.
- Dèan cinnteach gu bheil an cumhachd air a dhì-cheangal aig a’ bhriseadair cuairte mus tèid a stàladh no a chumail suas.
- Do not exceed the maximum load rating of 16A or 3200 Watts.
- Tha an inneal seo airson a chleachdadh a-staigh a-mhàin.
- Cùm air falbh bho uisge agus cus taiseachd.
3. Toradh thallview
The TM919TK Astronomical Time Switch features a clear LCD display and intuitive buttons for programming. Below are key components and their functions.
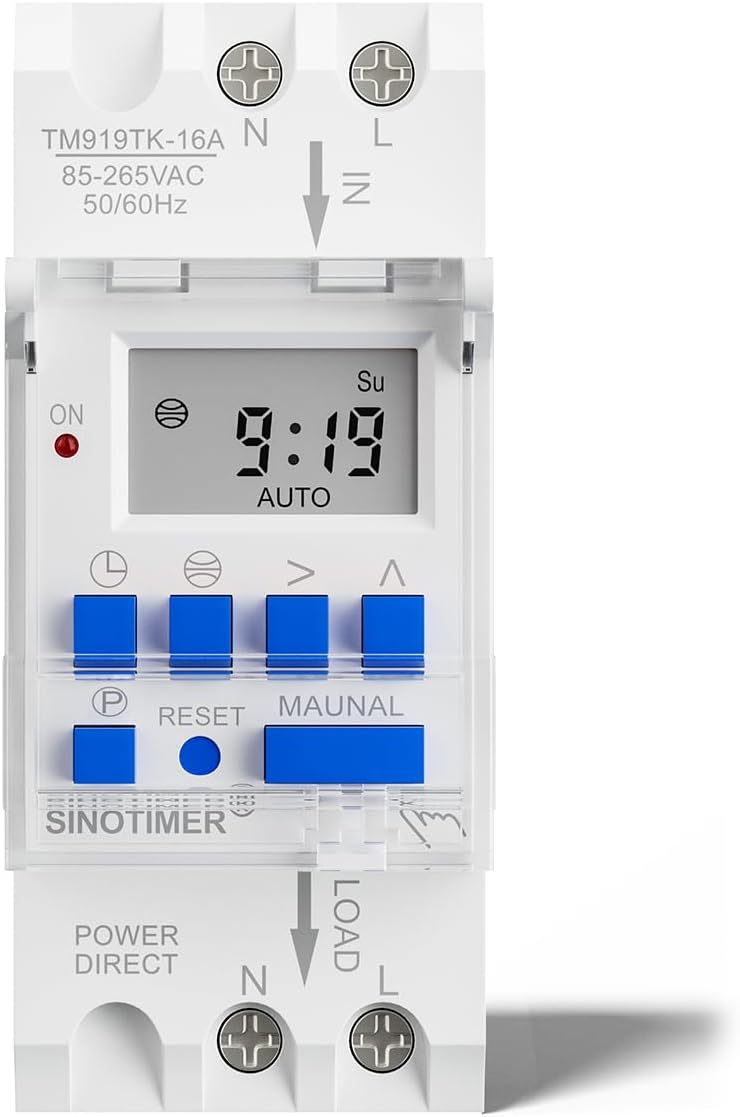
Figear 3.1: Aghaidh view of the TM919TK timer, showing the display, control buttons, and wiring terminals.
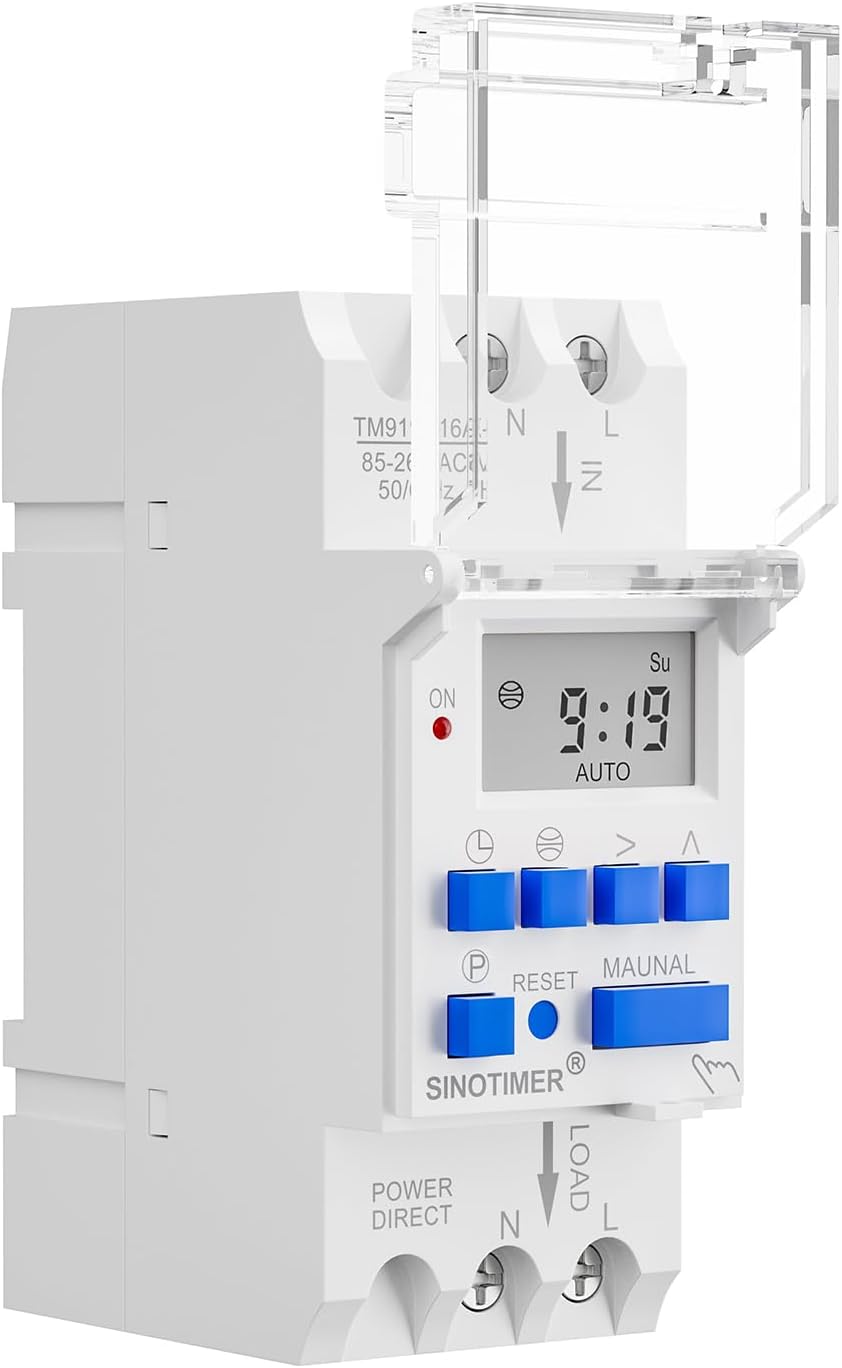
Figear 3.2: Taobh view of the TM919TK, illustrating its compact design and the clear protective cover over the buttons.

Figear 3.3: Taobh view revealing the replaceable battery compartment, ensuring easy maintenance.
4. Sònrachaidhean
| Feart | Mion-fhiosrachadh |
|---|---|
| Modail | TM919TK |
| Vol Obrachaidhtage | 85-265Vac, 50 / 60Hz |
| Luchdaich Max gnàthach | 16 A |
| Cumhachd luchdaidh Max | 3200 watt |
| Latitude Setting Range | North/South 0 - 70° (Accurate to 1 degree) |
| Longitude Setting Range | East/West -180° - 180° (Accurate to 1 degree) |
| Time Zone Range | 12 ~ -12 (Positive for Eastern, Negative for Western) |
| Mìosachan sìorraidh | 2017 gu 2042 |
| Roghainnean prògram | 8 ON/OFF programs (can be astronomical or fixed time) |
| Cruth ùine | Tionndadh 12/24 uair |
| Meudan | 2.68 x 1.42 x 3.54 òirleach |
| Cuideam nì | 4.2 unnsa |
5. Stàladh
The TM919TK is designed for DIN rail mounting. Follow the wiring diagram carefully to ensure correct and safe installation.
5.1 Diagram uèiridh

Figure 5.1: Wiring connections for the TM919TK. Connect the incoming Neutral (N) and Live (L) wires to the 'IN' terminals. Connect the load's Neutral (N) and Live (L) wires to the 'LOAD' terminals.
Cudromach: Always ensure the main power supply is turned off before attempting any wiring. Verify all connections are secure before restoring power.
6. Stiùireadh Obrachaidh
This section details how to set up and program your TM919TK Astronomical Time Switch.
6.1 Initial Preparation and Basic Settings
Before programming, ensure the timer is powered on and reset. You will then set the current date, time, and your geographical coordinates (latitude and longitude).
Video 6.1: Demonstrates how to press the "RESET" button to turn on the timer and then set the latitude, longitude, date, and current time. This is the first step in preparing the timer for operation.
- Cumhachd air agus Ath-shuidheachadh: Press the "RESET" button to activate the timer and clear any previous settings.
- Set Latitude/Longitude: Navigate through the settings to input your precise latitude and longitude. This is crucial for accurate sunrise/sunset calculations.
- Set Date and Current Time: Adjust the year, month, day, and current time to ensure the timer's internal clock is synchronized.
6.2 Astronomical Function Setting
The astronomical function allows the timer to automatically turn ON/OFF at local sunrise and sunset times, which are calculated based on your set latitude and longitude.
Video 6.2: Illustrates how to set the astronomical function. This includes entering the local sunrise/sunset time and adjusting for any desired advance or delay in the ON/OFF operation.
- Press the "P" button to enter the programming mode.
- Press the "globe" button (or equivalent) to access the astronomical settings.
- You can set the ON/OFF times relative to sunrise/sunset, including options to advance or delay the operation by a specific duration.
6.3 Time Mode Setting (Fixed Programs)
In addition to astronomical settings, you can program up to 8 fixed ON/OFF schedules for specific times of the day.
Video 6.3: Shows how to set fixed time programs. The display will first show the astronomical timer program, then allow setting or clearing of up to 8 ON/OFF programs.
- Press the "P" button to cycle through the program settings.
- For each program (1 ON, 1 OFF, 2 ON, 2 OFF, etc.), set the desired time and day(s) of the week.
- You can set or clear these programs as needed.
6.4 Canceling Programs
If you need to remove a previously set program, follow these steps:
Video 6.4: Demonstrates how to cancel both fixed time programs and astronomical programs. For fixed programs, press "P" then "MANUAL". For astronomical programs, press "P" then the "globe" button until the symbol disappears.
6.4.1 Canceling Fixed Time Programs
- Press "P" to enter the time setting mode.
- Navigate to the specific program you wish to cancel.
- Press the "MANUAL" button to cancel the program.
6.4.2 Canceling Astronomical Programs
- Press "P" to enter the time setting mode.
- Press the "globe" button (or equivalent) repeatedly until the astronomical symbol disappears from the display, indicating the program is canceled.
7. Cumail suas
7.1 Glanadh
To clean the device, wipe it with a soft, dry cloth. Do not use abrasive cleaners or solvents, as these may damage the casing no taisbeanadh.
7.2 Ath-nuadhachadh bataraidh
The TM919TK features a replaceable battery to maintain time and settings during power outages. If the display becomes dim or settings are lost frequently, the battery may need replacement.
- Cumhachd dì-cheangail: Ensure the main power supply to the timer is completely disconnected.
- Lorg Roinn Bataraidh: Refer to Figure 3.3 for the location of the battery compartment on the side of the unit.
- Cuir an àite bataraidh: Carefully open the compartment and replace the old battery with a new one of the same type. Observe polarity.
- Roinn Tèarainte: Dùin an roinn bataraidh gu tèarainte.
- Thoir air ais cumhachd: Reconnect the main power supply and verify the timer functions correctly.
8. A ’dèanamh trioblaid
| Trioblaid | Adhbhar a dh’fhaodadh a bhith ann | Fuasgladh |
|---|---|---|
| Tha an taisbeanadh bàn no dorcha. | No power supply; internal battery low or dead. | Check power connections. Replace internal battery (see Section 7.2). |
| Timer not switching ON/OFF at programmed times. | Incorrect programming; manual override active; incorrect current time/date/location. | Review programming steps (Section 6). Check if manual mode is active and switch to AUTO. Verify current time, date, latitude, and longitude settings. |
| Astronomical function is inaccurate. | Incorrect latitude/longitude or time zone settings. | Double-check and correct latitude, longitude, and time zone settings (Section 6.1). |
| Cannot enter programming mode. | Device may be locked or in an unexpected state. | Press the "RESET" button to restart the device. Try pressing "P" again. |
9. Barantas agus Taic
For warranty information or technical support, please contact SINOTIMER customer service through the retailer where the product was purchased or visit the official SINOTIMER website. Please have your product model number (TM919TK) and purchase details ready when contacting support.
Ask a question about this manual
Ask about setup, troubleshooting, compatibility, parts, safety, or missing instructions. Manuals+ will review the question and use this page’s manual context to help answer it.