1. Ro-ràdh
This manual provides essential information for the safe and effective operation, setup, and maintenance of your Senco TN51P1P 15 Gauge Pneumatic Finish Nailer. Please read all instructions carefully before using the tool to ensure proper function and user safety. This tool is designed for professional finish carpentry applications, including installing casing, paneling, cabinetry, and various other finish applications.

Ìomhaigh: Aghaidh view of the Senco TN51P1P 15 Gauge Pneumatic Finish Nailer.
2. Fiosrachadh Sàbhailteachd
Cùm sùil an-còmhnaidh air ceumannan sàbhailteachd bunaiteach gus cunnart leòn pearsanta agus milleadh air an inneal a lùghdachadh. Dh’ fhaodadh fàilligeadh ann a bhith a’ leantainn nan stiùiridhean seo dochann mòr adhbhrachadh.
- Leugh an Leabhar-làimhe: Tuig a h-uile stiùireadh agus rabhadh mus obraich thu.
- Cleachd dìon sùla: Cuir ort speuclairean sàbhailteachd le sgiathan taobh a tha ceadaichte le ANSI Z87.1 an-còmhnaidh.
- Caith Dìon Èisteachd: Faodaidh nochdadh fada do fhuaim milleadh a dhèanamh air èisteachd.
- Wear Appropriate Clothing: Do not wear loose clothing or jewelry that could get caught in moving parts.
- Dì-cheangail solar adhair: Always disconnect the air supply before loading fasteners, performing maintenance, clearing jams, or when the tool is not in use.
- Na bi a-riamh a’ comharrachadh dhaoine: Na comharraich an inneal gu bràth ort fhèin no air daoine eile.
- Cleachd cuideam adhair ceart: Do not exceed the recommended operating pressure (70-120 PSI).
- Obair-obrach tèarainte: Ensure the workpiece is stable and secure before fastening.
- Cùm deagh chois: Work in a well-lit area and maintain proper balance.
- Cùm clann air falbh: Na leig le clann no daoine gun trèanadh an inneal a chleachdadh.
3. Feartan toraidh
The Senco TN51P1P Finish Nailer is equipped with several features designed for efficiency and durability:

Image: Detailed diagram highlighting key features of the Senco TN51P1P nailer.
- Oil-Less Design: Eliminates the need for routine lubrication, saving time on daily maintenance.
- Dry Fire Lockout: Prevents the tool from firing when the magazine is empty, reducing wear and indicating when to reload.
- Selectable Trigger: Allows easy switching between contact actuation (bump fire) and sequential actuation modes for different applications.
- Quick Clear Latch: Provides a tool-free method to quickly clear nail jams or misfeeds.
- Atharrachadh Doimhneachd Gun Inneal: Enables quick and easy adjustment of nail depth for consistent flush or countersunk drives.
- 360 Degree Adjustable Exhaust: Directs exhaust air away from the operator or the work surface.
- Rotatable Belt Hook: Offers convenient access and storage, allowing for right or left-hand use.
- Ergonomic Overmolded Grip: Designed to reduce user fatigue and enhance control during operation.
- Aluminum Main Body: Ensures durability while maintaining a lightweight design.
- Plug Swivel: Enhances maneuverability by allowing the air hose to move freely.
- No-Mar Pad: Protects delicate work surfaces from scratches or damage during use.
4. Suidhich
4.1 A’ ceangal ri solar adhair
- Ensure the air compressor is off and the air hose is disconnected from the compressor.
- Connect the air hose to the tool's swivel plug.
- Set the air compressor pressure between 70-120 PSI (4.8-8.3 bar). Do not exceed 120 PSI.
- Connect the air hose to the compressor and turn on the compressor.
- Check for air leaks. If leaks are present, disconnect the air supply and tighten connections.
4.2 Luchdadh Cheanglaichean
The TN51P1P uses 15 gauge angled finish nails, ranging from 1-1/4" to 2-1/2" in length.
- Dì-cheangail an solar adhair bhon inneal.
- Tarraing air ais an co-chruinneachadh pusher gus an glas e na àite.
- Insert a strip of 15 gauge angled finish nails into the magazine, ensuring the nail points are facing down and the collation angle matches the tool's magazine.
- Release the pusher assembly, allowing it to push the nails forward until they are seated correctly.
- Ath-cheangail an solar adhair.
4.3 A’ gleusadh doimhneachd an dràibhidh
Tha inneal atharrachaidh doimhneachd gun inneal aig an inneal.
- Dì-cheangail an solar adhair bhon inneal.
- Locate the depth adjustment dial or lever near the nose of the tool.
- Rotate the dial or move the lever to increase or decrease the depth of the nail drive. Test on a scrap piece of material to achieve the desired depth.
- Ath-cheangail an solar adhair.
4.4 A’ taghadh modh losgaidh
The selectable trigger allows you to choose between two firing modes:
- Sequential Actuation: The trigger must be pressed for each fastener. The contact element must be depressed against the workpiece before the trigger is pulled. This mode offers precise fastener placement.
- Contact Actuation (Bump Fire): The tool will fire a fastener each time the contact element is depressed against the workpiece while the trigger is held down. This mode is suitable for rapid fastening.
To switch modes, locate the selector switch on the trigger assembly and move it to the desired position.
5. Stiùireadh Obrachaidh
- Ensure all safety precautions are followed and the tool is properly set up.
- Cùm an inneal gu daingeann leis an dà làmh.
- Cuir sròn an inneil gu daingeann an aghaidh a’ phìos obrach far a bheil an ceangal ri bhith air a dhraibheadh.
- For sequential mode, depress the contact element against the workpiece, then pull the trigger. For contact mode, hold the trigger and depress the contact element against the workpiece.
- After driving a fastener, lift the tool from the workpiece.
5.1 Dry Fire Lockout
The dry fire lockout feature prevents the tool from operating when the magazine is empty. This protects the tool from unnecessary wear. When the tool stops firing, it indicates that the magazine needs to be reloaded with fasteners.
5.2 A’ glanadh bacaidhean
If a fastener jam occurs:
- Immediately disconnect the air supply bhon inneal.
- Locate the quick clear latch near the nose of the tool.
- Open the latch to expose the fastener channel.
- Carefully remove the jammed fastener using pliers if necessary. Do not force it.
- Close the quick clear latch securely.
- Reconnect the air supply and test the tool on a scrap piece.
6. Cumail suas
Proper maintenance ensures the longevity and optimal performance of your Senco TN51P1P nailer.
- Oil-Less Design: This tool features an oil-less design, meaning routine lubrication of the internal components is not required. Do not add oil to the air inlet.
- Glanadh làitheil: Keep the tool clean and free of debris. Wipe down the exterior with a clean, dry cloth.
- Dèan sgrùdadh air criathar adhair: Periodically check the air inlet filter for clogs and clean if necessary.
- Check Fastener Channel: Ensure the fastener channel is clear of any residue or small debris that could cause jams.
- Bùth gu ceart: When not in use, store the tool in a dry, secure location, disconnected from the air supply.
7. A ’dèanamh trioblaid
If you encounter issues with your Senco TN51P1P nailer, refer to the following common troubleshooting steps:
- Inneal gun a bhith a’ losgadh:
- Check air supply connection and pressure (70-120 PSI).
- Ensure magazine is loaded with fasteners (dry fire lockout engaged if empty).
- Verify the contact element is fully depressed against the workpiece.
- Check for jammed fasteners.
- Ìnean gun a bhith a’ draibheadh gu h-iomlan:
- Increase air pressure within the recommended range.
- Adjust the depth of drive setting.
- Ensure the correct length and gauge of fasteners are being used.
- Nails Jamming Frequently:
- Ensure fasteners are loaded correctly and are not damaged.
- Check for debris in the fastener channel.
- Verify the correct fastener type for the tool.
- Aoidion adhair:
- Teannaich a h-uile ceangal adhair.
- Inspect O-rings and seals for damage.
If problems persist after following these steps, contact Senco customer support or an authorized service center.
8. Sònrachaidhean
Key specifications for the Senco TN51P1P 15 Gauge Pneumatic Finish Nailer:
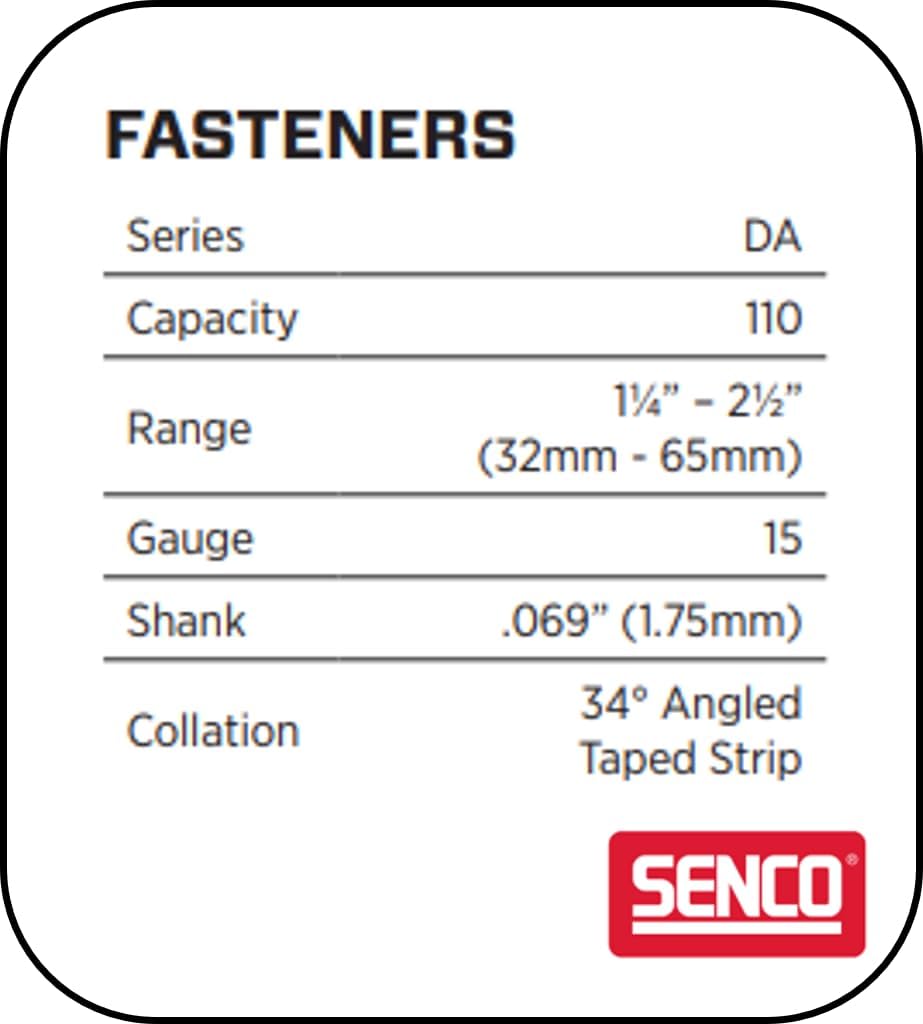
Image: Tool specifications for the Senco TN51P1P.

Image: Fastener specifications for the Senco TN51P1P.
| Feart | Luach |
|---|---|
| Spreagadh | Roghnach |
| Brùthadh Obrachaidh | 70 - 120 PSI (4.8 - 8.3 bar) |
| Air Consumption (60 CPM) | 3.2 scfm |
| Slighe a-steach adhair | 1/4" NPT |
| Cuideam | 4.5 lbs (2.0 kg) |
| Àirde | 12.25" (311 mm) |
| Fad | 13" (330 mm) |
| Leud | 3.5" (89 mm) |
| Prìomh Stuth Corp | Aluminium |
| Feart | Luach |
|---|---|
| Sreath | DA |
| Comas | 110 luchd-ceangail |
| Raon | 1-1/4" - 2-1/2" (32mm - 65mm) |
| Slat-tomhais | Tomhas 15 |
| Diameter Shank | 0.069" (1.75mm) |
| Co-chruinneachadh | 34° Angled Taped Strip |
9. Barantas agus Taic
The Senco TN51P1P Finish Nailer comes with a manufacturer's warranty. For specific warranty details, please refer to the warranty documentation included with your product or visit the official Senco website. The product description mentions a general "Warranty" without further specifics.
For technical assistance, parts, or service, please contact Senco customer support. Always provide your tool's model number (TN51P1P) and serial number when seeking support.
Optional protection plans may be available for purchase separately, offering extended coverage beyond the manufacturer's warranty.