Ro-ràdh
The ZEBRONICS Z310 NVMe Micro-ATX Motherboard is designed for modern computing needs, supporting Intel 6th, 7th, 8th, and 9th Generation Processors with an LGA 1151 socket. It features DDR4 memory support up to 2666 MHz, an NVMe M.2 slot, 5.1 channel audio, and various connectivity options including USB 3.0, SATA, RJ45 LAN, and HDMI. This manual provides essential information for the proper installation, operation, and maintenance of your motherboard.
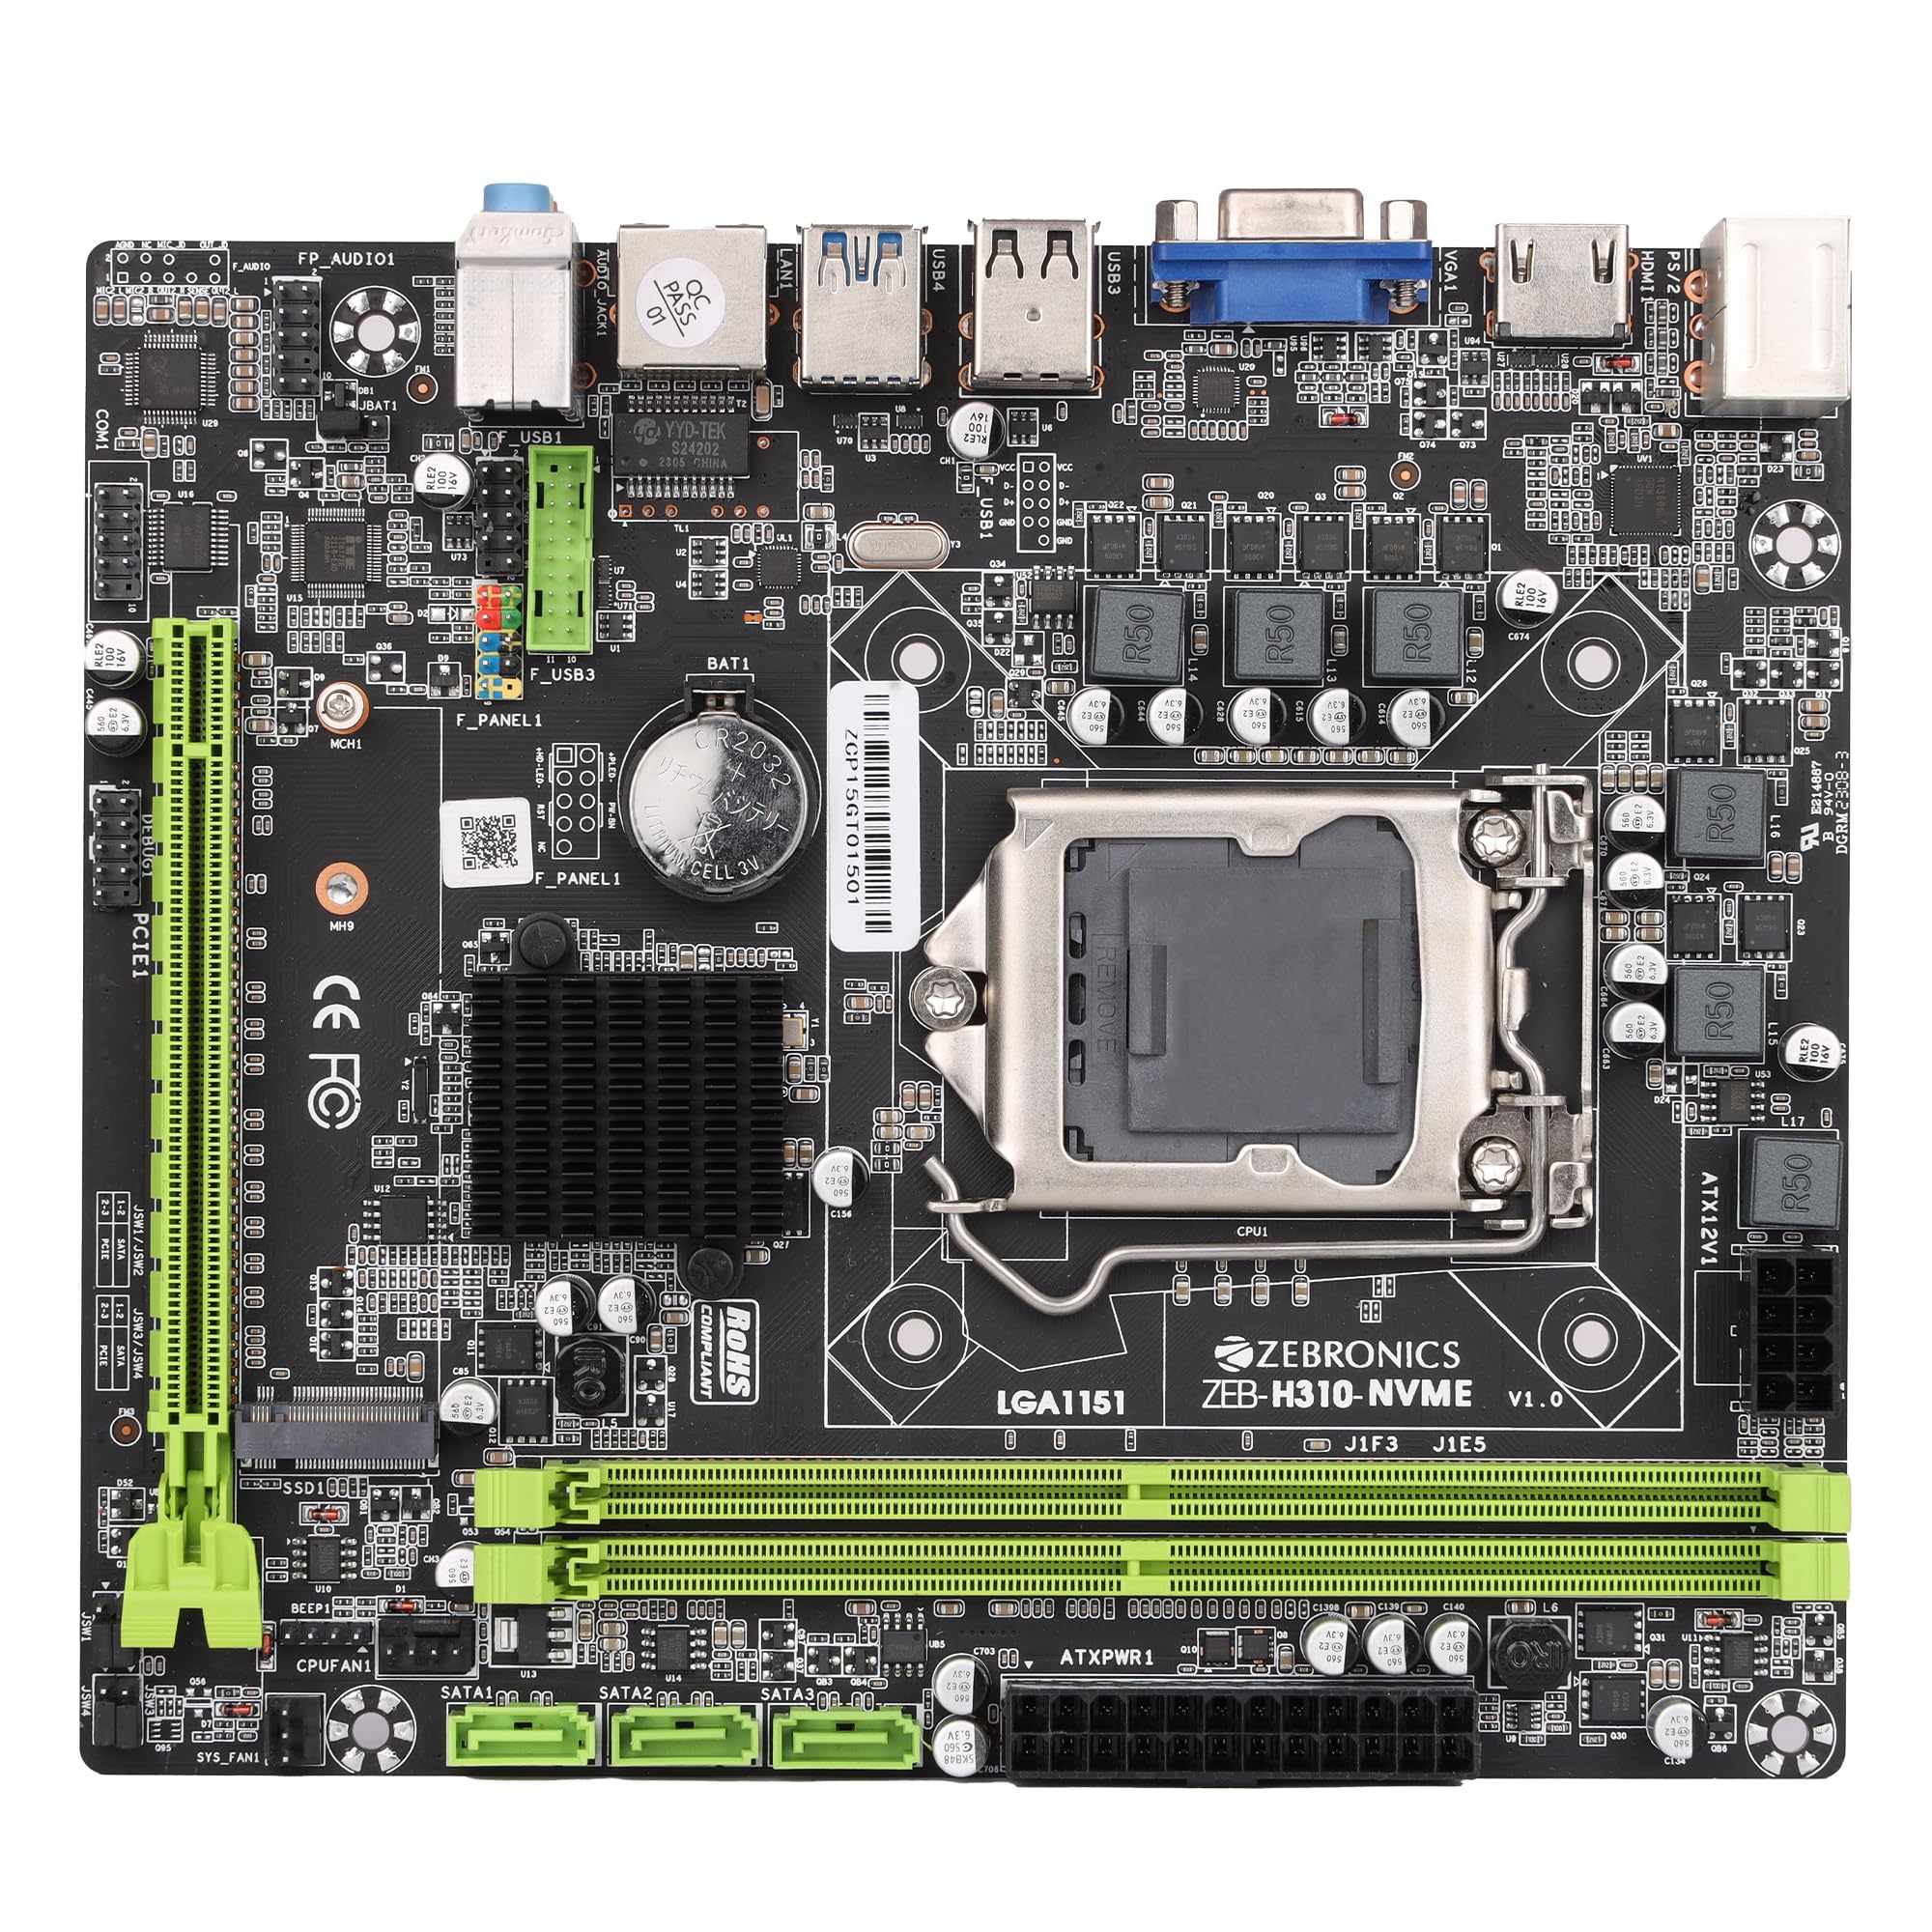
Figure 1: ZEBRONICS Z310 NVMe Micro-ATX Motherboard overview.
Prìomh fheartan
- Taic cuimhne DDR4: Compatible with DDR4 memory modules, supporting speeds from 2133MHz to 2666MHz for optimal system performance.
- Socaid LGA 1151: Designed to support Intel 6th, 7th, 8th, and 9th Generation Processors, ensuring smooth data transfer and increased processing power.
- Fuaim Seanail 5.1: Provides a captivating audio experience with crystal-clear sound.
- Ceangal LAN: Equipped with 10/100/1000 Mbps LAN support for fast and reliable internet connection.
- Sliotan PCIe 16: Facilitates seamless data transfer for graphics cards and other expansion cards.
- Roghainnean stòraidh: Includes 3 SATA ports for connecting multiple storage devices (HDDs, SSDs) and a SATA M.2 (NVMe) slot for high-speed M.2 drives.
- Puirt USB 3.0: Elevates data transfer speeds for external devices.

Figure 2: Visual representation of key features including DDR4, NVMe M.2, LGA 1151, and PCIe X16 support.
Stàladh agus stàladh
Mus tòisich thu air an stàladh, dèan cinnteach gu bheil an siostam agad dheth agus gun a bhith air a phlugadh a-mach às a’ bhalla. Cuir ort strap dùirn an-aghaidh statach gus casg a chuir air milleadh sgaoilidh electrostatach (ESD) air na pàirtean.
1. A’ stàladh an CPU
- Lorg socaid CPU LGA 1151 air a’ bhòrd-màthar.
- Fosgail luamhan socaid an CPU agus tog am plàta luchdaidh.
- Cuir an CPU gu faiceallach ris an t-socaid, a’ dèanamh cinnteach gu bheil an triantan òir air an CPU a’ freagairt ris an triantan air an t-socaid. Na cuir an CPU na àite le feachd.
- Leig sìos am plàta luchdaidh agus daingnich e leis an luamhan.

Figear 3: Suas gu h-àrd view of the motherboard, showing the LGA 1151 CPU socket.
2. Installing RAM (DDR4 Memory)
- Lorg an dà shliotan DDR4 DIMM.
- Fosgail na criomagan aig gach ceann den t-slot DIMM.
- Align the RAM module with the slot, ensuring the notch on the RAM module matches the key in the slot.
- Brùth sìos gu daingeann air gach ceann den mhodal RAM gus am bi na criomagan a’ snapadh nan àite.
3. A’ stàladh innealan stòraidh
- Draibhearan SATA: Connect SATA data cables from your storage devices (HDDs/SSDs) to the SATA ports on the motherboard. Connect power cables from your power supply to the drives.
- NVMe M.2 Drive: Locate the M.2 slot. Insert the NVMe M.2 drive at an angle and then gently push it down. Secure it with the provided screw.

Figure 4: Labeled diagram of the motherboard highlighting various ports including SATA and M.2 interface.
4. A’ ceangal an t-solair cumhachd
- Ceangail an ceanglaiche cumhachd ATX 24-prìne bhon t-solar cumhachd agad ris a’ phrìomh socaid cumhachd air a’ bhòrd-màthar.
- Connect the 8-pin (or 4-pin, depending on your PSU) CPU power connector to the ATX12V socket near the CPU. Ensure all 8 pins are connected if your PSU provides an 8-pin connector for stable operation.
5. A’ ceangal innealan-iomaill agus am pannal aghaidh
- Connect USB devices, keyboard, mouse, and display cables to the rear I/O panel.
- Connect the front panel headers (power button, reset button, HDD LED, power LED, front USB, front audio) to their respective pins on the motherboard. Refer to the motherboard diagram for correct pin alignment.

Figure 5: Rear I/O panel with various ports including PS/2, VGA, USB, LAN, and audio jacks.
Stiùireadh Obrachaidh
After completing the hardware installation, you can proceed with the initial boot-up and operating system installation.
- Ceangail do monitor, meur-chlàr, agus luchag.
- Cumhachd air an t-siostam agad.
- Rè tòiseachadh, brùth air an iuchair ainmichte (DEL no F2 mar as trice) gus faighinn a-steach do rèiteachadh BIOS/UEFI.
- Cuir air dòigh òrdugh tòiseachaidh gus an siostam obrachaidh agad a stàladh bho dhràibh USB no diosc optigeach.
- Save changes and exit BIOS. The system will restart and begin the OS installation process.
- Install necessary drivers for the motherboard components (chipset, audio, LAN, etc.) from the provided driver CD or the ZEBRONICS weblàrach.
Cumail suas
Bidh cumail suas cunbhalach a’ cuideachadh le bhith a’ dèanamh cinnteach gum mair am bòrd-màthar agad fad-beatha agus gum bi e seasmhach.
- Cùm e glan: Glan duslach bhon bhòrd-màthar agus pàirtean eile bho àm gu àm le bhith a’ cleachdadh èadhar teann. Dèan cinnteach gu bheil an siostam dheth agus gun a bhith a’ cleachdadh a’ phluga mus glan thu e.
- Thoir sùil air ceanglaichean: Ensure all power and data cables are securely connected. Loose connections can cause system instability.
- Ùrachaidhean BIOS: Check the official ZEBRONICS website for BIOS/UEFI updates. Update only if necessary and follow the instructions carefully.
- Smachd Àrainneachdail: Operate the motherboard in a well-ventilated area to prevent overheating.
Fuasgladh thrioblaidean
Ma thachras tu ri duilgheadasan, thoir sùil air na ceumannan cumanta fuasgladh-cheistean a leanas:
- Gun chumhachd:
- Ensure the power supply is connected correctly to both the 24-pin ATX and 8-pin (or 4-pin) CPU power connectors. A common issue is not fully connecting the 8-pin CPU power.
- Verify the power button is correctly connected to the front panel header.
- Check if the power supply unit (PSU) is functional.
- Gun taisbeanadh:
- Ensure the monitor is connected to the correct video output (motherboard integrated graphics or dedicated graphics card).
- Ath-shuidhich na modalan RAM. 'S e RAM a tha air a shuidheachadh gu ceàrr adhbhar cumanta nach eil taisbeanadh ann.
- If using a dedicated graphics card, ensure it is properly seated in the PCIe slot and has adequate power.
- Neo-sheasmhachd/Tubaistean an t-siostaim:
- Check for overheating. Ensure CPU cooler is properly installed and fans are spinning.
- Verify RAM compatibility and stability. Test with one RAM stick at a time.
- Dèan cinnteach gu bheil na draibhearan uile ùraichte.
- Cùisean Fuaim:
- Ensure audio cables are connected to the correct jacks on the rear I/O panel or front panel.
- Install or update audio drivers.
- Thoir sùil air roghainnean claisneachd anns an t-siostam obrachaidh agad.
For further assistance, consult the ZEBRONICS support weblàrach-lìn no cuir fios gu seirbheis teachdaiche.
Sònrachaidhean
| Feart | Mion-fhiosrachadh |
|---|---|
| Brand | ZEBRONICS |
| Ainm Modail | Z310 NVMe |
| Socaid CPU | LGA 1151 |
| Pròiseasairean Co-chòrdail | Intel Core 6th Gen, 7th Gen, 8th Gen, 9th Gen |
| Seòrsa Chipset | Intel Z310 |
| Teicneòlas cuimhne RAM | DDR4 |
| Astar Cloc Cuimhne | 2400 MHz (A’ toirt taic do suas ri 2666 MHz) |
| Slots Cuimhne Ri fhaighinn | 2 |
| Drive/Memory Storage Capacity (Max) | 32 GB |
| Puirt SATA Iomlan | 3 |
| M.2 Sliotan | 1 (NVMe support) |
| Eadar-aghaidh cairt grafaigeachd | PCI Express |
| Total PCIe Ports | 1 (PCIe 16x) |
| Gu h-iomlan puirt USB | 6 (a’ gabhail a-steach USB 3.0) |
| Puirt USB 2.0 | 2 |
| Àireamh de phuirt Ethernet | 1 (10/100/1000 Mbps) |
| Total HDMI Port | 1 |
| Prìomh Seòrsa Power Connector | 24-pin |
| Cuideam nì | 800 gram |
| Meudan nì (L x W x H) | 22.1L x 5.5W x 27.5H Ceudameatairean |
Barantas agus Taic
The ZEBRONICS Z310 NVMe Micro-ATX Motherboard comes with a 1-year carry-in service center warranty. For warranty claims or technical support, please contact ZEBRONICS customer service or visit their official weblàrach.
Gheibh thu barrachd fiosrachaidh agus goireasan taic air an ZEBRONICS Store on Amazon.in.
Bhidio Bathar Tharview
Bhidio: Taisbeanadh bhidio toraidh oifigeilasing the features and overview of the ZEBRONICS Z310 NVMe Micro-ATX Motherboard.