1. Ro-ràdh
This manual provides instructions for the safe operation, maintenance, and troubleshooting of your FLEX 24V Brushless Cordless 1/2-Inch Hammer Drill Turbo Mode Kit, model FX1271T-2B. Please read this manual thoroughly before using the tool to ensure proper and safe operation.
The FLEX FX1271T-2B is a powerful 24V brushless cordless hammer drill designed for demanding drilling and driving applications. It features a 1/2-inch full-metal ratcheting chuck, two-speed settings, a Turbo Mode for increased speed, and an anti-kickback safety feature. This kit includes the drill, a 2.5Ah Lithium-Ion Battery, a 5.0Ah Lithium-Ion Battery, and a 160W Fast Charger.
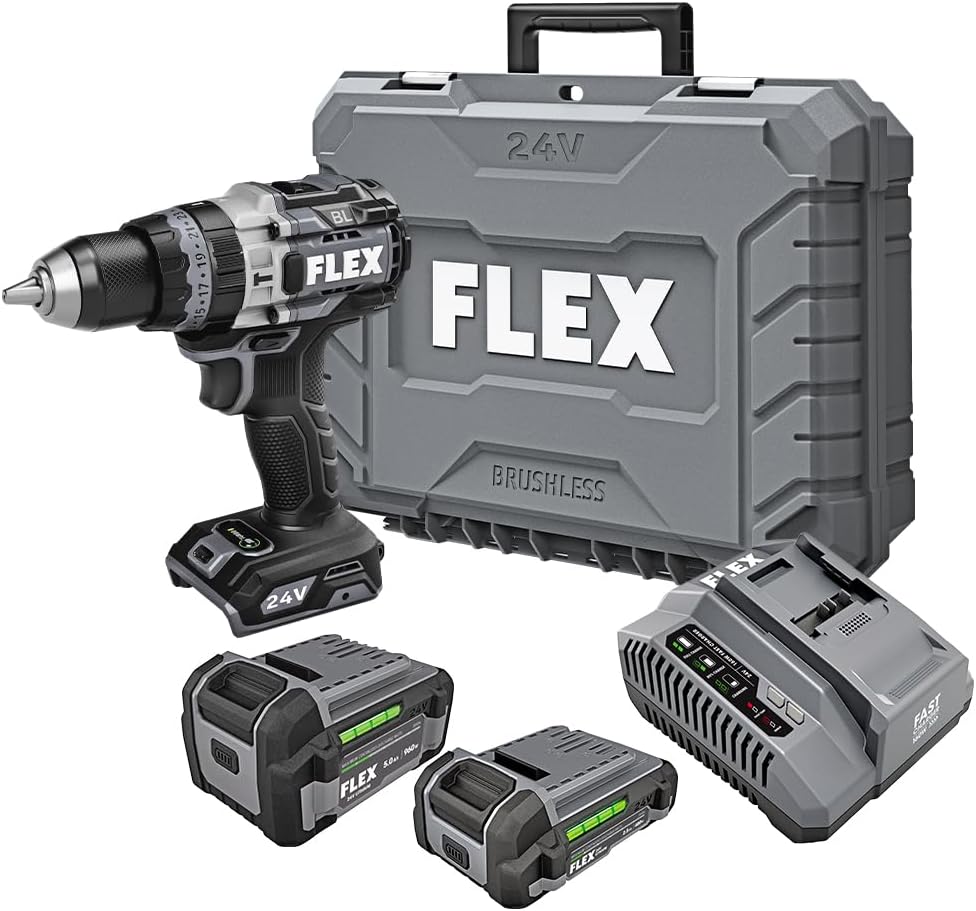
Figure 1: FLEX 24V Brushless Cordless 1/2-Inch Hammer Drill Kit (FX1271T-2B) including drill, two batteries, charger, and carrying case.
2. Stiùireadh Sàbhailteachd Coitcheann
RABHADH: Leugh a h-uile rabhadh sàbhailteachd, stiùireadh, dealbh, agus sònrachadh a tha air a thoirt seachad leis an inneal cumhachd seo. Mura lean thu a h-uile stiùireadh gu h-ìosal dh’ fhaodadh clisgeadh dealain, teine agus / no droch leòn adhbhrachadh.
2.1 Sàbhailteachd Raon Obrach
- Cùm an raon obrach glan agus air a dheagh shoillseachadh. Bidh raointean cluttered no dorcha a’ toirt cuireadh do thubaistean.
- Na obraich innealan cumhachd ann an àileachdan spreadhaidh, leithid làthaireachd lioftaichean lasanta, gasaichean no duslach. Bidh innealan cumhachd a’ cruthachadh sradagan a dh’ fhaodadh an duslach no an ceò a lasadh.
- Cùm clann agus luchd-amhairc air falbh fhad ‘s a bhios tu ag obair inneal cumhachd. Faodaidh buaireadh toirt ort smachd a chall.
2.2 Sàbhailteachd Dealain
- Feumaidh plugaichean innealan cumhachd a bhith co-ionnan ris an ionad. Na atharraich am plugan a-riamh ann an dòigh sam bith. Na cleachd plugaichean adapter sam bith le innealan cumhachd talmhainn (stèidhichte). Lùghdaichidh plugaichean neo-atharraichte agus ionadan maidsidh cunnart clisgeadh dealain.
- Seachain conaltradh bodhaig le uachdar talmhaidh no talmhainn, leithid pìoban, rèididheatoran, raointean, agus fuaradairean. Tha cunnart nas motha ann bho clisgeadh dealain ma tha do bhodhaig air a thalmhadh no air an talamh.
- Na cuir a-mach innealan cumhachd gu uisge no suidheachaidhean fliuch. Meudaichidh uisge a thèid a-steach don inneal cumhachd an cunnart bho clisgeadh dealain.
2.3 Sàbhailteachd Pearsanta
- Cuir ort dìon-sùla an-còmhnaidh. Cleachd speuclairean sàbhailteachd, dìon-sùla, no sgiath-aghaidh.
- Cuir ort dìon-èisteachd nuair a bhios tu ag obrachadh an inneil airson ùine mhòr.
- Cuir aodach ceart. Na cleachd aodach sgaoilte no seudaireachd. Cùm do fhalt agus d’ aodach air falbh bho phàirtean gluasadach.
- Bi furachail, cùm sùil air na tha thu a’ dèanamh, agus cleachd ciall cumanta nuair a bhios tu ag obrachadh inneal cumhachd.
2.4 Cleachdadh agus Cùram Innealan
- Na cuir stad air an inneal cumhachd. Cleachd an inneal cumhachd ceart airson an tagradh agad.
- Cuir às don phasgan bataraidh bhon inneal cumhachd mus dèan thu atharrachaidhean sam bith, ag atharrachadh sgeadachadh no a’ stòradh innealan cumhachd.
- Glèidh innealan cumhachd leisg a-mach à ruigsinneachd chloinne agus na leig le daoine air nach eil eòlach air an inneal cumhachd no an stiùireadh seo an inneal cumhachd obrachadh.
- Cumail suas innealan cumhachd agus goireasan. Thoir sùil airson mì-thaobhadh no ceangal de phàirtean gluasadach, briseadh phàirtean, agus suidheachadh sam bith eile a dh’ fhaodadh buaidh a thoirt air gnìomhachd an inneil cumhachd.
2.5 Cleachdadh agus cùram inneal bataraidh
- Ath-phàigheadh a-mhàin leis a 'charger a dh' ainmich an neach-dèanamh. Faodaidh charger a tha freagarrach airson aon sheòrsa de phasgan bataraidh cunnart teine a chruthachadh nuair a thèid a chleachdadh le pasgan bataraidh eile.
- Cleachd innealan cumhachd a-mhàin le pacaidean bataraidh ainmichte. Faodaidh cleachdadh pacaidean bataraidh sam bith eile cunnart bho leòn is teine.
- Nuair nach eilear a’ cleachdadh pacaid bataraidh, cùm air falbh e bho stuthan meatailt eile, leithid criomagan pàipeir, buinn, iuchraichean, ìnean, sgriothan no stuthan beaga meatailt eile, a dh’ fhaodas ceangal a dhèanamh bho cheann-uidhe gu ceann eile. Le bhith a’ giorrachadh cinn-uidhe a’ bhataraidh còmhla dh’ fhaodadh losgadh no teine adhbhrachadh.
- Fo chumhachan ana-cainteach, faodar leaghan a chuir a-mach às a’ bhataraidh; conaltradh a sheachnadh. Ma thachras conaltradh gun fhiosta, sruthadh le uisge. Ma chuireas leaghan fios gu sùilean, iarr cuideachadh meidigeach cuideachd. Faodaidh leaghan a thèid a chuir a-mach às a’ bhataraidh irioslachd no losgadh adhbhrachadh.
3. Co-phàirtean air an toirt a-steach
Your FLEX 24V Brushless Cordless 1/2-Inch Hammer Drill Kit (FX1271T-2B) includes the following items:
- FLEX 24V Brushless Cordless 1/2-Inch Hammer Drill
- (1) FLEX 24V 2.5Ah Lithium-Ion Battery (FX0111-1)
- (1) FLEX 24V 5.0Ah Lithium-Ion Battery (FX0121-1)
- FLEX 160W Fast Charger
- Làimhseachadh cuideachail
- Cùis Giùlain

Figure 2: The FLEX Advantage highlights the included 2.5Ah and 5.0Ah Lithium-Ion batteries, emphasizing their power, runtime, and fast charging capabilities.
4. Suidheachadh agus Cleachdadh Tùsail
4.1 A’ cur cosgais air a’ bhataraidh
- Connect the 160W Fast Charger to a standard power outlet.
- Sleamhnaich am pasgan bataraidh air an luchdair gus an cliog e na àite.
- The charger's indicator lights will show the charging status. A fully charged battery will be indicated by a solid green light.
- Aon uair ‘s gu bheil e làn chosgais, thoir air falbh am bataraidh bhon charger.
4.2 A ’stàladh a’ bhataraidh
- Cuir am pasgan bataraidh còmhla ris a’ phort bataraidh aig bonn làmh an drile.
- Sleamhnaich am bataraidh a-steach don phort gus an glac e gu tèarainte na àite. Dèan cinnteach gu bheil e na shuidhe gu tur gus casg a chuir air a ghluasad gun fhiosta fhad ’s a tha e ag obair.
- Gus am bataraidh a thoirt a-mach, brùth air a’ phutan (no na putan) fuasglaidh air taobhan a’ phacaid bataraidh agus sleamhnaich a-mach e.
4.3 A’ ceangal an làmh-chuideachaidh
For improved control and safety, especially during high-torque applications or hammer drilling, attach the auxiliary handle.
- Fuasgail an làmh taice clamp le bhith ga thionndadh tuathal.
- Slide the handle over the front of the drill body, positioning it to your preferred angle.
- Dèan teann air a' chlamp by rotating it clockwise until the handle is securely fastened.

Figure 3: The drill with the auxiliary handle attached, providing enhanced control and stability, particularly when the anti-kickback feature engages.
4.4 A’ stàladh bìdean drile no ghoireasan
- Dèan cinnteach gu bheil an drile dheth agus gu bheil am bataraidh air a thoirt a-mach airson sàbhailteachd.
- Grip the rear collar of the 1/2-inch full-metal ratcheting chuck and rotate the front collar counter-clockwise to open the chuck jaws.
- Cuir am bit drile no an goireas gu tur a-steach do ghiallan a’ chuck.
- Rotate the front collar clockwise to tighten the chuck jaws firmly around the bit. The ratcheting mechanism will provide an audible click when securely tightened.
- Gently pull on the bit to ensure it is properly secured.

Figure 4: Detail of the 1/2-inch full-metal ratcheting chuck, designed for secure bit retention and durability.
5. Stiùireadh Obrachaidh
5.1 Cumhachdachadh Air/Dheth agus Smachd Astair
- Tionndadh brosnachaidh: Squeeze the trigger switch to turn the drill on. Release it to turn the drill off.
- Astar caochlaideach: The trigger switch is pressure-sensitive, allowing for variable speed control. Pressing the trigger further increases the speed.
- Roghainniche Air Adhart/Air Ais: Located above the trigger, push the selector left for forward rotation (drilling/driving) and right for reverse rotation (removing screws). Center position locks the trigger for safety.
5.2 Gear Selection (2-Speed)
The drill features a 2-speed gearbox for optimal performance across various applications.
- Gèar 1 (Astar ìosal, Torc àrd): Slide the gear selector switch to position '1'. Ideal for driving screws, drilling large holes, or applications requiring maximum torque.
- Gèar 2 (Astar Àrd, Torc Ìosal): Slide the gear selector switch to position '2'. Suitable for fast drilling of smaller holes in wood or metal.
NOTE: Always ensure the drill is stopped before changing gear settings to prevent damage to the gearbox.
5.3 Mode Selection (Drill, Drive, Hammer Drill)
Rotate the collar behind the chuck to select the desired operating mode:
- Modh Drile (Ìomhaigh Drile): For drilling holes in wood, metal, and plastics.
- Modh Dràibhidh (Ìomhaigh Sgriubha): For driving screws. The clutch settings (numbered ring) allow you to adjust the torque to prevent over-driving screws or damaging materials.
- Modh Drile-Òrd (Ìomhaigh an Òrd): For drilling into masonry, brick, and concrete. This mode combines rotary action with a hammering motion.
5.4 Modh Turbo
The Turbo Mode button, located on top of the drill, provides an immediate increase in speed for faster results when needed.
- Brùth an TURBO button during operation to engage maximum speed.
- Release the button to return to the previously selected speed setting.

Figure 5: The Turbo Mode button, when pressed, provides increased speed for rapid task completion.
5.5 Anti-Kickback Feature
The drill is equipped with an advanced anti-kickback braking technology. If the drill bit binds during operation, the system will detect the sudden rotational force and rapidly stop the motor to reduce the risk of kickback and potential injury.
5.6 Solas LED Amalaichte
An LED light is integrated into the drill to illuminate the work area, improving visibility in dimly lit conditions. The light activates when the trigger is pressed.

Figure 6: The integrated LED light provides illumination for improved visibility in dark work environments.
5.7 Drilling into Masonry (Hammer Drill Mode)
When drilling into masonry, brick, or concrete:
- Select Hammer Drill Mode.
- Ensure the auxiliary handle is securely attached and held firmly with both hands.
- Cleachd drilean clachaireachd iomchaidh.
- Apply steady, firm pressure to the drill, allowing the hammering action to break up the material.

Figure 7: The FLEX hammer drill in action, demonstrating its capability to drill into tough materials with 1,400 in-lbs of torque.
6. Cumail suas
6.1 Glanadh
- Dì-cheangail am pasgan bataraidh an-còmhnaidh mus dèan thu glanadh no cumail suas sam bith.
- Cleachd bruis bhog no èadhar teannaichte gus duslach agus sprùilleach a ghlanadh bho na fosglaidhean fionnarachaidh.
- Sguab an taigheadas inneil le sanasamp aodach. Na cleachd ceimigean cruaidh no innealan-glanaidh sgudail.
- Cùm giallan a’ chuck glan agus saor bho sprùilleach gus dèanamh cinnteach gu bheil greim ceart aig a’ bhit.
6.2 Stòradh
- Store the tool, batteries, and charger in a cool, dry place, away from direct sunlight and moisture.
- Ensure batteries are partially charged (not fully depleted or fully charged for long-term storage) before storing.
- Store the tool in its carrying case to protect it from damage.
7. A ’dèanamh trioblaid
| Trioblaid | Adhbhar a dh’fhaodadh a bhith ann | Fuasgladh |
|---|---|---|
| Chan eil an drile a’ tòiseachadh. | Bataraidh gun a bhith air a luchdadh no air a stàladh gu ceàrr. Forward/Reverse selector in center (locked) position. | Charge battery and ensure it is securely installed. Move selector to forward or reverse position. |
| Call cumhachd rè obrachadh. | Tha cosgais bataraidh ìosal. Dìon overload air a ghnìomhachadh. | Luchdaich a-nuas am bataraidh. Reduce pressure on the tool; allow it to cool down. |
| Sleamhnaicheas am bit anns a’ chuck. | Cha deach an chuck a theannachadh gu leòr. Tha giallan an chuck salach no caite. | Retighten chuck firmly. Clean chuck jaws. If problem persists, chuck may need replacement. |
| Spionnadh no fuaim anabarrach. | Damaged or bent drill bit. Co-phàirtean sgaoilte. | Replace drill bit. Check for loose screws or parts. If problem persists, discontinue use and contact service. |
8. Sònrachaidhean
| Feart | Mion-fhiosrachadh |
|---|---|
| Modail Àireamh | FX1271T-2B |
| Voltage | 24 Volt |
| Meud Chuck | 1/2-òirleach |
| Seòrsa Chuck | Full-Metal Ratcheting |
| Torc as àirde | 1400 òirleach punnd |
| Astar rothlach as àirde | 2500 rpm |
| Àireamh de Luas | 2 |
| Comas Bataraidh (Air a ghabhail a-steach) | 2.5 Ah, 5.0 Ah Lithium-Ion |
| Charger Type (Included) | Charger luath 160W |
| Feartan sònraichte | Turbo Mode, Anti-Kickback, LED Light, Brushless Motor |
| Cuideam nì | 15.37 notaichean (Pasgan) |
| Meudan toraidh | 7.2"L x 4"W x 10"H (Tool) |
| Comas Drileadh (Fiodh) | 2 òirlich |
| Comas Drileadh (Meatailt) | 2 òirlich |
9. Barantas agus Taic
9.1 Barantas Fad-beatha Earranta FLEX
This FLEX tool is protected by the FLEX Limited Lifetime Warranty. To qualify for this warranty, you must register your new FLEX tool, battery, or charger within 30 days of purchase through December 31, 2025. Registration can be completed at clàraichmyFLEX.com.
Please refer to the official FLEX website or your product packaging for full terms and conditions of the warranty.
9.2 Taic teachdaiche
For technical assistance, replacement parts, or warranty claims, please contact FLEX customer support. Contact information can typically be found on the FLEX official weblàrach-lìn no air pacaigeadh an toraidh agad.
When contacting support, please have your model number (FX1271T-2B) and purchase date available.