1. Ro-ràdh
This manual provides detailed instructions for the safe and efficient operation of your ATOMSTACK A12 Pro Laser Engraving Machine. Please read this manual thoroughly before use to ensure proper setup, operation, and maintenance. Keep this manual for future reference.
Rabhaidhean Sàbhailteachd:
- Always wear UV-filtering eye protection when operating the laser engraver.
- Ensure proper ventilation to dissipate fumes and smoke generated during engraving/cutting.
- Na fàg an inneal gun neach-frithealaidh rè obrachadh.
- Cùm stuthan lasanta air falbh bhon àite obrach.
- Familiarize yourself with the emergency stop button location.
2. Pasgan-susbaint
Dèan cinnteach gu bheil na nithean gu lèir a tha air an liostadh gu h-ìosal air an toirt a-steach don phacaid agad:
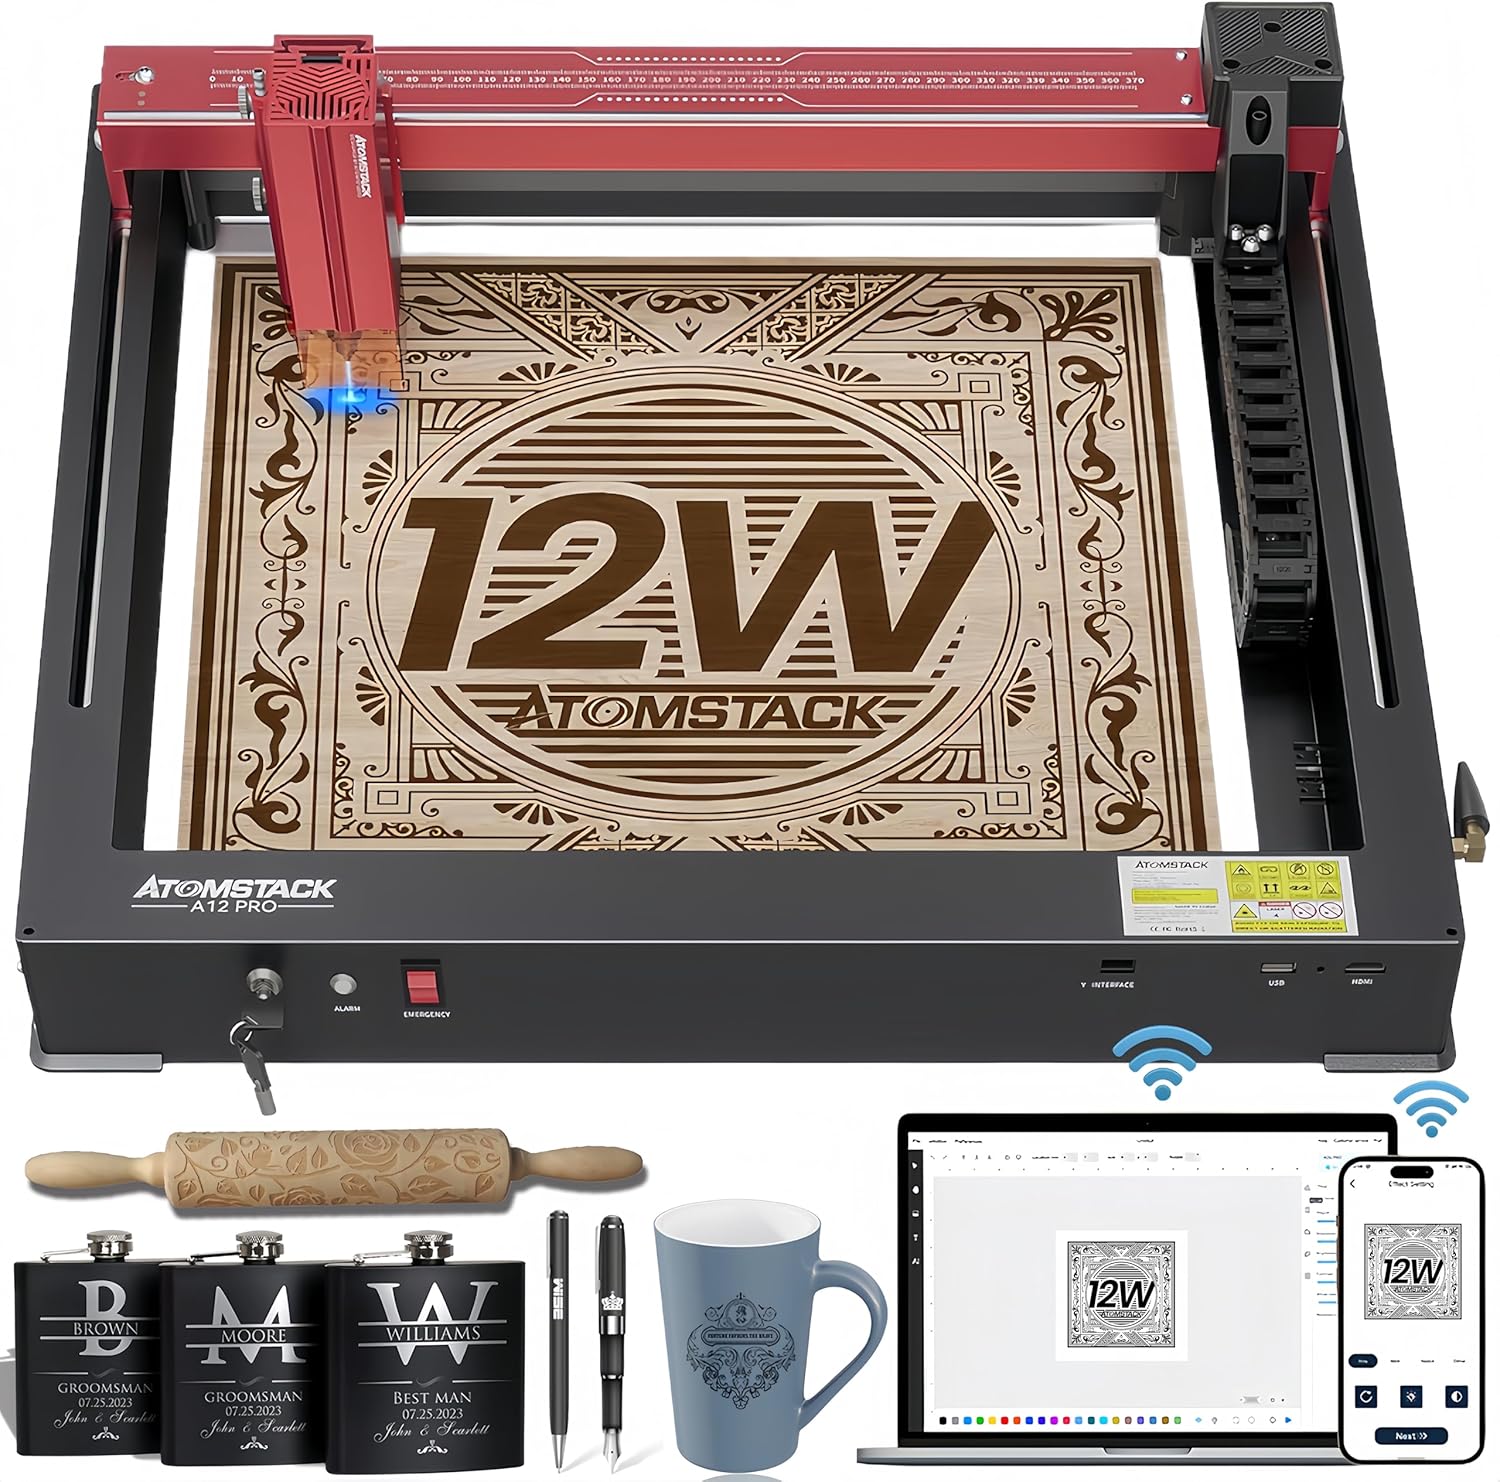
Figure 2.1: ATOMSTACK A12 Pro Laser Engraving Machine and included accessories.
- ATOMSTACK A12 Pro Laser Engraving Machine (Unibody Frame)
- Ceann laser
- Adaptor Cumhachd (24V, 5A)
- Càball cumhachd
- Càball USB (Seòrsa-C)
- Goggles (UV-filtering eye protection)
- Fixed Focus Lens
- Leabhar-làimhe cleachdaiche
- Tools (H3 hexagon L-shaped wrench, M4 thumb screws)
- Draibhearan airson flash drive
- Antenna WiFi
- Silicone Hose (air hose)
- Wire Anchor
- Càball Clamp
- 100*30 lint free cloth
- Sliochd
- Switch Key
3. Stiùirich rèiteachaidh
The ATOMSTACK A12 Pro features an unibody design for minimal assembly. Follow these steps to get started:
- Unboxing: Carefully remove the machine and all accessories from the packaging. The machine is pre-calibrated and shipped as a single unit.

Figure 3.1: The ATOMSTACK A12 Pro is ready to use right out of the box with its unibody design.
- Install the Slider: Attach the slider component to the designated rail on the machine. Secure it with the provided screws.
- Install the Laser Head: Mount the laser head onto the slider. Ensure it is firmly attached.
- Install the WiFi Antenna: Screw the WiFi antenna into its port on the machine's side.
- Install Tubing and X-axis Link Lines: Connect the tubing and X-axis link lines as shown in the diagram to ensure proper cable management and operation.
- Ceangail cumhachd agus USB: Plug the power adapter into the machine and a power outlet. Connect the USB cable from the machine to your computer.
- Cumhachd air: Insert the switch key and turn it to the ON position. The machine is now ready for software setup.
Video 3.1: A detailed guide on how to install and set up the ATOMSTACK laser engraver.
4. Stiùireadh Obrachaidh
4.1 Smachd Bathar-bog
The ATOMSTACK A12 Pro supports multiple control methods:
- ATOMSTACK PC Software: Exclusive software for simplified operation, ideal for beginners.
- LightBurn & LaserGRBL: Traditional PC software for advanced users.
- ATOMSTACK Mobile APP: Available on Android and Apple App Stores for WiFi control via smartphone.

Figear 4.1: Os a chionnview of the various software and app control options for the laser engraver.
4.2 Pròiseas Greanta
- Suidheachadh stuthan: Place your material flat on the engraving bed.
- Atharrachadh Fòcas: Use the fixed-focus design for rapid and precise focusing in approximately 10 seconds.
- Cross Positioning: Utilize the newly added cross laser positioning feature for clear visibility of the laser's location, ensuring perfect alignment for engraving and easy horizontal adjustment.
- Roghainnean bathar-bog: Adjust engraving parameters (speed, power, passes) in your chosen software based on the material.
- Tòisich a 'gràbhaladh: Initiate the engraving process from the software.

Figure 4.2: The cross positioning system helps align objects and lock to edges for precise horizontal carving.
5. Features & Capabilities
- Dealbhadh Unibody: Sturdy all-aluminum unibody design, installation-free and pre-calibrated.
- Astar Àrd & Mionaideachd: New dual-axis linear guide rail structure and high-speed motherboard allow engraving speeds up to 600mm/s, 3-6 times faster than traditional frame machines. Accuracy within 0.004 inches.
- Laser cumhachdach: 12000mW diode laser (Laser Class 4) with 50W machine power and a 0.05*0.06mm ultra-fine laser spot focus.
- Thicker Cuts: Can cut through 8mm wood, 5mm black acrylic, and 0.02mm stainless steel in a single pass.
- Diverse Material Compatibility: Engraves and cuts a wide range of materials including wood, acrylic, metal, glass, ceramics, leather, paper, cardboard, and more.
- Automatic Power Failure Recovery: Memorizes engraving position and swiftly resumes from the paused point, ensuring uninterrupted production and material saving.
- Tèarainteachd leasaichte: Equipped with 4-way limit switches, UV-filtering eye protection, a tilt detector with a 15-degree alarm, and an emergency stop button.

Figure 5.1: Comparison showing the significantly faster engraving speed of the A12 Pro.
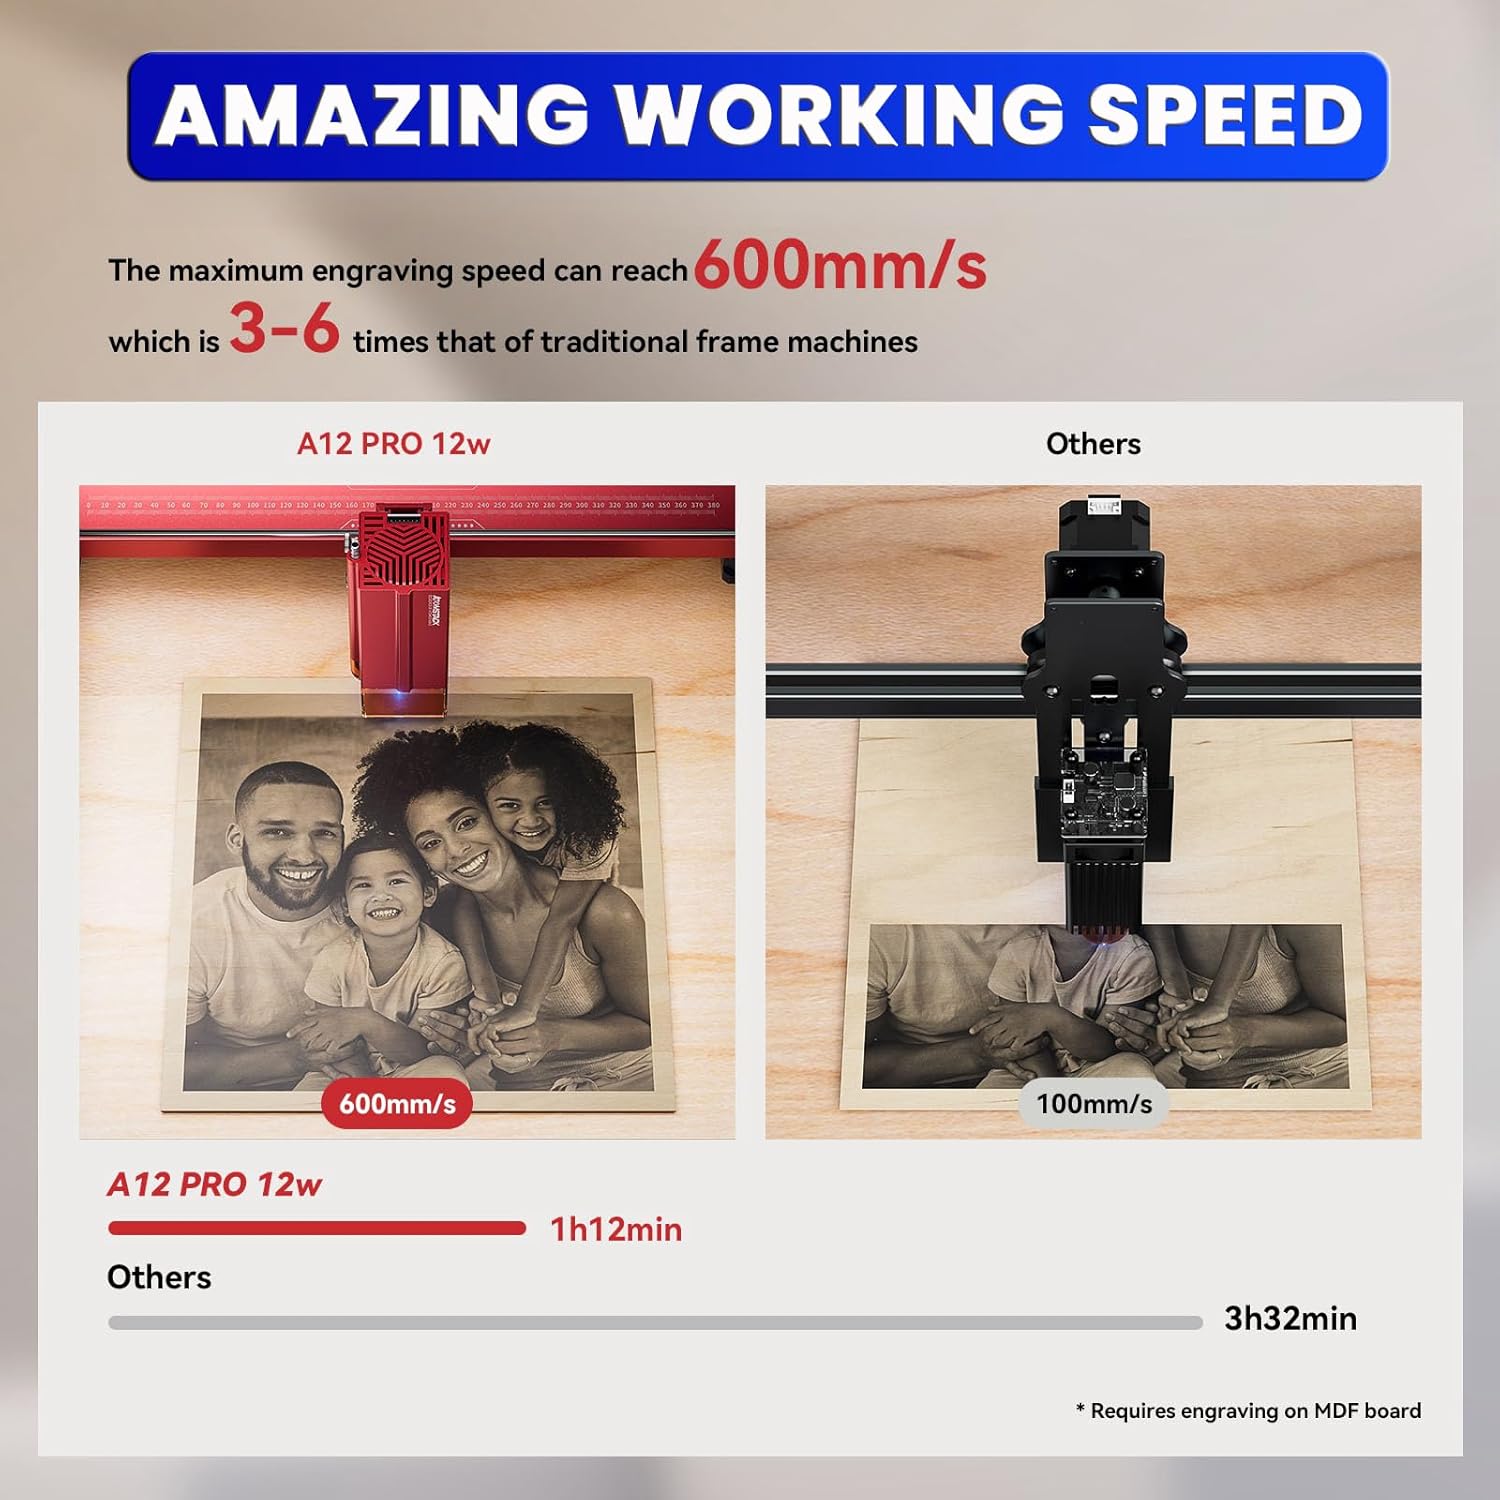
Figure 5.2: Demonstrates the maximum cutting thickness for various materials with the A12 Pro.

Figear 5.3: Examples of various materials that can be engraved or cut by the machine.
6. Cumail suas
- Glanadh lionsa: Regularly clean the laser lens with the provided lint-free cloth to maintain optimal performance and prevent residue buildup.
- Rail Lubrication: Periodically apply a small amount of lubricant to the guide rails to ensure smooth movement of the laser head.
- Toirt air falbh sprùilleach: Keep the engraving bed and surrounding area free of debris and dust. Use an air compressor or brush to clear away small particles.
- Ùrachaidhean firmware: Check the official ATOMSTACK website periodically for firmware updates to ensure your machine has the latest features and bug fixes.
7. A ’dèanamh trioblaid
| Trioblaid | Adhbhar a dh’fhaodadh a bhith ann | Fuasgladh |
|---|---|---|
| An t-inneal nach eil cumhachd air | Power cable loose; Emergency stop engaged; Key not turned. | Check power connections; Disengage emergency stop; Turn key to ON. |
| Laser not firing/weak output | Lens dirty; Incorrect focus; Low power setting in software. | Clean laser lens; Adjust focus; Increase power setting. |
| Engraving is distorted/inaccurate | Loose belts/rails; Material shifting; Incorrect software settings. | Check and tighten belts/rails; Secure material; Verify software settings. |
| Software not connecting to machine | USB cable issue; Driver not installed; Incorrect COM port. | Try different USB port/cable; Install drivers; Select correct COM port in software. |
8. Sònrachaidhean
- Meudan toraidh: 23.22 x 23.22 x 7.08 òirleach
- Cuideam nì: 18.74 not
- Cumhachd toraidh laser: 12000mW (12W)
- Cumhachd inneal: 50W
- Meud Spot Laser: 0.05*0.06mm
- Luas gràbhalaidh: Suas gu 600mm / s
- Cruinneas: Within 0.004 inches
- Ceangal: USB, WiFi (via Mobile APP)
- Bathar-bog le taic: ATOMSTACK PC Software, LightBurn, LaserGRBL
- Dèanadair: Tha Shenzhen AtomStack Technologies Co., Earr.
- Dùthaich Tùs: Sìona
9. Barantas agus Taic
Your ATOMSTACK A12 Pro Laser Engraving Machine comes with a standard manufacturer's warranty. For detailed warranty information, technical support, or service inquiries, please refer to the warranty card included in your package or visit the official ATOMSTACK weblàrach.
Our professional technical and support teams are available 24/7 to answer any questions or concerns you may have.