FVTLED WK602US
FVTLED Smart Recessed Lighting 4-Inch User Manual
Model: WK602US
Ro-ràdh
This manual provides comprehensive instructions for the installation, operation, and maintenance of your FVTLED Smart Recessed Lighting. Please read this manual thoroughly before installation and use to ensure safe and efficient operation. This 4-inch LED downlight features RGBWC color changing capabilities, dimmable 2700K-6500K white light, and smart control via Bluetooth or Wi-Fi (with bridge).
Fiosrachadh Sàbhailteachd
- Cuir dheth an cumhachd aig a’ bhriseadair cuairte an-còmhnaidh mus dèan thu stàladh no seirbheiseachadh.
- Bruidhinn ri neach-dealain le teisteanas mura h-eil thu cinnteach mun phròiseas stàlaidh.
- Do not modify the product in any way, as this will void the warranty and may cause safety hazards.
- Ensure the product is installed in a dry, indoor location.
- Cùm a-mach à ruigsinn chloinne.
Sònrachaidhean
| Modail | WK602US (ZH-MHDA4-RGBWW(US)) |
| Dath an t-solais | RGB & Warm White & Cool White (RGBWC) |
| Meudan | Outer Diameter: 4.72 inches (120mm), Height: 1.77 inches (45mm) |
| Meud toll drile | 3.93-4.13 òirleach (100-105mm) |
| Voltage | 100-264VAC, 50/60HZ |
| Dètage | 9W |
| Luminous Flux | 700LM |
| Teòthachd dath | 2700K-6500K |
| CRI | >80 |
| Ceàrn Beam | 120° |
| Modh smachd | Bluetooth App, Optional Remote Control, Voice Control (via Bluetooth mesh smart bridge with Alexa/Google Assistant) |
| Seòrsa stàlaidh | Flush Mount (with spring clips) |
| Bunait nam bulbaichean | E26 (inneal-atharrachaidh air a ghabhail a-steach) |
| Cleachdadh a-staigh / a-muigh | A-staigh |
Dè th' anns a' Bhocsa
- 1 x FVTLED 4-Inch Smart Recessed Downlight
- 1 x E26 Base Adapter
- Leabhar-làimhe stiùiridh
Note: Bluetooth Mesh Smart Remote Controller and AAA Batteries are not included and must be purchased separately if desired for remote control functionality.
Stàladh agus stàladh
Follow these steps for proper installation of your FVTLED Smart Recessed Lighting. Ensure power is off at the circuit breaker before beginning.
Prepare the Ceiling Hole
Drill a hole in the ceiling with a diameter of 100-105mm (3.93-4.13 inches). Ensure the hole is clean and free of debris.
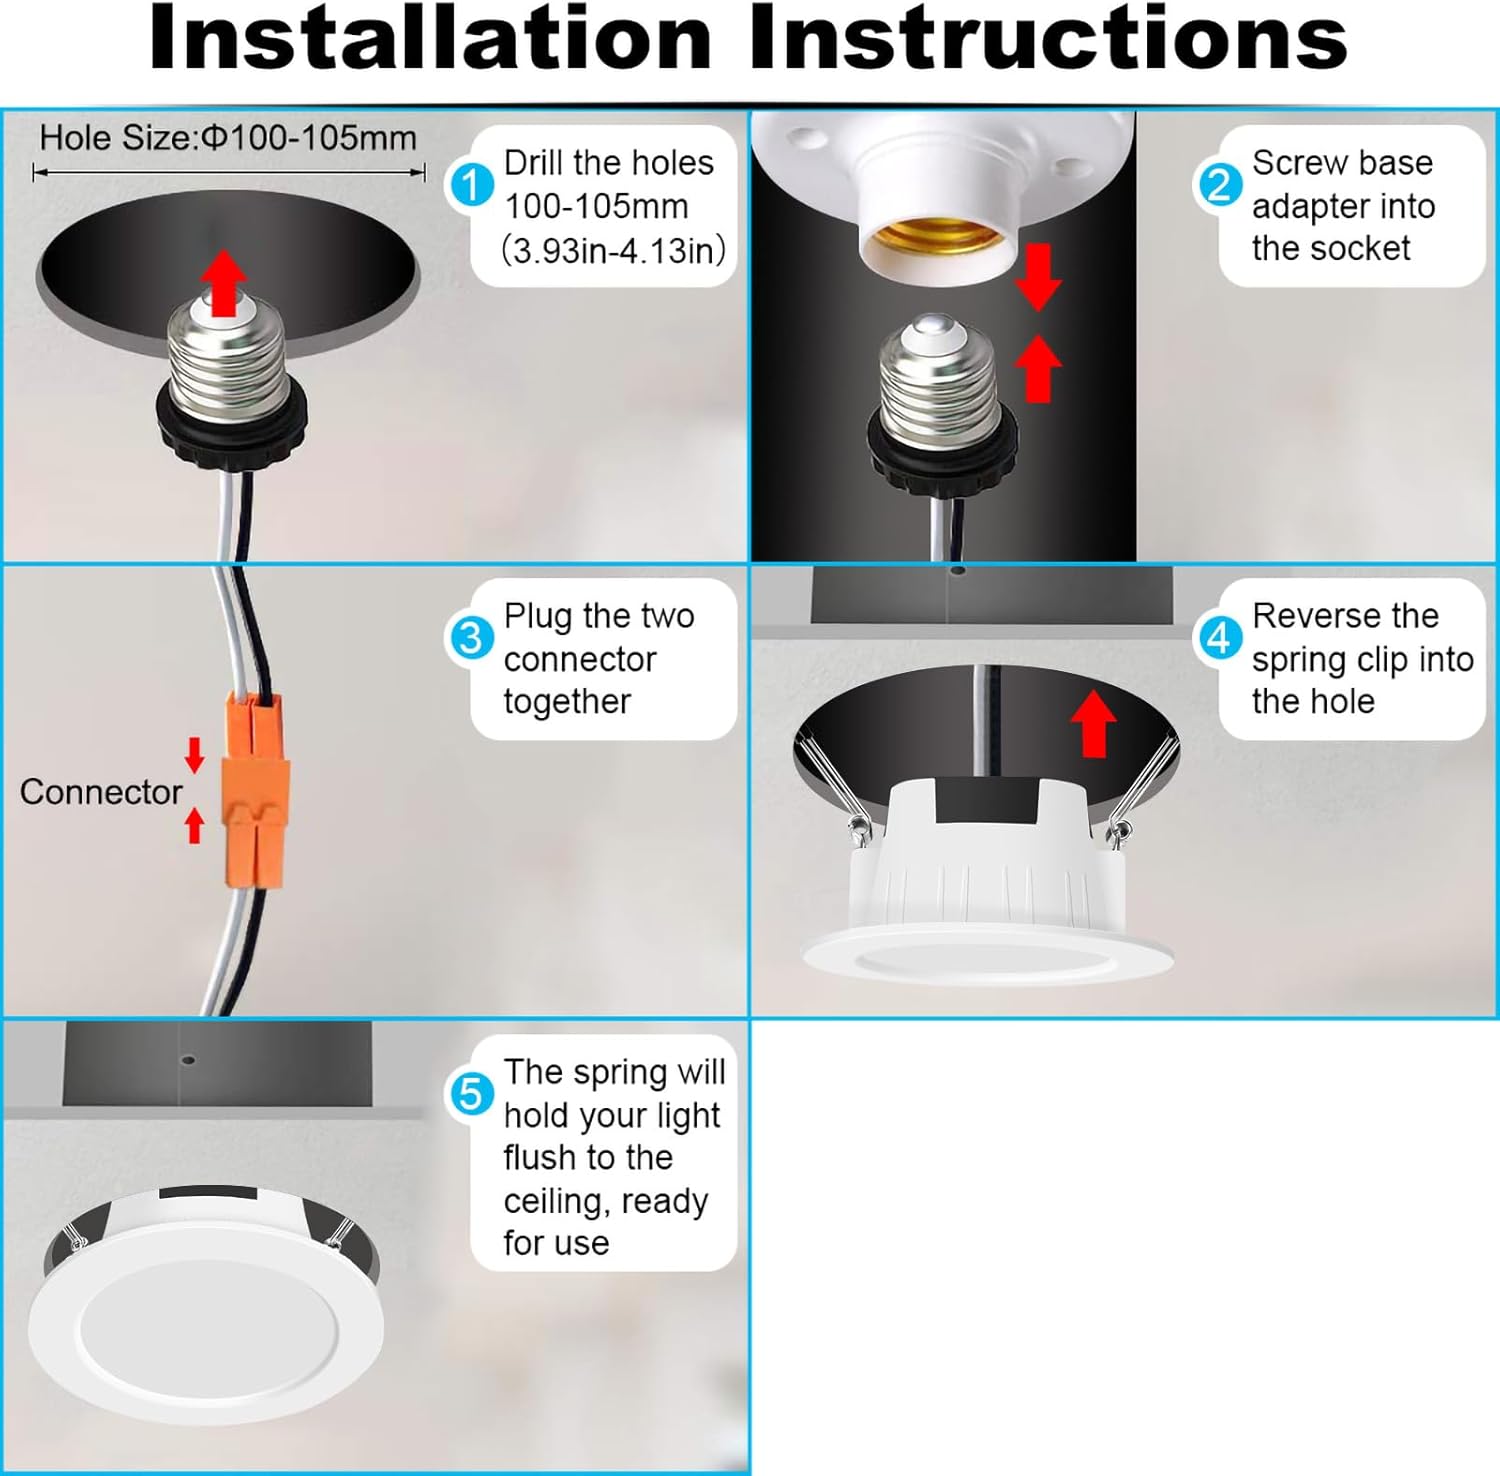
Tuairisgeul Ìomhaigh: A diagram illustrating the first step of installation, showing a drill creating a circular hole in a ceiling, with the recommended hole size of 100-105mm indicated.
Connect the E26 Base Adapter
Screw the E26 base adapter into the existing light bulb socket in your ceiling. Ensure it is securely fastened.
Tuairisgeul Ìomhaigh: A diagram showing the E26 base adapter being screwed into a standard light bulb socket, indicating the connection point for the recessed light.
Plug in the Connector
Connect the two parts of the electrical connector from the recessed light and the E26 adapter. Ensure a firm connection.
Tuairisgeul Ìomhaigh: A diagram illustrating the connection of the two electrical connectors, one from the light fixture and one from the E26 adapter, ensuring a secure fit.
Insert the Light Fixture
Reverse the spring clips on the recessed light and push the light fixture into the prepared ceiling hole. The spring clips will secure the light in place.
Tuairisgeul Ìomhaigh: A diagram showing the recessed light fixture being pushed into the ceiling hole, with the spring clips compressed to allow insertion and then expanding to hold the light.
Sàbhail an Solas
Once inserted, the spring clips will hold the light flush against the ceiling, completing the physical installation.
Tuairisgeul Ìomhaigh: A diagram showing the final installed recessed light, sitting flush with the ceiling surface, indicating a successful installation.
After physical installation, restore power at the circuit breaker. The light is now ready for smart control setup.
App Control and Pairing
The FVTLED Smart Recessed Lighting can be controlled via the "FVTLED" mobile application. For advanced features like voice control with Alexa or Google Assistant, a Bluetooth mesh smart bridge is required (sold separately).
Downloading the FVTLED App
- Download the "FVTLED" app from your smartphone's app store (iOS or Android).
- Open the app and follow the on-screen instructions to create an account or proceed as a guest.
Pairing the Lights (Direct Bluetooth)
- Dèan cinnteach gu bheil Bluetooth air a chomasachadh air an fhòn-smart agad.
- In the FVTLED app, tap "Add Device" or the "+" icon.
- The app will automatically search for nearby devices. Select your FVTLED light(s) from the list.
- Lean molaidhean sam bith a bharrachd gus am pròiseas càraidh a chrìochnachadh.
Tuairisgeul a’ Bhidio: This video demonstrates the process of connecting FVTLED smart lights to the FVTLED mobile application. It shows how to add devices, connect to a Wi-Fi bridge (if applicable), group lights, and control individual light colors, brightness, and color temperature. It also highlights music synchronization, various scene modes, custom mode creation, and setting up timing schedules. Finally, it briefly touches upon compatibility with Alexa and Google Assistant and sharing control with family members.
Connecting via Bluetooth Mesh Smart Bridge (for Wi-Fi/Voice Control)
If you wish to control your lights via Wi-Fi or integrate with voice assistants like Alexa or Google Assistant, you will need to install a Bluetooth mesh smart bridge (sold separately).
- Install and power on your Bluetooth mesh smart bridge according to its specific instructions.
- In the FVTLED app, follow the instructions to add the smart bridge. This typically involves selecting the bridge and connecting it to your home Wi-Fi network.
- Once the bridge is connected, the app will automatically detect and add all paired FVTLED lights to the bridge network.

Tuairisgeul Ìomhaigh: A diagram illustrating the connectivity of FVTLED smart lights. It shows the lights wirelessly connected to a smartphone via Bluetooth, and also to a smart bridge which then connects to a home network, enabling control via Amazon Alexa and Google Assistant devices. Various room types are shown where these lights can be used.
Voice Control Integration (Alexa/Google Assistant)
After successfully connecting your lights to the Bluetooth mesh smart bridge, you can integrate them with Amazon Alexa or Google Assistant for voice control. Refer to the FAQ section within the FVTLED app for detailed, step-by-step instructions on linking your FVTLED account with Alexa or Google Home.
Stiùireadh Obrachaidh
Individual Light Control
- In the FVTLED app, select the individual light you wish to control.
- Use the color wheel to select from 16 million RGB colors.
- Adjust the color temperature between 2700K (warm white) and 6500K (cool white).
- Slide the brightness control from 10% to 100%.

Tuairisgeul Ìomhaigh: A smartphone screen displaying the FVTLED app interface, showing a color wheel for RGB selection and a slider for brightness adjustment. Three FVTLED recessed lights are shown in the background, illuminated in different colors (green, white, purple), demonstrating individual control.
Smachd buidhne
- To control multiple lights simultaneously, select the desired lights in the app to form a group.
- You can create custom groups for different rooms or areas (e.g., Living Room, Kitchen, Bedroom).
- Once grouped, any color, brightness, or color temperature changes will apply to all lights within that group.
Modhan Seallaidh
- The app offers various pre-set scene modes (e.g., Christmas, Halloween, Birthday Party, Golden Dawn, Aurora Night) to suit different moods and occasions.
- Select a scene mode from the app to instantly change the lighting ambiance.

Tuairisgeul Ìomhaigh: A collage of images demonstrating various lighting patterns and colors achievable with FVTLED smart lights in a living room setting. Examples include vibrant pink, green, and purple lighting, showcasing "multiple situational patterns" for different moods or events.
Sioncronachadh Ciùil
- Activate the music mode in the app.
- The lights will flicker and change colors in sync with the rhythm of the music playing from your device.
Custom Mode (DIY)
- Create your own custom lighting effects by adjusting color, scene mode, warm light mode, and color mode.
- You can also customize the rhythm and flicker amplitude of the lights.
Timing Mode (Schedule)
- Set schedules for your lights to turn on or off at specific times daily.
- The lights will retain their last mode settings when turned off and on via schedule.
Cumail suas
- Glanadh: Ensure power is off before cleaning. Wipe the light fixture with a soft, dry cloth. Do not use abrasive cleaners or solvents.
- Ath-chur bulb: This LED downlight features integrated LEDs and does not require bulb replacement.
- Ùrachaidhean firmware: Periodically check the FVTLED app for firmware updates to ensure optimal performance and access to new features.
Fuasgladh thrioblaidean
- Chan eil solas a 'tionndadh air:
- Thoir sùil a bheil an cumhachd air aig a’ bhriseadair cuairte.
- Dèan cinnteach gu bheil a h-uile ceangal dealain tèarainte.
- Verify the E26 adapter is properly screwed into the socket.
- Cannot connect to the FVTLED app:
- Dèan cinnteach gu bheil Bluetooth air a chomasachadh air an fhòn-smart agad.
- Make sure the light is powered on and within Bluetooth range.
- Restart the FVTLED app and try pairing again.
- If using a smart bridge, ensure the bridge is powered on and connected to your Wi-Fi network.
- Lights are not responding to voice commands:
- Confirm that your Bluetooth mesh smart bridge is properly installed and connected to both the lights and your Wi-Fi.
- Verify that your FVTLED account is correctly linked with Alexa or Google Assistant.
- Thoir sùil air a’ cheangal eadar-lìn agad.
- Ensure you are using the correct voice commands as specified in the FVTLED app's FAQ section.
- Lights are not staying flush with the ceiling:
- Ensure the ceiling hole diameter is within the recommended 100-105mm range.
- Verify that the spring clips are properly engaged and not obstructed.
- If the issue persists, additional securing methods may be required, such as using caulk or a metal ring from a previous fixture, as suggested by some users.
Barantas agus Taic
For warranty information and technical support, please refer to the official FVTLED website or contact FVTLED customer service directly. Contact details can typically be found within the FVTLED mobile application or on the product packaging.
Faodaidh tu cuideachd tadhal air an FVTLED Store on Amazon airson tuilleadh fiosrachaidh mu thoraidhean agus goireasan taic.