1. Ro-ràdh
This manual provides instructions for the safe and effective use of your LLAVETOR Digital Torque Adapter. This device converts any standard ratchet wrench into a precise digital torque wrench, suitable for various applications including bicycles, motorcycles, automotive repair, and industrial use.
Am measg nam prìomh fheartan tha:
- High-definition LED backlight display for easy reading in dark environments.
- Accuracy of ±2% clockwise and ±3% counter-clockwise.
- Four selectable torque units: N.m, ft-lb, in-lb, kg.cm.
- Dealbhadh teann agus aotrom airson comas giùlain.
- Includes 1/2", 3/8", and 1/4" adapters for versatility.
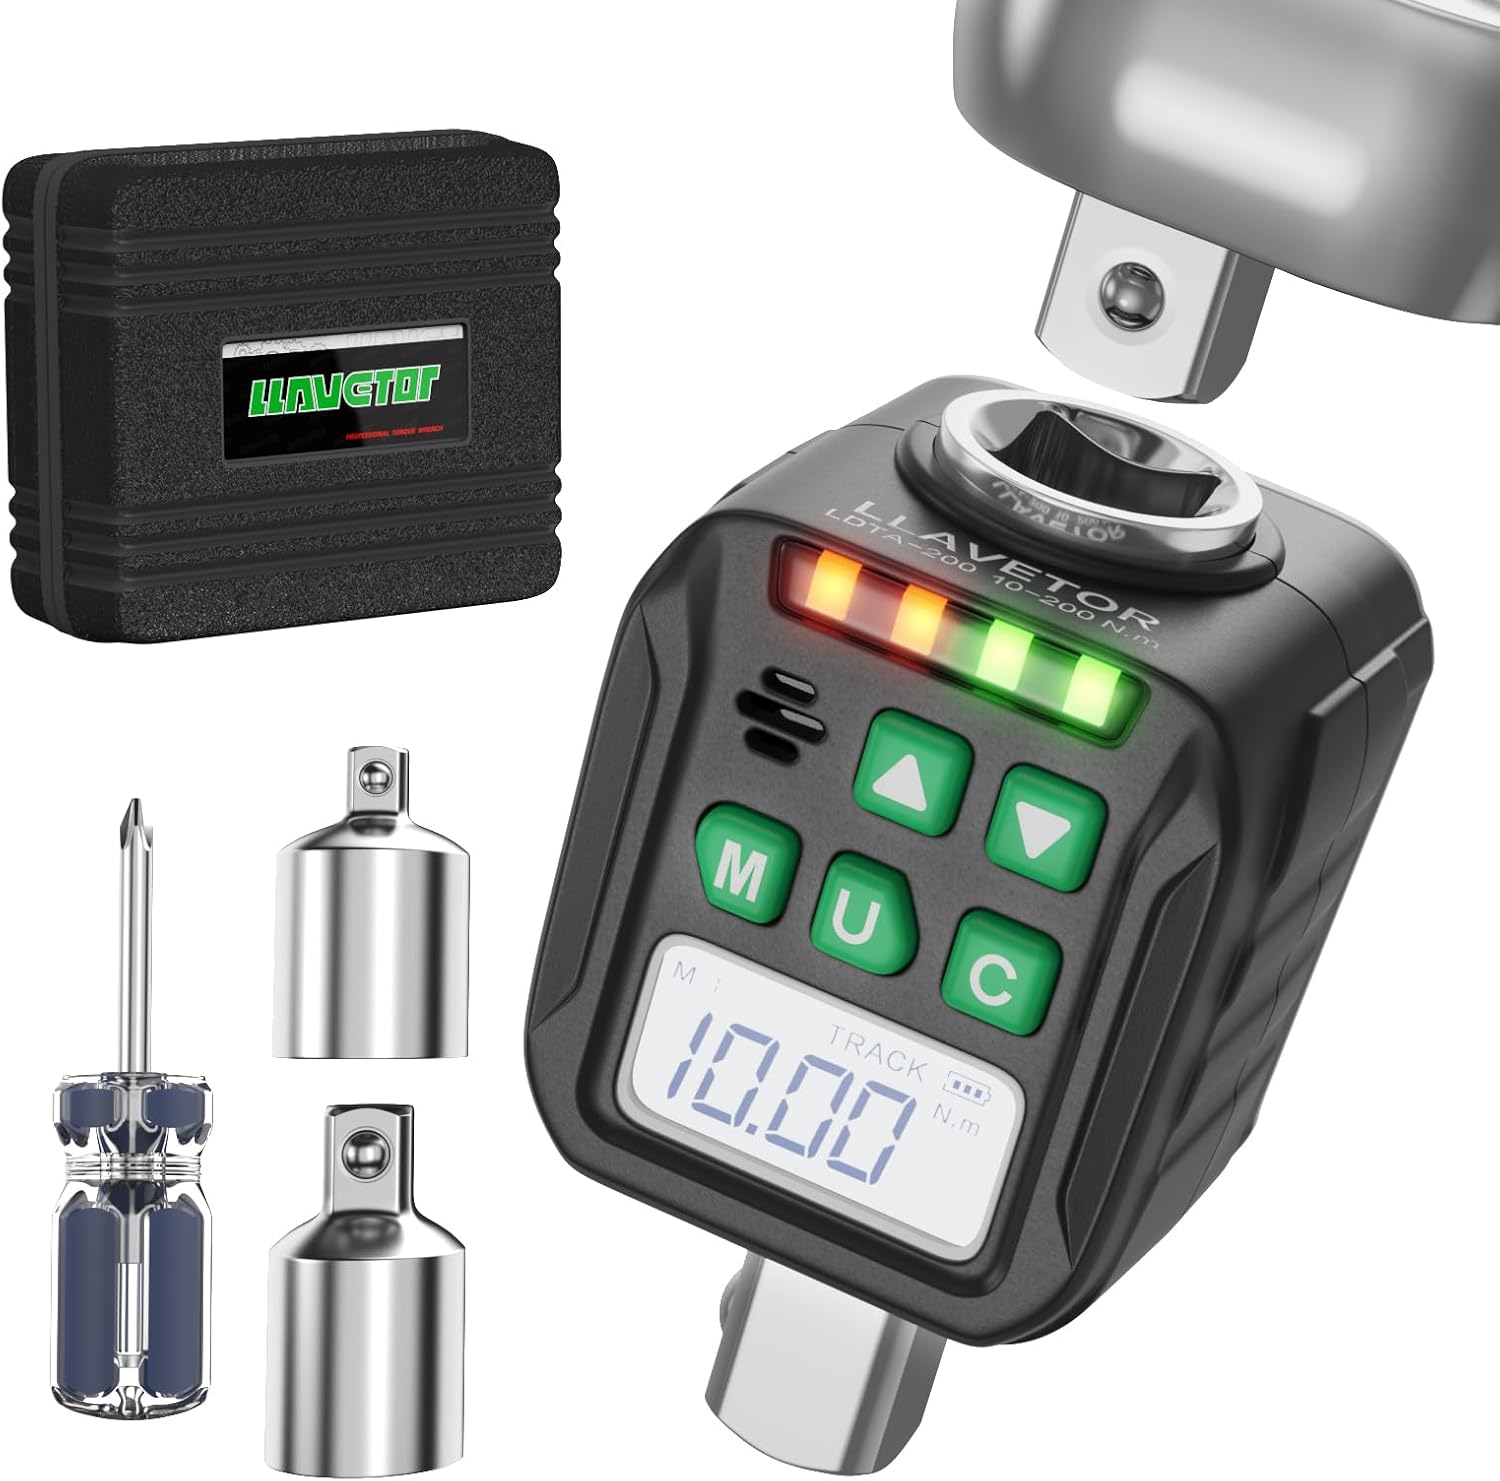
Image 1: LLAVETOR Digital Torque Adapter. This image shows the compact design of the digital torque adapter, ready for use with a ratchet.
2. Suidhich
2.1 Susbaint a’ phacaid
Dèan cinnteach gu bheil a h-uile nì anns a’ phacaid:
- 1 x 1/2" Digital Torque Adapter
- 1 x 3/8" Adapter
- 1 x 1/4" Adapter
- 2 x Bataraidh AA
- 1 x screwdriver
2.2 Stàladh bataraidh
The digital torque adapter requires two AA batteries for operation.
- Lorg còmhdach roinn a’ bhataraidh air cùl an inneil.
- Use the provided screwdriver to open the battery compartment.
- Cuir a-steach dà bataraidh AA, a’ dèanamh cinnteach gu bheil am polarachd cheart (+/-).
- Dùin còmhdach roinn a’ bhataraidh agus tèarainte leis an sgriubha.
2.3 A’ ceangal innealan-atharrachaidh
The digital torque adapter comes with 1/2", 3/8", and 1/4" adapters to fit various drive sizes.
- Select the appropriate adapter (e.g., 3/8" or 1/4") if your ratchet or socket is not 1/2".
- Insert the adapter into the 1/2" square drive of the digital torque adapter.
- Attach your ratchet wrench to the input square drive of the digital torque adapter.
- Attach the desired socket to the output square drive of the digital torque adapter (or the attached adapter).
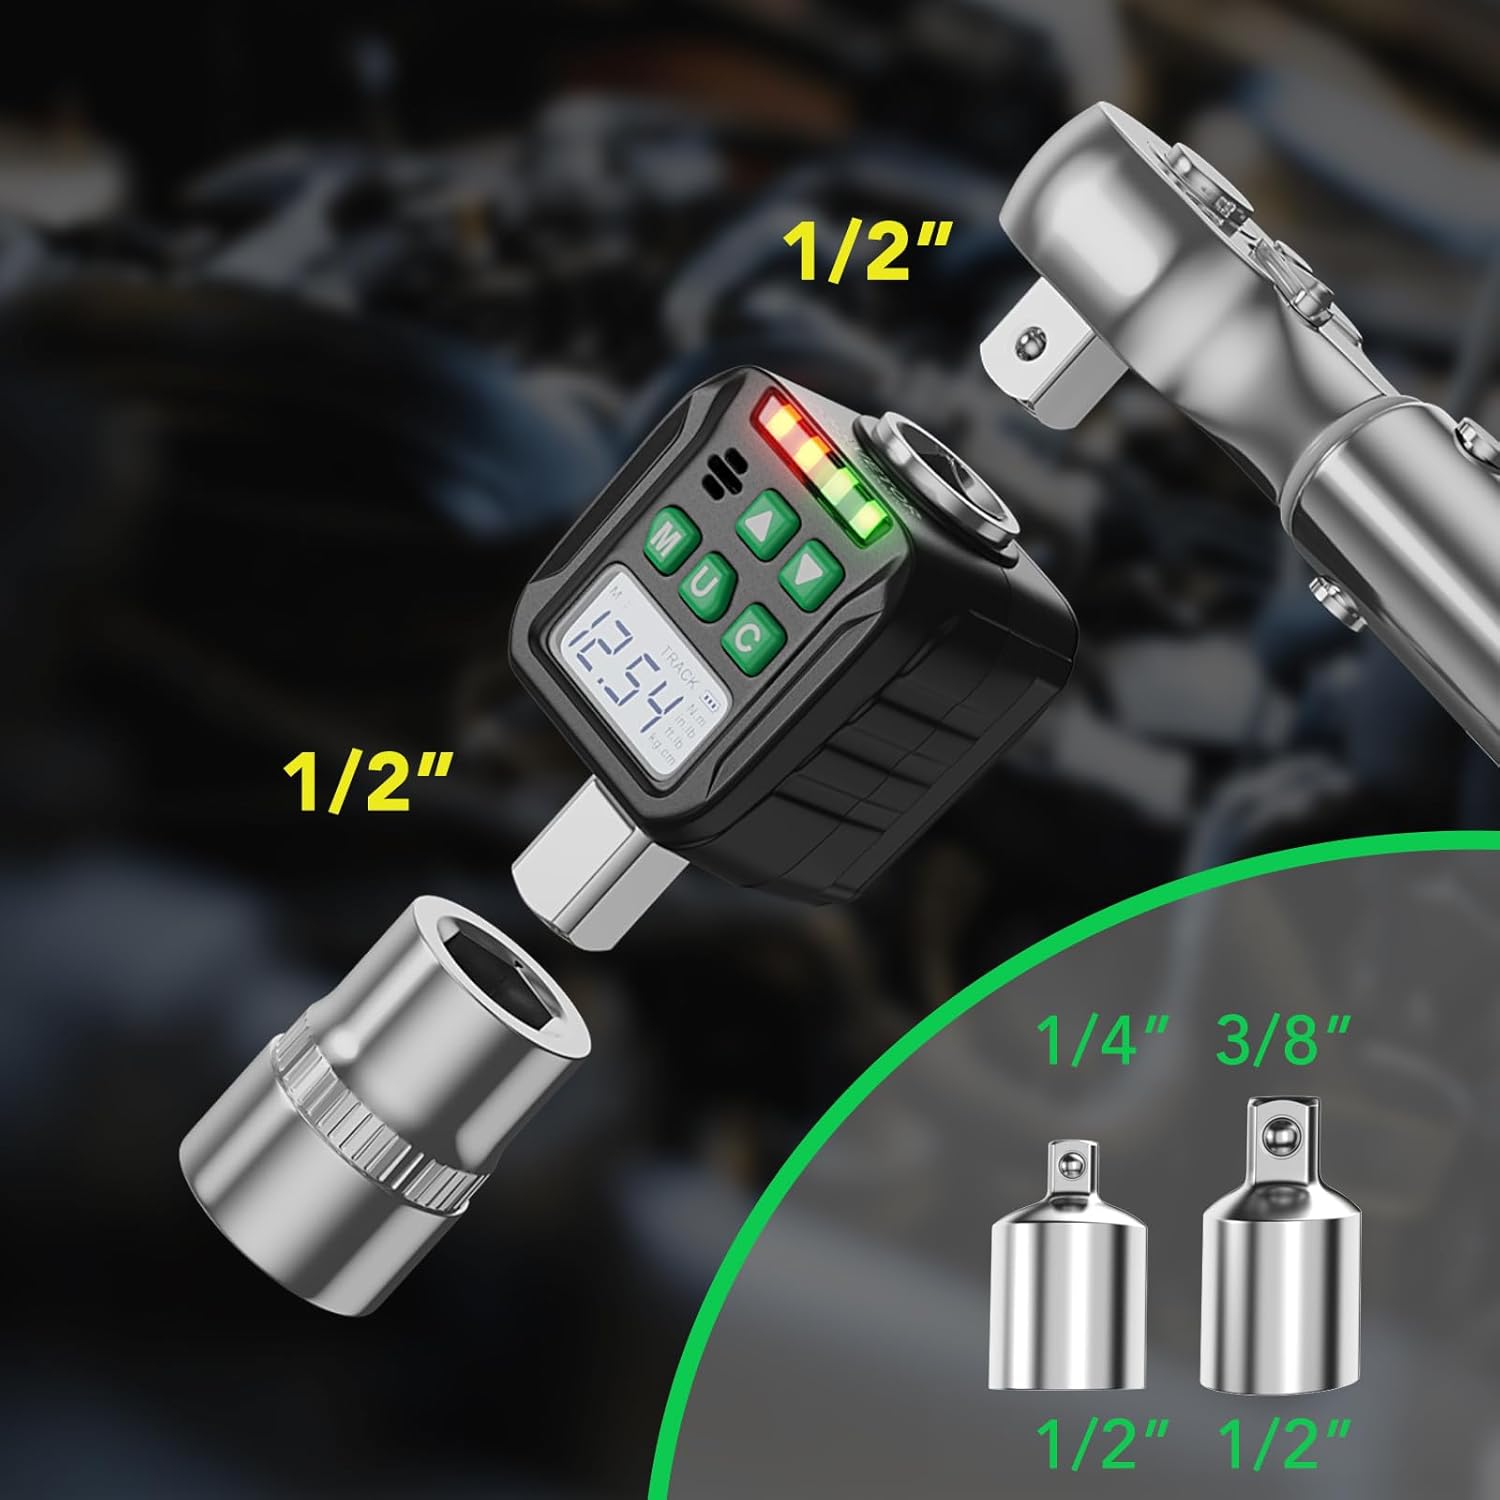
Image 2: Adapter Connections. This image illustrates how to connect the digital torque adapter to a ratchet and how to use the included 3/8" and 1/4" adapters for different socket sizes.
3. Stiùireadh Obrachaidh
3.1 Cumhachd air / dheth
- Brùth an M button to power on the device. The LED display will illuminate.
- Gus cumhachd a thoirt air falbh, brùth agus cùm grèim air an M button for 3 seconds. The device will also automatically power off after a period of inactivity to conserve battery.
3.2 Taghadh Aonad
The device supports four torque units: N.m, ft-lb, in-lb, and kg.cm.
- Brùth an U button to cycle through the available units. The selected unit will be displayed on the screen.

Image 3: Four Measurement Modes. This image displays the digital torque adapter's screen, highlighting the four selectable measurement units: Newton-meters (N.m), foot-pounds (ft-lb), inch-pounds (in-lb), and kilogram-centimeters (kg.cm).
3.3 Mode Selection (Track Mode / Peak Mode)
The adapter features two operating modes: Track Mode and Peak Mode.
- Gus atharrachadh eadar modhan, brùth is cum sìos am putan U button for 3 seconds. Use the Up (▲) and Down (▼) buttons to select the desired mode.
Modh Track
In Track Mode, the device displays the torque value in real-time as force is applied. This is useful for monitoring torque during tightening.
Modh as àirde
In Peak Mode, the device captures and displays the maximum torque value achieved during the tightening process. This value remains on the screen until reset or a higher peak is reached.

Image 4: Track and Peak Modes. This image illustrates the difference between Track Mode, which shows real-time torque, and Peak Mode, which displays the maximum torque applied.
3.4 Setting Target Torque (Preset Value Mode)
The device allows you to set a target torque value. When the applied torque approaches the target, the device will provide visual and audible alerts.
- Brùth an M button to enter the preset value setting mode.
- Use the Up (▲) and Down (▼) buttons to adjust the target torque value.
- Brùth an M brùth air a’ phutan a-rithist gus an suidheachadh a dhearbhadh agus a shàbhaladh.
The device can store up to 6 groups of preset values and 500 groups of stored data.

Image 5: Preset Values and Data Storage. This image highlights the device's ability to store 6 groups of preset torque values and up to 500 groups of measurement data.
3.5 Torque Application and Indication
As torque is applied, the LED indicator lights will illuminate, and a buzzer will sound to indicate proximity to the target torque.
- Solais Uaine: Indicate that the applied torque is approaching the target value.
- Solais Dheirg: Indicate that the target torque has been reached or exceeded.
- Buzzer: Sounds when the target torque is reached.

Image 6: LED Indicators and Buzzer. This image shows the digital torque adapter in use, with its LED indicator lights and an icon representing the audible buzzer, which alert the user when the target torque is reached.
3.6 Clockwise and Counter-Clockwise Torque
The adapter can measure torque in both clockwise and counter-clockwise directions with specified accuracy.

Image 7: Accuracy and Mode Switching. This image emphasizes the device's accuracy of ±3% and visually differentiates between Peak Mode and Track Mode displays, which can be switched by holding the 'U' button.
4. Cumail suas
4.1 Glanadh
- Sguab an inneal le clò bog, tioram. Na cleachd innealan-glanaidh sgrìobach no fuasglaidhean.
4.2 Stòradh
- Store the digital torque adapter in a dry place, away from direct sunlight and extreme temperatures.
- Thoir air falbh bataraidhean mura tèid an inneal a chleachdadh airson ùine mhòr gus casg a chur air aodion.
4.3 Calabradh
- For optimal accuracy, periodic calibration by a qualified technician is recommended.
5. A ’dèanamh trioblaid
5.1 Device does not power on
- Thoir sùil air stàladh agus polarachd a’ bhataraidh.
- Cuir bataraidhean AA ùra nan àite.
5.2 Inaccurate readings
- Ensure the adapter is securely attached to the ratchet and socket.
- Verify the correct unit of measurement is selected.
- Smaoinich air calibrachadh proifeasanta ma mhaireas na duilgheadasan.
5.3 Display is dim or unreadable
- Cuir bataraidhean an àite.
- Dèan cinnteach nach eil an inneal fosgailte do theodhachd anabarrach.
6. Sònrachaidhean
| Feart | Mion-fhiosrachadh |
|---|---|
| Modail | LDTA |
| Meud Drive | 1/2 inch (includes 3/8" and 1/4" adapters) |
| Raon Torque | 10-200 Nm (7.38-147.5 Ft-lb) |
| Cruinneas | ±2% Clockwise, ±3% Counter-clockwise |
| Aonadan Torque | N.m, ft-lb, in-lb, kg.cm |
| Taisbeanadh | Backlight LED |
| Stòradh Dàta | 500 buidheann |
| Preset Values | 6 buidheann |
| Stòr cumhachd | 2 x Bataraidh AA |
| Stuth | Iarann |
| Dath | Chrome |
| Modh obrachaidh | Mechanical (Digital Readout) |
Nota: Faodaidh mion-chomharrachaidhean atharrachadh gun rabhadh.
7. Barantas agus Taic
7.1 Fiosrachadh Barantais
This product is covered by a standard manufacturer's warranty against defects in materials and workmanship. Please refer to the packaging or contact LLAVETOR customer service for specific warranty terms and duration.
7.2 Taic teachdaiche
For technical assistance, troubleshooting, or warranty claims, please contact LLAVETOR customer support.
Visit the official LLAVETOR weblàrach-lìn airson fiosrachadh conaltraidh agus goireasan a bharrachd.