Vetroo AL800
Vetroo AL800 Mid Tower ATX PC Computer Case
Leabhar-làimhe stiùiridh
Ro-ràdh
This manual provides detailed instructions for the assembly, operation, and maintenance of your Vetroo AL800 Mid Tower ATX PC Computer Case. Please read this manual thoroughly before beginning installation to ensure proper setup and optimal performance.

Figure 1: Vetroo AL800 Mid Tower ATX PC Computer Case (Black)
Fiosrachadh Sàbhailteachd
- Dì-cheangail an solar cumhachd bhon t-socaid balla an-còmhnaidh mus cuir thu a-steach no mus toir thu air falbh co-phàirtean sam bith.
- Handle components with care to avoid damage from electrostatic discharge. Consider using an anti-static wrist strap.
- Keep the case and components away from liquids and excessive humidity.
- Dèan cinnteach gu bheil fionnarachadh ceart ann gus casg a chuir air cus teasachadh.
- Na feuch ri atharrachadh a dhèanamh air a’ chùis no air na pàirtean aice, oir dh’ fhaodadh seo do bharantas a dhèanamh neo-dhligheach agus cunnartan sàbhailteachd adhbhrachadh.
Susbaint pacaid
Dèan cinnteach gu bheil a h-uile nì anns a’ phacaid:
- Vetroo AL800 Mid Tower ATX PC Computer Case
- Bogsa Goireasan (sgriuban, seasamh-offs, ceanglaichean càbaill)
- Pre-installed 1x 120mm PWM/ARGB Fan (rear)
- Leabhar-làimhe cleachdaiche (an sgrìobhainn seo)
Prìomh fheartan
- ARGB LED Strip: Integrated LED lighting and ARGB case fans can be synchronized with compatible motherboards via a 5V 3-pin interface.
- Door Opening Design: Features a 4mm thick tempered glass side panel with a convenient door-opening mechanism for easy access to internal components.
- High Performance Airflow: A mesh front panel and strategically placed dust filters ensure optimal airflow and system cooling.
- Co-fhreagarrachd farsaing: Supports ATX, M-ATX, and ITX motherboards. Accommodates GPUs up to 340mm in length and CPU coolers up to 165mm in height.
- Taic fuarachaidh leaghaidh: Front panel supports up to a 360mm liquid cooling radiator.
- Taic Fan: Supports up to 8 x 120mm fans.
- Stiùireadh càball sìmplidh: Includes two soft silicone cord grommets for organized cable routing.
- Powerful I/O Panel: Features 1x USB 3.2 Type-C port, 2x USB 3.0 ports, and a combined microphone/headphone jack.
Stàladh agus stàladh
1. Ullachadh Coitcheann
- Cuir a’ chùis air uachdar rèidh, seasmhach.
- Open the tempered glass side panel by gently pulling it open. It is hinged for easy access.
- Remove the tempered glass panel if necessary for easier installation by lifting it off its hinges once open.

Figure 2: Tempered Glass Door Opening Design
2. Stàladh motherboard
- Stàlaich an sgiath I/O (mas e iomchaidh) a-steach do fhosgladh cùil a’ chùis.
- Align your ATX, M-ATX, or ITX motherboard with the pre-installed standoffs.
- Daingnich am bòrd-màthar le bhith a’ cleachdadh nan sgriothan a tha air an toirt seachad bhon bhogsa ghoireasan.
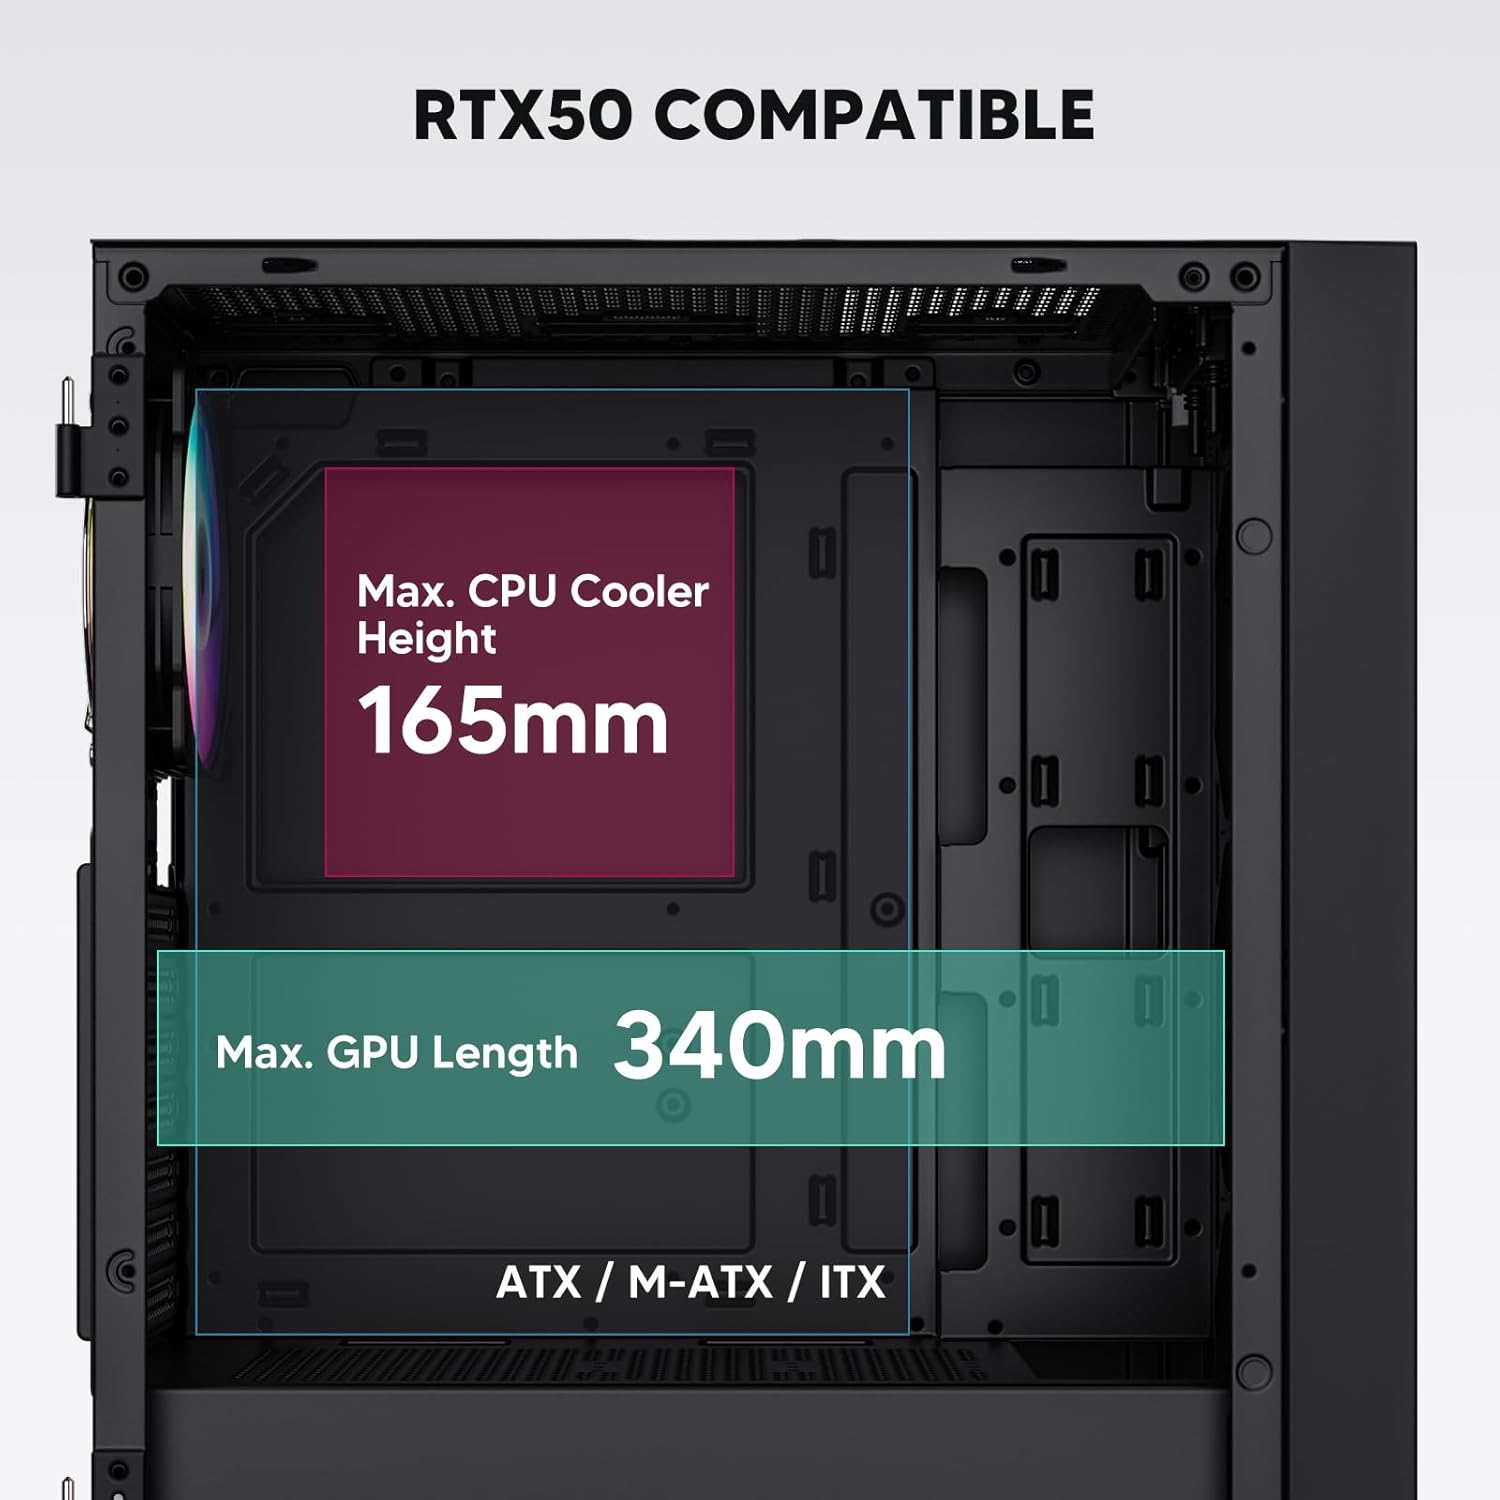
Figure 3: Motherboard and Component Clearance (Max CPU Cooler Height 165mm, Max GPU Length 340mm)
3. Stàladh Inneal Stòraidh (HDD/SSD)
- Locate the dedicated mounting points for SSDs and HDDs.
- Install 2.5" SSDs onto the SSD trays or mounting brackets.
- Install 3.5" HDDs into the drive cage located at the bottom of the case.
- Secure all drives with the appropriate screws.

Figure 4: Internal Layout with Drive Bay Locations (SSD, HDD, Power Supply)
4. Stàladh Solarachadh Cumhachd
- Mount your power supply unit (PSU) in the dedicated compartment at the bottom rear of the case.
- Ensure the PSU fan faces downwards (if the case has a bottom vent) or upwards, depending on your cooling preference.
- Secure the PSU with screws from the rear of the case. The case supports PSUs up to 200mm in length.
5. Stàladh Cairt Leudachaidh (GPU)
- Thoir air falbh na còmhdaichean slot PCI-E riatanach bho chùl a’ chùis.
- Cuir a-steach do chairt grafaiceachd no cairtean leudachaidh eile a-steach do shliotan PCI-E a’ bhùird-mhàthar.
- Secure the cards with screws. The case supports GPUs up to 340mm in length.
6. Cooling System Installation (Fans/Radiators)
- The case comes with one pre-installed 120mm PWM/ARGB fan at the rear.
- Additional fans (120mm or 140mm) can be installed at the front, top, and bottom.
- Liquid cooling radiators up to 360mm can be installed at the front, and up to 240mm at the top.
- Refer to the diagram for supported fan and radiator configurations.

Figure 5: Fan and Liquid Radiator Support Diagram
7. Ceanglaichean Pannal Aghaidh
- Connect the front panel cables (Power, Reset, USB 3.0, USB Type-C, HD Audio) to the corresponding headers on your motherboard.
- Consult your motherboard manual for the exact pin layout of these headers.
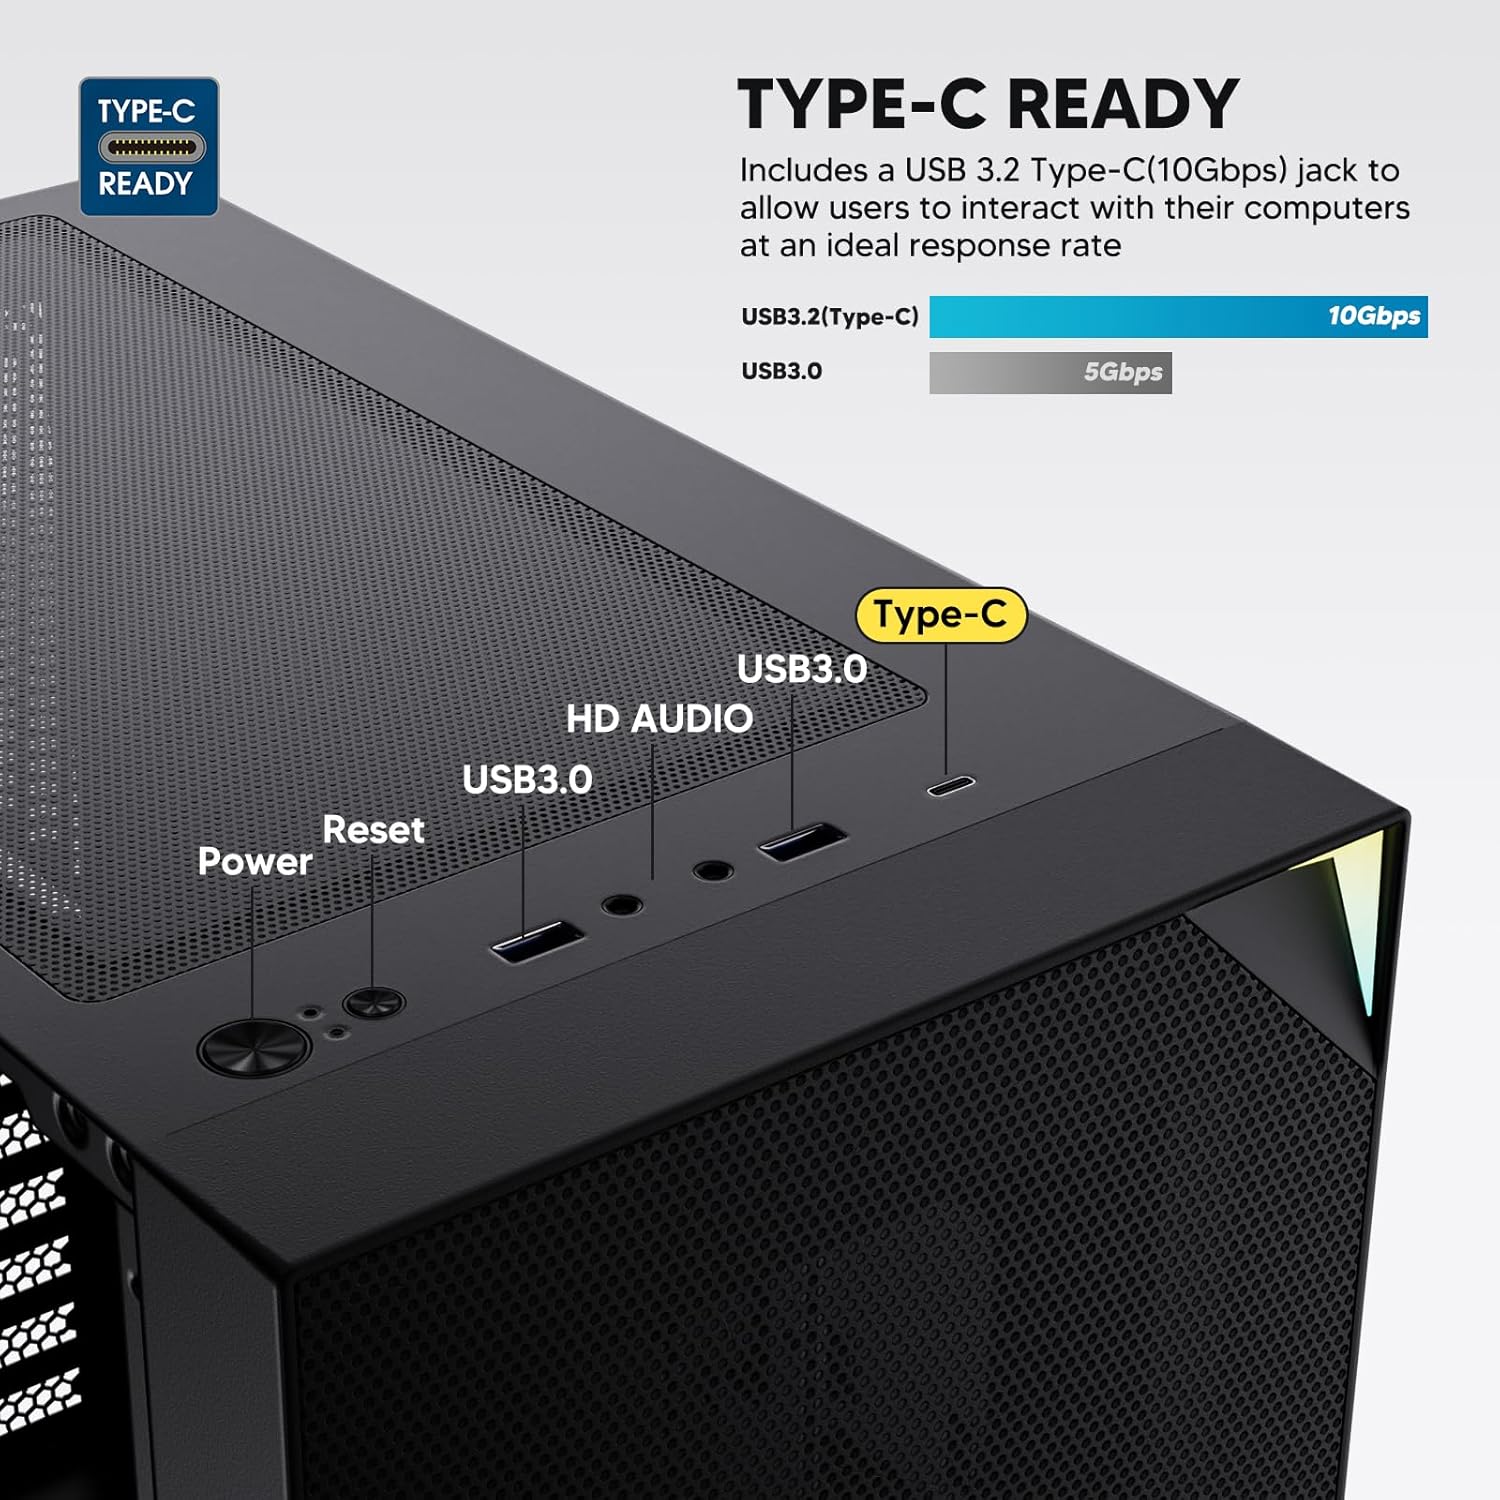
Figure 6: Top I/O Panel Connections
8. ARGB and PWM Connections
- The pre-installed fan and ARGB LED strip require connection to your motherboard.
- Connect the 4-pin PWM connector from the fan to a compatible fan header on your motherboard for speed control.
- Connect the 3-pin ARGB connector from the fan and LED strip to a 5V 3-pin ARGB header on your motherboard for lighting synchronization. Na ceangail ri ceann-loidhne RGB 12V, oir nì seo cron air na LEDs.
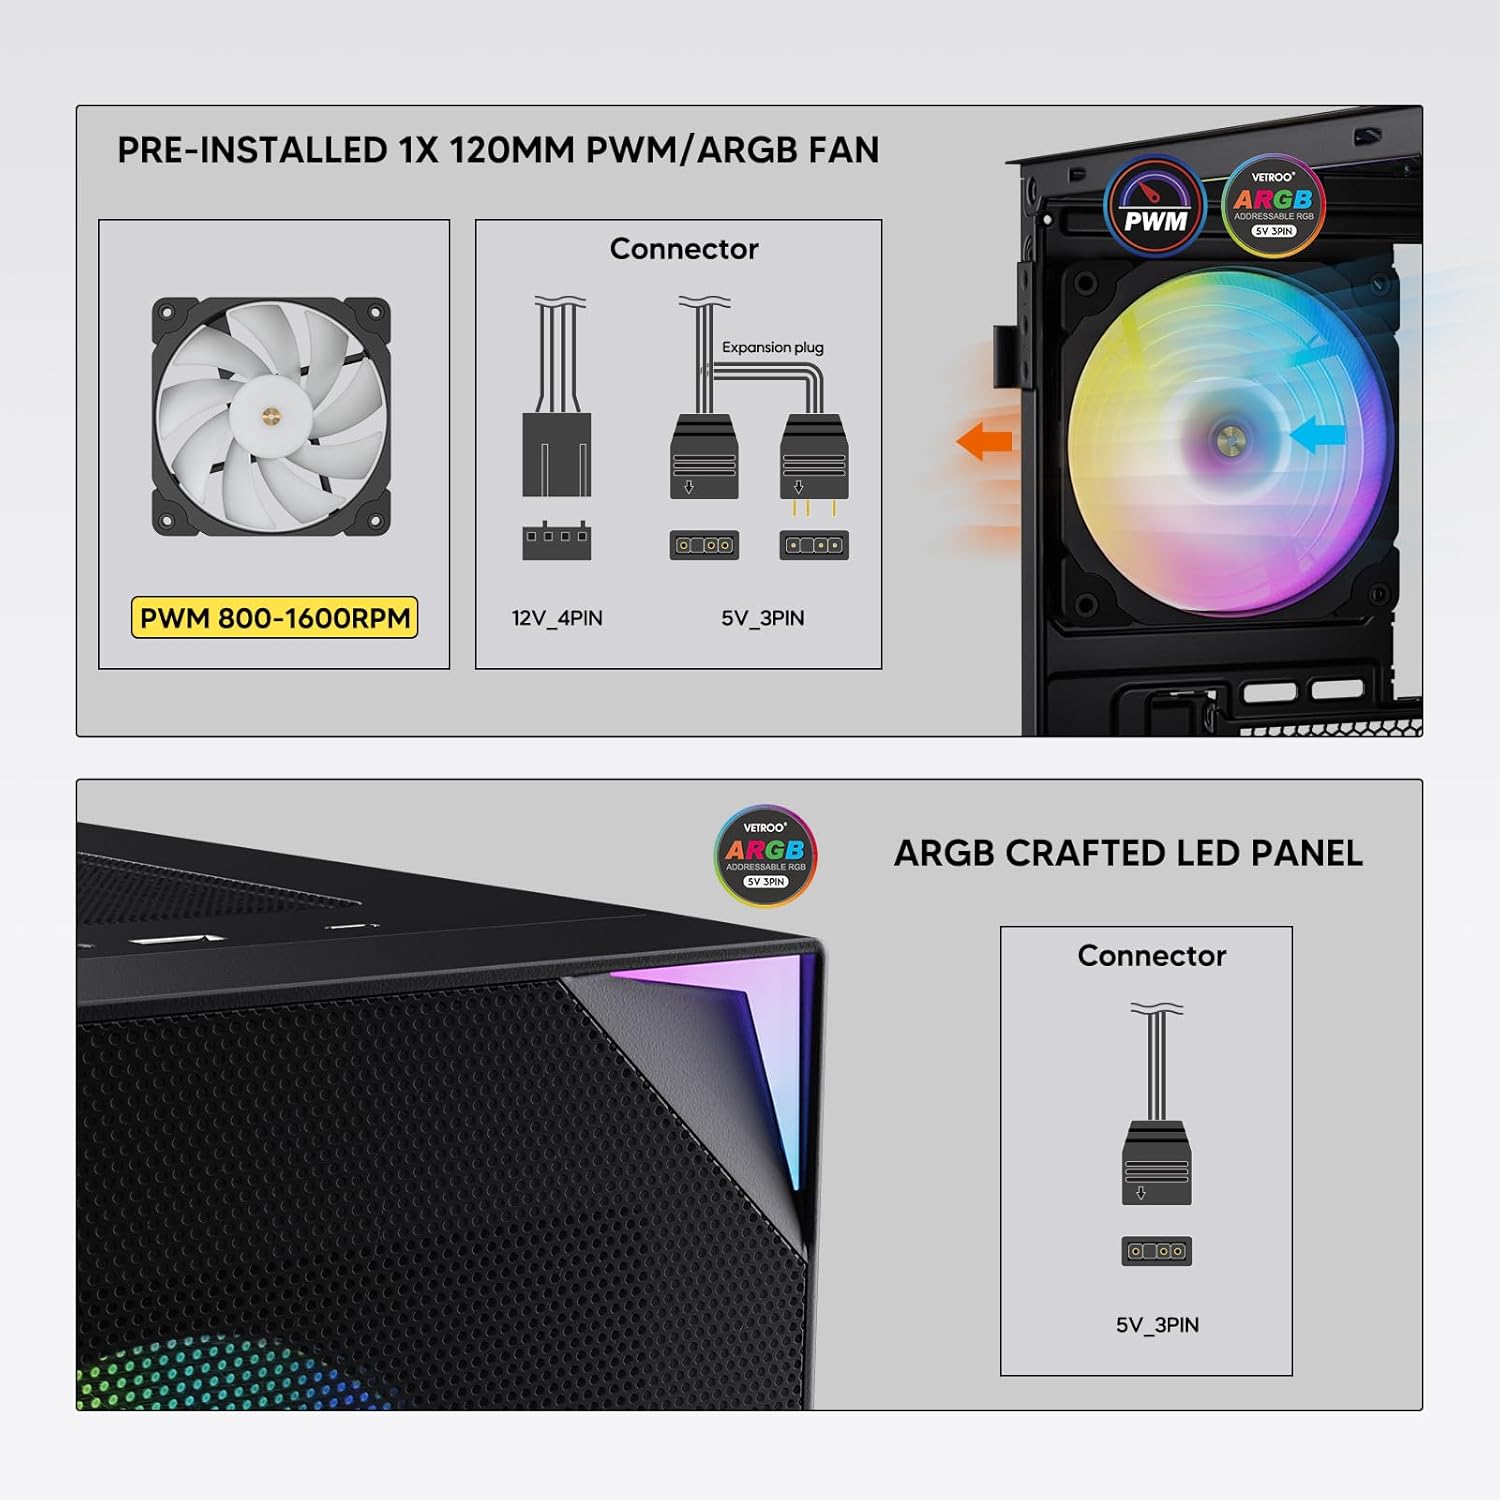
Figure 7: PWM and ARGB Connector Details
9. Riaghladh càball
- Utilize the cable routing cutouts and tie-down points behind the motherboard tray to organize cables.
- The soft silicone grommets help protect cables and provide a clean look.
- Proper cable management improves airflow and aesthetics.
Obrachaidh
1. A’ chiad chumhachd air
- After all components are securely installed and cables connected, close the tempered glass side panel.
- Ceangail do monitor, meur-chlàr, luchag agus càball cumhachd ris a’ PC.
- Tionndaidh an suidse cumhachd air an PSU agad chun t-suidheachaidh ‘ON’.
- Press the power button on the top I/O panel of the case to start your system.
2. Smachd Solais ARGB
- If connected to a compatible motherboard's 5V 3-pin ARGB header, the lighting of the pre-installed fan and LED strip can be controlled via your motherboard's RGB software (e.g., ASUS Aura Sync, MSI Mystic Light Sync, Gigabyte RGB Fusion, ASRock Polychrome Sync).
- Refer to your motherboard's manual for specific instructions on using its ARGB control software.
3. Airflow Management
- The mesh front panel is designed for optimal air intake.
- Ensure that intake fans (typically front and bottom) and exhaust fans (typically rear and top) are configured to create positive or neutral air pressure for efficient cooling and dust prevention.

Figure 8: Airflow Diagram with Dust Filters
Cumail suas
1. Glanadh Criathrag Duslach
- The case is equipped with dust filters on the top and bottom panels.
- Regularly check and clean these filters to maintain optimal airflow and prevent dust buildup inside the system.
- Gently remove the magnetic dust filters and clean them with compressed air or by rinsing with water (ensure they are completely dry before re-installation).
2. Tempered Glass Panel Care
- Glan am pannal glainne tempered le clò bog, gun lint agus inneal-glanaidh glainne neo-sgrìobach.
- Seachain ceimigean cruaidh no stuthan sgrìobach a dh’ fhaodadh sgrìobadh no milleadh a dhèanamh air a’ ghlainne.
Fuasgladh thrioblaidean
- Chan eil an siostam a’ dol air:
- Dèan cinnteach gu bheil an càball cumhachd ceangailte gu tèarainte ris an PSU agus ris a’ bhalla.
- Dèan cinnteach gu bheil suidse an PSU san t-suidheachadh 'ON'.
- Check that the front panel power button cable is correctly connected to the motherboard header.
- Confirm all power cables (24-pin ATX, CPU, GPU) are properly seated in the motherboard and components.
- Luchd-leantainn gun a bhith a’ snìomh / ARGB gun a bhith a’ lasadh suas:
- Check that the fan's PWM connector is securely plugged into a motherboard fan header.
- Verify the ARGB 3-pin connector is correctly attached to a 5V 3-pin ARGB header on the motherboard (not 12V RGB).
- Ensure your motherboard's ARGB software is installed and configured correctly.
- Puirt USB nach eil ag obair:
- Confirm the USB 3.0 and USB Type-C front panel cables are correctly connected to their respective motherboard headers.
- Check your motherboard manual for correct header locations.
- For other component-specific issues, refer to the instruction manuals for your motherboard, CPU, GPU, and other installed hardware.
Sònrachaidhean
| Brand | Vetroo |
| Ainm Modail | AL800 |
| Àireamh Modail Nì | VT-CASE-AL800-BK (FBA) |
| Seòrsa cùise | Tùr Meadhanach |
| Co-fhreagarrachd motherboard | ATX, M-ATX, ITX |
| Dath | Dubh |
| Stuth | Meatailt, Glainne Tempered |
| Cuideam nì | 12.37 notaichean (timcheall air 5.61 kg) |
| Meudan toraidh (LxWxH) | 18.4 x 8.6 x 17.9 òirleach (timcheall air 46.7 x 21.8 x 45.5 cm) |
| Fad GPU Max | 340 mm |
| Àirde nas fhuaire CPU | 165 mm |
| Fad PSU Max | 200 mm |
| Puirt aghaidh I / O. | 1x USB 3.2 Type-C, 2x USB 3.0, HD Audio (Mic/Headphone), Power, Reset |
| Taic Fan | Front: 3x 120mm or 2x 140mm; Top: 2x 120mm or 2x 140mm; Rear: 1x 120mm; Bottom: 2x 120mm |
| Taic Radiator | Front: 120/140/240/280/360mm; Top: 120/140/240mm; Rear: 120mm |
| Fans ro-stàlaichte | 1x 120mm PWM/ARGB (Rear) |
Barantas agus Taic
For warranty information, technical support, or to inquire about replacement parts, please visit the official Vetroo weblàrach-lìn no cuir fios chun t-seirbheis teachdaiche aca gu dìreach. Cùm dearbhadh do cheannach airson tagraidhean barantais.
Official Vetroo Store: Vetroo Amazon Store
Ask a question about this manual
Ask about setup, troubleshooting, compatibility, parts, safety, or missing instructions. Manuals+ will review the question and use this page’s manual context to help answer it.