DOOMAY 5293B
DOOMAY Digital Alarm Clock Instruction Manual
Modail: 5293B
Brand: DOOMAY
1. Ro-ràdh
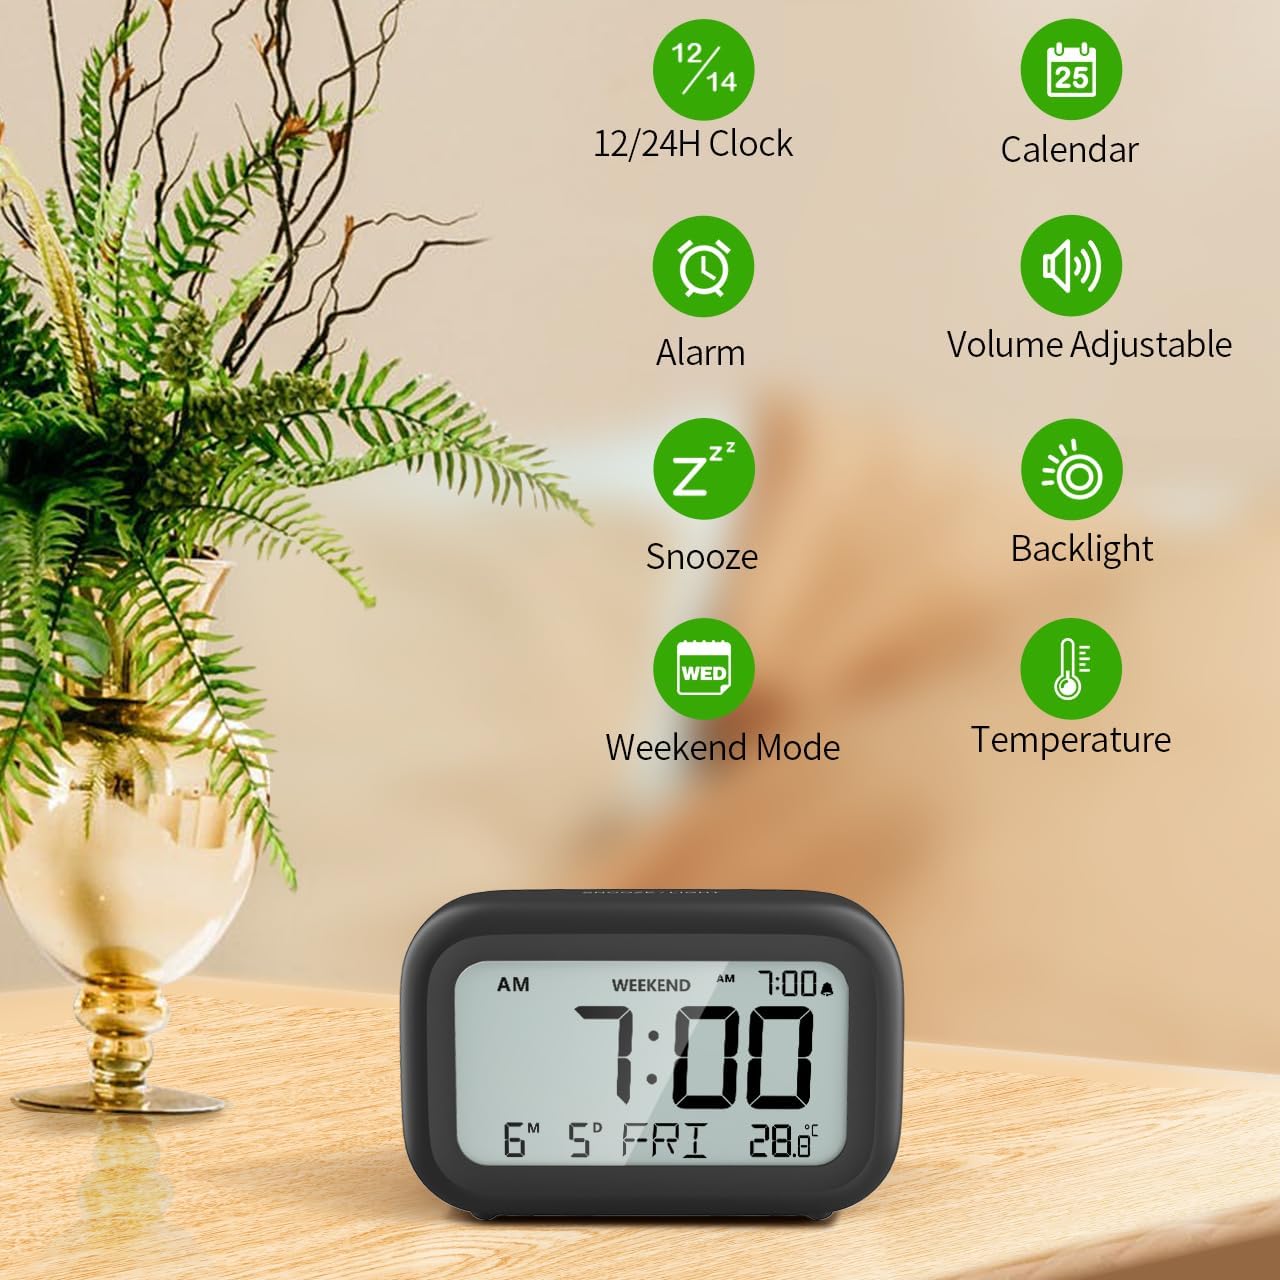
Thank you for choosing the DOOMAY Digital Alarm Clock. This compact and modern alarm clock is designed for convenience and reliability, featuring an LCD display, adjustable volume, snooze function, weekend mode, and indoor temperature display. This manual provides detailed instructions to help you set up and operate your new alarm clock effectively.

Figear 1: Aghaidh view of the DOOMAY Digital Alarm Clock.
2. Pasgan-susbaint
- DOOMAY Digital Alarm Clock (1 unit)
- Bataraidhean AAA (2 aonad)
- Leabhar-làimhe Stiùiridh (An sgrìobhainn seo)
3. Suidhich
3.1 Stàladh bataraidh
The DOOMAY Digital Alarm Clock is powered by two AAA batteries. These batteries are included in the package.
- Lorg còmhdach roinn a’ bhataraidh air cùl a’ chloc-rabhaidh.
- Sleamhnaich an còmhdach sìos gus an roinn fhosgladh.
- Cuir a-steach dà bataraidh AAA, a’ dèanamh cinnteach gu bheil am polarachd cheart (+ agus -) mar a tha air a chomharrachadh taobh a-staigh a’ bhataraidh.
- Cuir còmhdach roinn a’ bhataraidh air ais le bhith ga shleamhnadh suas gus an cliog e na àite.

Figear 2: Air ais view with battery compartment and control buttons.
Thoir an aire: When the display flashes '8888' and the clock beeps, it indicates that the batteries are low and need to be replaced.
4. Stiùireadh Obrachaidh
The DOOMAY Digital Alarm Clock offers various functions for timekeeping, alarming, and environmental monitoring. Refer to the buttons on the back of the clock for settings.
Figear 3: Os a chionnview of clock features.
4.1 Suidheachadh Ùine is Ceann-latha
Gus an t-àm agus an ceann-latha làithreach a shuidheachadh:
- Brùth agus cùm an SET button (usually represented by a clock icon or '12/24H' button) on the back of the clock until the numbers on the display begin to flash.
- Cleachd an + agus - buttons to adjust the flashing value (Year, Month, Day, Hour, Minute).
- Brùth an SET button again to confirm the setting and move to the next value.
- Once all values are set, the display will stop flashing. The day of the week will automatically update based on the date.
For a visual guide, refer to the video below, specifically from 0:18 for Date Setting agus 0:32 for Time Setting.
4.2 Suidheachadh rabhaidh
To set your alarm time:
- Brùth an ALARM button (bell icon) on the back of the clock. The alarm time will appear and flash.
- Cleachd an + agus - buttons to adjust the desired alarm hour and minute.
- Brùth an ALARM button again to confirm the alarm setting.
- To turn the alarm ON or OFF, simply press the ALARM button once. An alarm icon will appear on the display when the alarm is active.
For a visual guide, refer to the video below, specifically from 0:13 for turning alarm ON/OFF agus 0:37 for Alarm Setting.
4.3 Gnìomh Snooze
When the alarm sounds, gently touch the SNOOZE / SOLAS button located on the top of the clock. This will activate the snooze function, providing an additional 9 minutes of sleep before the alarm sounds again. You can repeat this process multiple times.

Figear 4: A’ cur an gnìomh an gnìomh snooze.
To turn off the alarm completely after it sounds, press any button on the back of the clock.
For a visual guide, refer to the video below, specifically from 0:46 for Snooze function.
4.4 Modh Deireadh-sheachdain
The Weekend Mode allows you to set the alarm to only sound from Monday to Friday, preventing it from disturbing you on weekends.
- Brùth an CEANN-LATHA button (calendar icon) on the back of the clock to toggle Weekend Mode ON or OFF.
- When Weekend Mode is active, 'WEEKEND' will be displayed on the screen, and the alarm will be automatically disabled on Saturday and Sunday.

Figure 5: Weekend Mode and Alarm Volume Levels.
For a visual guide, refer to the video below, specifically from 0:50 for Weekend Mode ON/OFF.
4.5 Gnìomh Solais-cùil
The clock features a convenient 5-second on-demand backlight for viewing the time in low-light conditions.
- Simply touch the SNOOZE / SOLAS button on the top of the clock to activate the backlight.
- The backlight will illuminate for approximately 5 seconds and then automatically turn off to conserve battery life.

Figure 6: Backlight in use.
For a visual guide, refer to the video below, specifically from 0:54 for 5 Seconds Backlight.
4.6 Taisbeanadh Teòthachd
The clock displays the indoor temperature. You can switch between Celsius (°C) and Fahrenheit (°F) units.
- Brùth an ° C / ° F button on the back of the clock to toggle between Celsius and Fahrenheit.

Figure 7: Indoor Temperature Display.
4.7 12/24 Hour Time Format
You can switch the time display between 12-hour (with AM/PM indicator) and 24-hour formats.
- Brùth an 12/24h button on the back of the clock to switch between the two formats.
For a visual guide, refer to the video below, specifically from 0:58 for 12/24Hr Time Format Switchable.
4.8 Alarm Volume Adjustment
The alarm clock offers two volume levels for the alarm sound: LOW (70dB) and HIGH (85dB).
- While setting the alarm, or when the alarm is sounding, you can cycle through the volume levels by pressing the appropriate button (often the + or - button, or a dedicated volume button if available). Refer to the icons on the back of your clock.
For a visual guide, refer to the video below, specifically from 0:42 for 2 Levels of Volume Adjustable.
Operating Instructions Video Guide
Video 1: Comprehensive guide on setting up and operating the DOOMAY Digital Alarm Clock. This video demonstrates battery installation, setting time and date, alarm functions, snooze, weekend mode, backlight, and volume adjustment.
5. Cumail suas
- Glanadh: Sguab an gleoc le clò bog, tioram. Na cleachd innealan-glanaidh sgrìobach no fuasglaidhean.
- Ath-nuadhachadh bataraidh: Replace batteries when the low battery indicator appears (flashing '8888' and beeping). Always use new AAA batteries.
- Stòradh: Ma bhios tu a’ stòradh a’ ghleoc airson ùine mhòr, thoir a-mach na bataraidhean gus casg a chur air aodion.
6. A ’dèanamh trioblaid
| Trioblaid | Adhbhar a dh’fhaodadh a bhith ann | Fuasgladh |
|---|---|---|
| Tha taisbeanadh a’ chloca bàn no dorcha. | Tha bataraidhean marbh no air an stàladh gu ceàrr. | Cuir bataraidhean AAA ùra nan àite, a’ dèanamh cinnteach gu bheil am polarachd cheart. |
| Chan eil an inneal-rabhaidh a’ fuaimeachadh. | Alarm is not activated or Weekend Mode is ON. | Press the ALARM button to activate. Check if Weekend Mode is active and disable if necessary. |
| Tha an t-àm/ceann-latha ceàrr. | Not set correctly or batteries were removed. | Follow instructions in Section 4.1 to reset time and date. |
| Backlight does not stay on. | Is e obrachadh àbhaisteach a tha seo. | The backlight is designed to illuminate for 5 seconds to conserve battery life. It is not a continuous backlight. |
7. Sònrachaidhean
- Modail: 5293B
- Seòrsa taisbeanaidh: LCD didseatach
- Stòr cumhachd: 2 x Bataraidhean AAA (Air a ghabhail a-steach)
- Meudan toraidh: 4.29"W x 2.72"H (approx. 10.9cm x 6.9cm)
- Stuth: Styrene acrylonitrile butadiene (ABS)
- Feartan: Alarm, Snooze, Weekend Mode, Indoor Temperature (°C/°F), 12/24H Time Format, 5-second Backlight
- Meud an rabhaidh: 2 levels (70dB, 85dB)
- Cuideam nì: 4.48 unnsa (timcheall air 127g)
8. Barantas agus Taic
DOOMAY products are manufactured with high-quality materials and craftsmanship. For any questions, concerns, or technical support regarding your DOOMAY Digital Alarm Clock, please contact the seller or refer to the product listing on the platform where it was purchased. Please retain your proof of purchase for warranty claims.
Ask a question about this manual
Ask about setup, troubleshooting, compatibility, parts, safety, or missing instructions. Manuals+ will review the question and use this page’s manual context to help answer it.