1. Ro-ràdh
Tapadh leibh airson ceannachasing the Technics SL-1200MK7 Direct Drive Turntable. This manual provides essential information for the proper setup, operation, and maintenance of your new turntable. Please read this manual thoroughly before using the product to ensure optimal performance and longevity.
The Technics SL-1200MK7 is engineered for precision and durability, offering a high-quality audio experience for both professional DJs and audiophiles. Its robust construction and advanced features make it a reliable choice for vinyl playback.
2. Fiosrachadh Sàbhailteachd
Gus casg a chur air clisgeadh dealain, teine no milleadh air an aonad, feuch an lean thu na ceumannan sàbhailteachd a leanas:
- Na cuir an aonad seo fo uisge no taiseachd.
- Na toir air falbh an còmhdach. Thoir an aire do luchd-obrach teisteanasach a-mhàin airson an obair-chàraidh.
- Na cuir stuthan làn de lioftaichean, leithid vasaichean, air an aonad.
- Dèan cinnteach gu bheil fionnarachadh ceart ann. Na cuir bacadh air fosglaidhean fionnarachaidh.
- Cleachd an solar cumhachd a tha air a shònrachadh airson an aonaid seo a-mhàin.
- Disconnect the power plug from the wall outlet if the unit will not be used for a long period.
- Seachain an aonad a chur ann an solas dìreach na grèine no faisg air stòran teas.
3. Stiùirich rèiteachaidh
3.1 A’ fosgladh agus na pàirtean a tha air an toirt a-steach
Thoir a h-uile pàirt a-mach às a’ phacaid gu faiceallach. Dèan cinnteach gu bheil na nithean a leanas an làthair:
- Technics SL-1200MK7 Turntable Unit
- Lid (Dust Cover)
- Càball cumhachd
- RCA Signal Cable
- Platter
- Slipmat
- Frith-chuideam
- Headshell with Cartridge (may be sold separately)
- Adaptair 45 RPM
3.2 Suidheachadh
Place the turntable on a stable, level surface, away from direct sunlight, heat sources, and strong magnetic fields. Ensure there is adequate space around the unit for ventilation and cable connections. Avoid placing it near speakers to minimize vibrations that could affect playback quality.

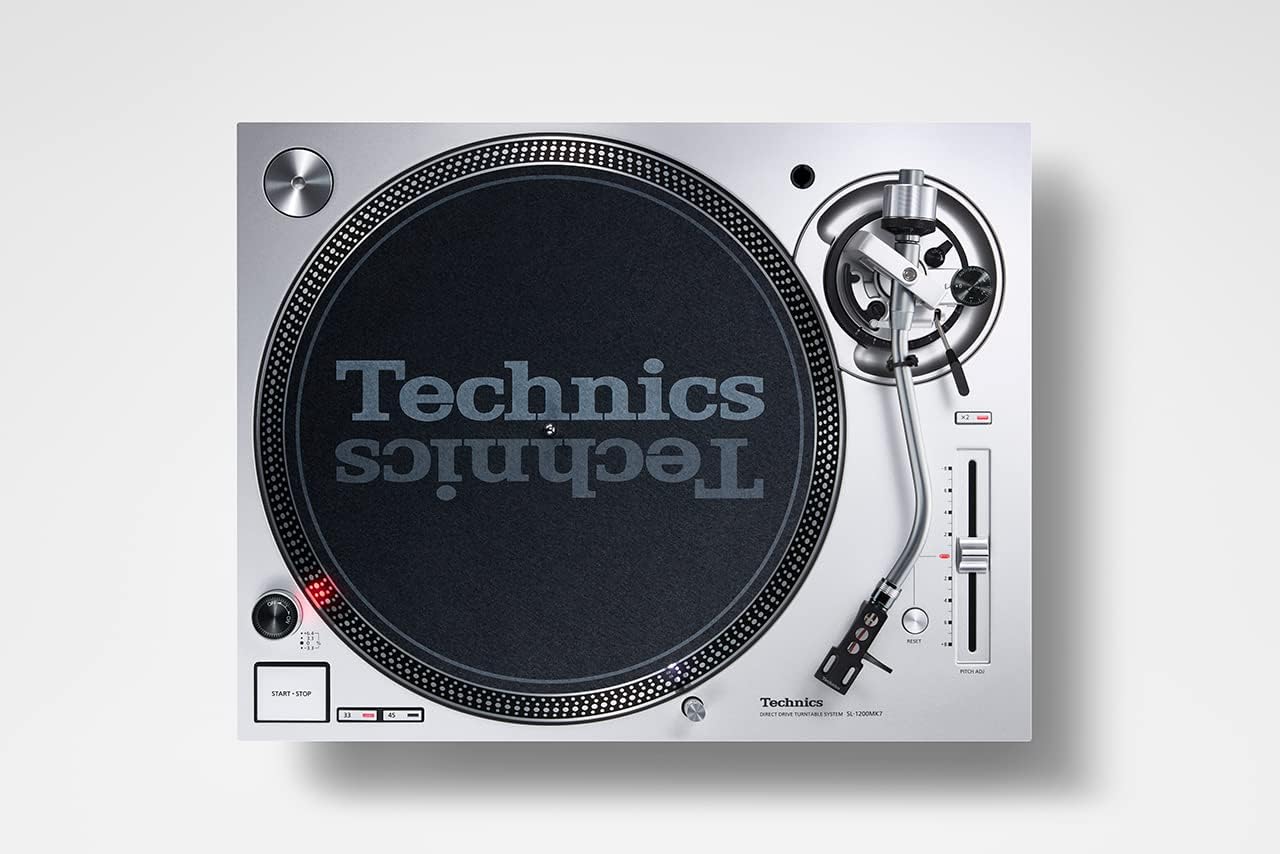
Figear 3.2.1: Prìomh view of the Technics SL-1200MK7 Turntable, showcasing its sleek grey finish and classic design. This image provides an overview of the unit's primary components.
3.3 Seanadh
- Stàladh a’ phlàta: Carefully place the platter onto the spindle. Ensure it sits flush and rotates freely.
- Slipmat Placement: Cuir am mata-slip a tha air a ghabhail a-steach air mullach a’ phlàta.
- Còmhdach dust: Attach the dust cover to the hinges at the rear of the unit.
- Cartridge and Headshell: If not pre-installed, attach your preferred cartridge to the headshell. Ensure the stylus is protected during installation.
- Tonearm Balance: Mount the headshell onto the tonearm. Adjust the counterweight until the tonearm is balanced and floats horizontally.
- Feachd tracadh: Set the tracking force according to your cartridge manufacturer's specifications using the tonearm's tracking force dial.
- Anti-sgait: Adjust the anti-skate dial to match the tracking force setting.
Figear 3.3.1: Suas gu h-àrd view of the Technics SL-1200MK7, highlighting the platter, tonearm, and control layout. This perspective is useful for understanding component placement during assembly.
3.4 Ceanglaichean
- Toradh RCA: Connect the supplied RCA signal cable from the turntable's RCA output jacks to the PHONO input of your ampliifier no phono roamplifier. Ensure correct left (white) and right (red) channel connections.
- Uèir talmhainn: Ceangail an uèir talmhainn bhon chlàr-tionndaidh ris an teirminéal talmhainn air do ampliifier no phono roamplifier gus hum a lughdachadh.
- Cumhachd: Connect the power cable to the turntable and then to a suitable wall outlet.

Figear 3.4.1: Taobh view of the Technics SL-1200MK7, illustrating its sturdy base and adjustable feet. This view helps in understanding the unit's profile and stability features.
4. Stiùireadh Obrachaidh
4.1 A’ cur cumhachd air/dheth
To power on the turntable, rotate the power switch/strobe illuminator knob clockwise. The strobe light will illuminate. To power off, rotate the knob counter-clockwise until it clicks off.
4.2 A’ cluich clàr
- Cuir clàr air a’ chlàr.
- Select the appropriate speed (33 ⅓, 45, or 78 RPM) using the speed selector buttons. For 78 RPM, refer to the advanced settings in the full manual.
- Brùth air a’ phutan START/STOP gus tòiseachadh air cuairteachadh a’ phlàta.
- Tog a’ ghàirdean-tòin gu socair a’ cleachdadh luamhan a’ chiù.
- Position the tonearm over the desired groove of the record.
- Leig às luamhan a’ chiù mean air mhean gus leigeil leis an stoidhle a dhol sìos air a’ chlàr.
- To stop playback, lift the tonearm using the cueing lever and return it to the tonearm rest. Press the START/STOP button to stop the platter.
4.3 Pitch Control
The SL-1200MK7 features a pitch control slider to adjust the playback speed. Move the slider up or down to increase or decrease the speed. The RESET button instantly returns the pitch to 0%.
5. Cumail suas
5.1 Glanadh
- Còmhdach dust: Sguab le clò bog, tioram. Airson comharran stòlda, cleachd clò beagan tioram.amp clò agus inneal-glanaidh tlàth, an uairsin tiormaich gu mionaideach.
- Platter and Chassis: Use a soft, lint-free cloth. Avoid abrasive cleaners.
- Stylus: Use a dedicated stylus brush or cleaner. Always brush from back to front.
5.2 Ath-chur Stoidhle
The stylus is a delicate component and wears over time. Replace it according to your cartridge manufacturer's recommendations (typically every 500-1000 hours of playback). Refer to your cartridge manual for specific replacement instructions.
6. A ’dèanamh trioblaid
| Trioblaid | Adhbhar a dh’fhaodadh a bhith ann | Fuasgladh |
|---|---|---|
| Gun fhuaim no tomhas-lìonaidh ìosal | Ceanglaichean ceàrr; Amplifier input not set to PHONO; Cartridge/stylus issue. | Check RCA and ground connections. Ensure amplifier is set to PHONO input. Verify cartridge is properly installed and stylus is not damaged. |
| Fuaim air a mhilleadh | Incorrect tracking force/anti-skate; Worn or dirty stylus; Damaged record. | Adjust tracking force and anti-skate. Clean or replace stylus. Inspect record for damage. |
| Plàta gun snìomh | Power not connected; START/STOP button not pressed. | Check power cable connection. Press the START/STOP button. |
| Leum no leum | Dust on stylus/record; Incorrect tracking force/anti-skate; Turntable not level; Vibrations. | Clean stylus and record. Re-adjust tracking force and anti-skate. Ensure turntable is level and on a stable surface. |
7. Sònrachaidhean
| Feart | Mion-fhiosrachadh |
|---|---|
| Ainm Modail | Sl 1200 |
| Àireamh Modail Nì | SL-1200MK7EG |
| Brand | Teicnigeach |
| Dath | Glas |
| Stuth | Aluminium |
| Teicneòlas ceangail | Cuideach |
| Astar rothlach as àirde | 78 RPM (supports 33 ⅓, 45, and 78 RPM) |
| Cuideam nì | 22 notaichean (timcheall air 10 kg) |
| Meud pacaid | 21.34 x 17.17 x 9.53 òirleach |
| Co-phàirtean air an toirt a-steach | Lid, power cable, RCA signal cable |
8. Barantas agus Taic
For warranty information and technical support, please refer to the warranty card included with your product or visit the official Technics weblàrach. Cùm dearbhadh ceannach airson tagraidhean barantais sam bith.
For further assistance, you may contact Technics customer service through their official channels. Please have your model number (SL-1200MK7EG) and serial number ready when contacting support.