Ro-ràdh
This manual provides detailed instructions for the installation, operation, and maintenance of the DROK DC 8-36V 5A PWM Motor Speed Controller. This device is designed to precisely control the speed of DC motors and adjust the brightness of LEDs by utilizing Pulse Width Modulation (PWM) technology. It operates within a wide voltage range of 8V to 36V DC and supports a maximum current of 5A.
Stàladh agus stàladh
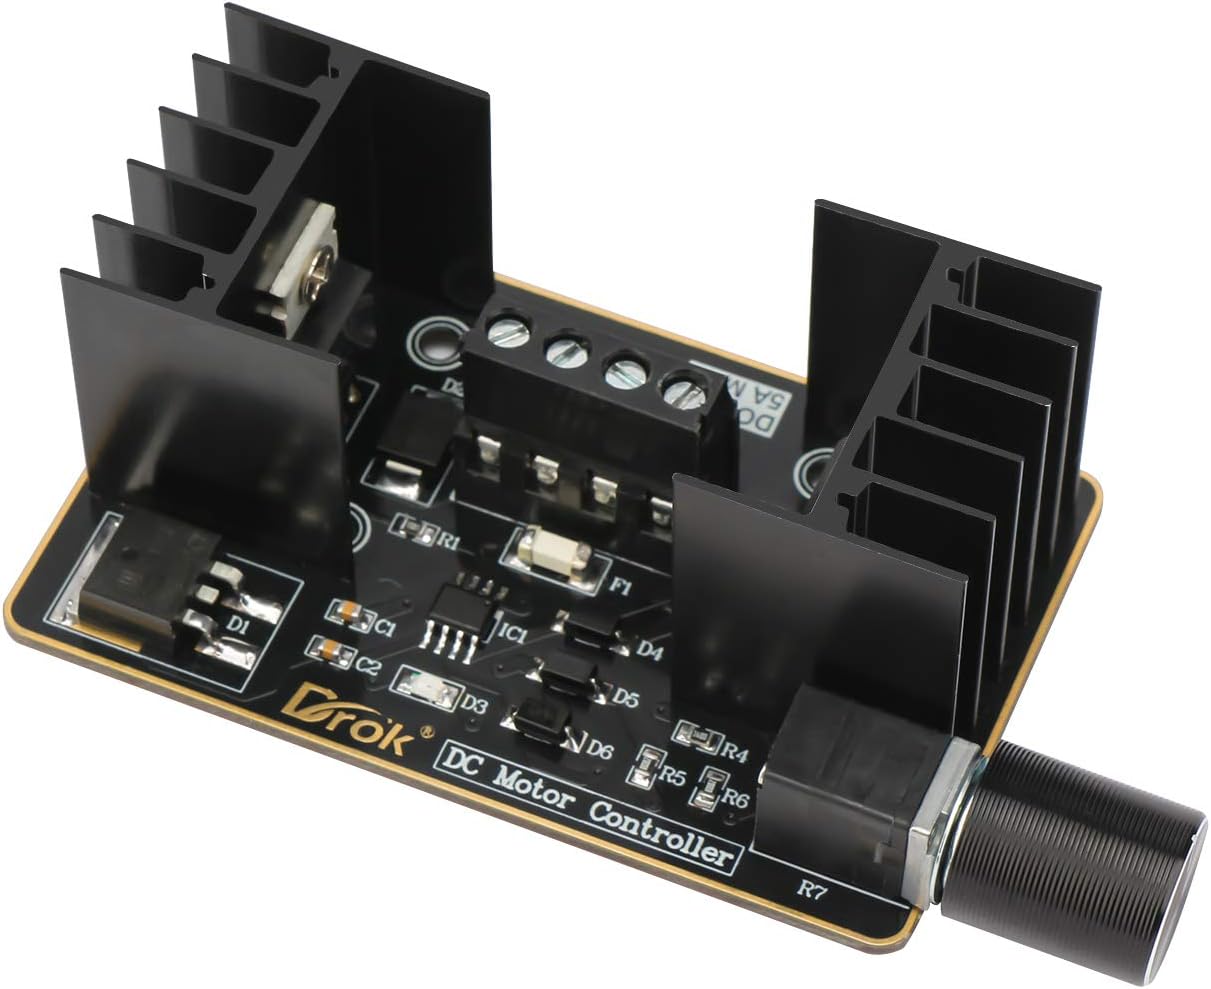
Comharrachadh co-phàirt
Familiarize yourself with the key components of the motor speed controller before installation. A typical layout includes:
- Cuir a-steach Cumhachd DC 8-36V: Terminals for connecting the power supply.
- Motor Wiring Terminals: Terminals for connecting the DC motor. Changing the wiring direction here reverses the motor's rotation.
- Speed Regulator Potentiometer (with switch): Used to adjust the output PWM duty cycle, thereby controlling motor speed or LED brightness. It also functions as an ON/OFF switch.
- Yellow Working Indicator: Illuminates when the module is powered and operating.
- High-quality Power Tube & Schottky Diode: Essential components for power regulation and protection.
- Surface Mount Fuse: Provides overcurrent protection.
- Immersion Gold PCB: High-quality circuit board material.
Note: For a visual reference of component locations, please refer to the product images provided on the product page.

Figear 1: Mullach view of the DROK DC Motor Speed Controller, showing various components and heat sinks.
Stiùireadh wiring
Follow these steps to correctly wire the motor speed controller:
- Ceangal solar cumhachd: Connect your DC power supply (8-36V) to the 'DC 8-36V Power Input' terminals. Ensure correct polarity: '+' to positive, '-' to negative.
- Ceangal motair: Connect your DC motor to the 'Motor Wiring Terminals'. The motor's positive and negative terminals can be connected to either terminal on the controller. To reverse the motor's direction, simply swap the motor's wiring connections.
- LED Dimming (Optional): For LED dimming applications, connect the LED strip or module to the 'Motor Wiring Terminals' in place of a motor, observing correct polarity if specified by the LED manufacturer.
Important: Always ensure the power supply is disconnected before making or changing any wiring connections. Double-check all connections for correct polarity and secure fastening to prevent damage to the module or connected devices.
Figear 2: Dùin suas view of the terminal connections on the DROK DC Motor Speed Controller, illustrating where to connect power and motor/LED.
Stiùireadh Obrachaidh
Once the controller is correctly wired and powered on, operate it as follows:
- Cumhachd air / dheth: The speed regulator potentiometer often includes an integrated switch. Rotate the knob clockwise from the 'OFF' position to power on the module. Continue rotating to increase speed/brightness. Rotate counter-clockwise to decrease speed/brightness and eventually turn off the module.
- Atharrachadh luaths / soilleireachd: Turn the potentiometer knob clockwise to increase the motor speed or LED brightness. Turn it counter-clockwise to decrease the motor speed or LED brightness. The yellow working indicator will confirm the module is active.
- Stiùireadh motair: If the motor rotation direction is not as desired, power off the module, swap the two wires connected to the 'Motor Wiring Terminals', and then power on again.

Figear 3: Dùin suas view of the speed regulator potentiometer on the DROK DC Motor Speed Controller, used for power and speed/brightness adjustment.
Cumail suas
To ensure optimal performance and longevity of your DROK DC Motor Speed Controller, follow these maintenance guidelines:
- Glanadh: Cùm am modúl glan agus saor bho dhuslach is sprùilleach. Cleachd clò bog, tioram airson glanadh. Seachain a bhith a’ cleachdadh lionntan no innealan-glanaidh sgrìobach.
- Àrainneachd: Operate the controller in a dry, well-ventilated environment. Avoid exposure to moisture, extreme temperatures, or corrosive substances.
- Sgaoileadh teas: The module is equipped with heat sinks. Ensure adequate airflow around the module, especially during prolonged operation at higher loads, to prevent overheating. Do not obstruct the heat sinks.
- Ceanglaichean: Periodically check all wiring connections to ensure they remain secure and free from corrosion. Loose connections can lead to intermittent operation or damage.
Fuasgladh thrioblaidean
| Trioblaid | Adhbhar a dh’fhaodadh a bhith ann | Fuasgladh |
|---|---|---|
| Module has no power / Yellow indicator is off |
|
|
| Motor not spinning / LED not dimming |
|
|
| Motor speed/LED brightness inconsistent |
|
|
Sònrachaidhean
| Feart | Luach |
|---|---|
| Vol Obrachaidhtage | DC 8-36V |
| An-dràsta as àirde | 5A |
| Seòrsa smachd | PWM (Atharrachadh Leud Pulse) |
| Cuideam nì | 2.08 unnsa |
| Meud pacaid | 5.28 x 2.72 x 1.97 òirleach |
| Stuth | Plastaig |
| Dath | Dubh |
| ASIN | B086DMNNLR |
| Ceann-latha Ri fhaighinn an-toiseach | 5 an t-Ògmhios, 2020 |
Barantas agus Taic
For warranty information or technical support, please refer to the documentation included with your purchase or contact DROK customer service directly. Keep your purchase receipt as proof of purchase for any warranty claims.
For further assistance, visit the official DROK weblàrach no cuir fios chun na seanalan taic aca.