1. Ro-ràdh
This manual provides detailed instructions for the installation, operation, and maintenance of your Anlapus 1080p HD-TVI Surveillance Camera. Please read this manual thoroughly before using the product to ensure proper function and safety.
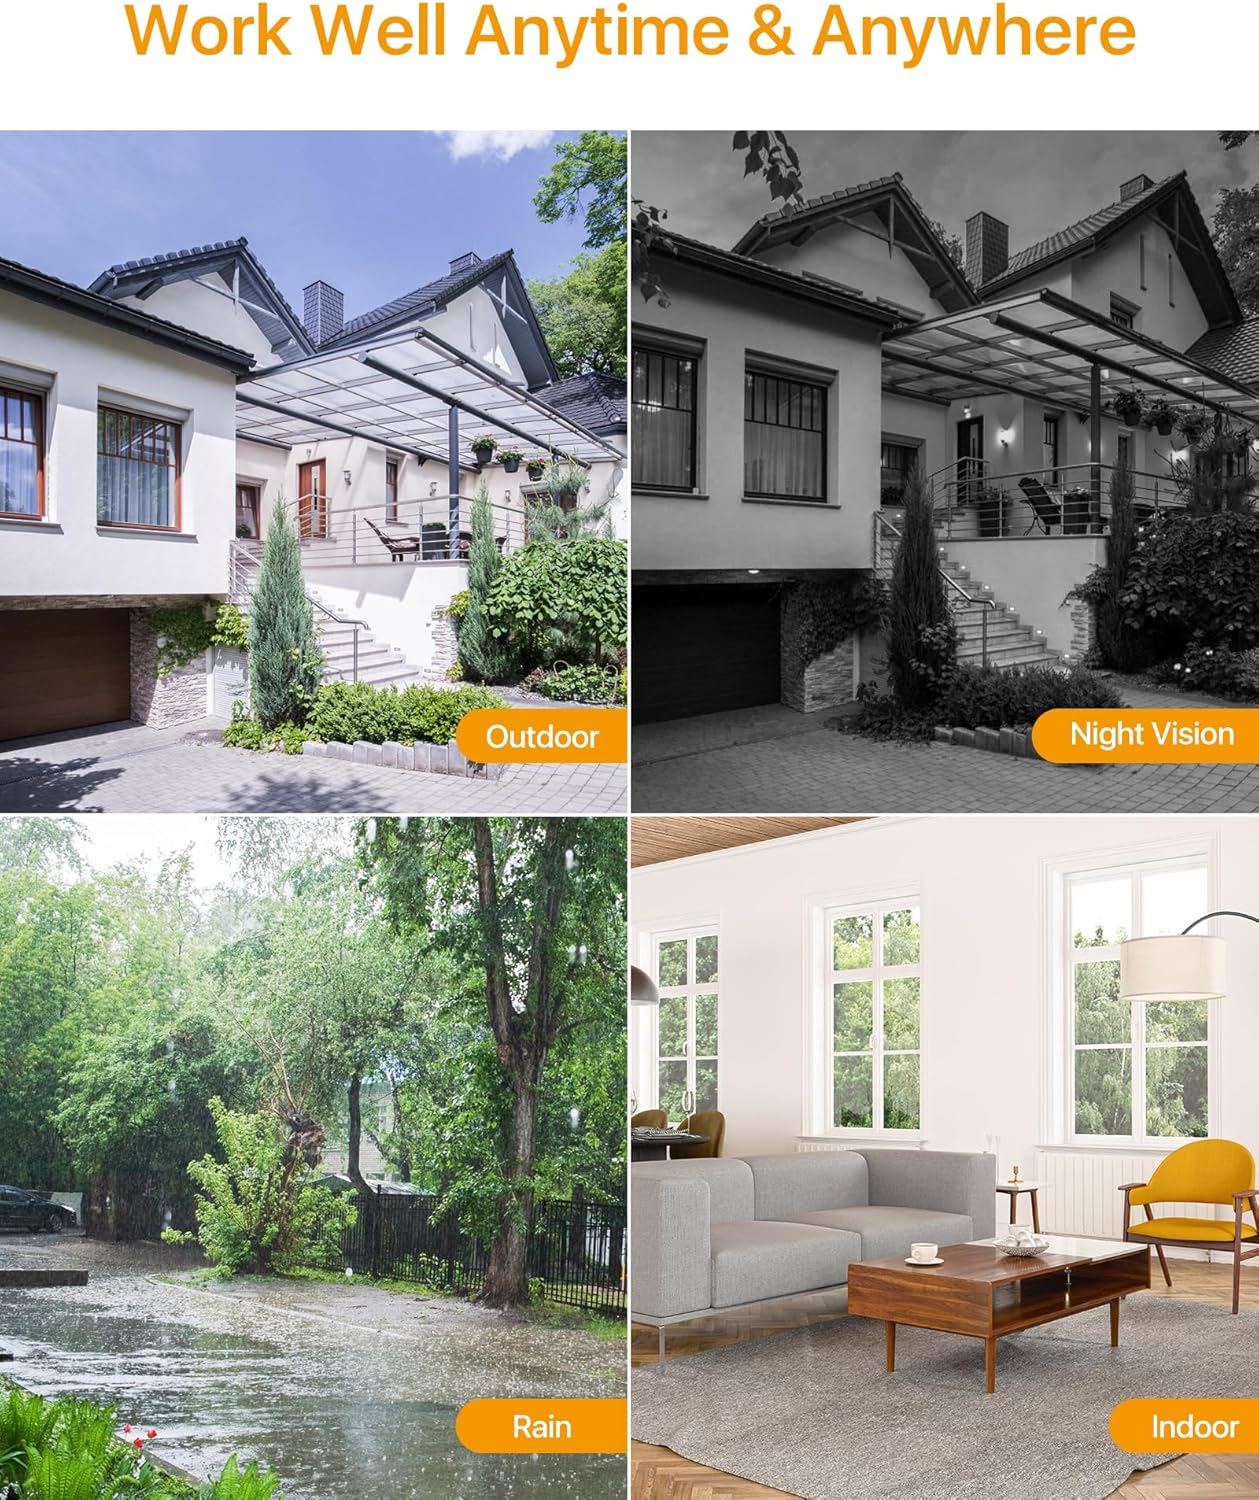
The Anlapus HD-TVI camera is designed for both indoor and outdoor surveillance, offering high-definition video quality and robust performance in various environmental conditions.
2. Pasgan-susbaint
Dearbhaich gu bheil na nithean uile a tha air an liostadh gu h-ìosal air an toirt a-steach sa phacaid agad. Ma tha nithean sam bith a dhìth no millte, cuir fios gu taic luchd-cleachdaidh.
- 4 x Anlapus 1080p HD-TVI Cameras
- 4 x BNC Video Cables
- 1 x Solar cumhachd
- 1 x 1-to-4 Power Splitter Cable
- 4 x Stiogairean Rabhaidh
- 4 x Mounting Screw Bags (including screws and wall plugs)
- 4 x Mounting Hole Templates
- 1 x Stiùireadh tòiseachaidh luath
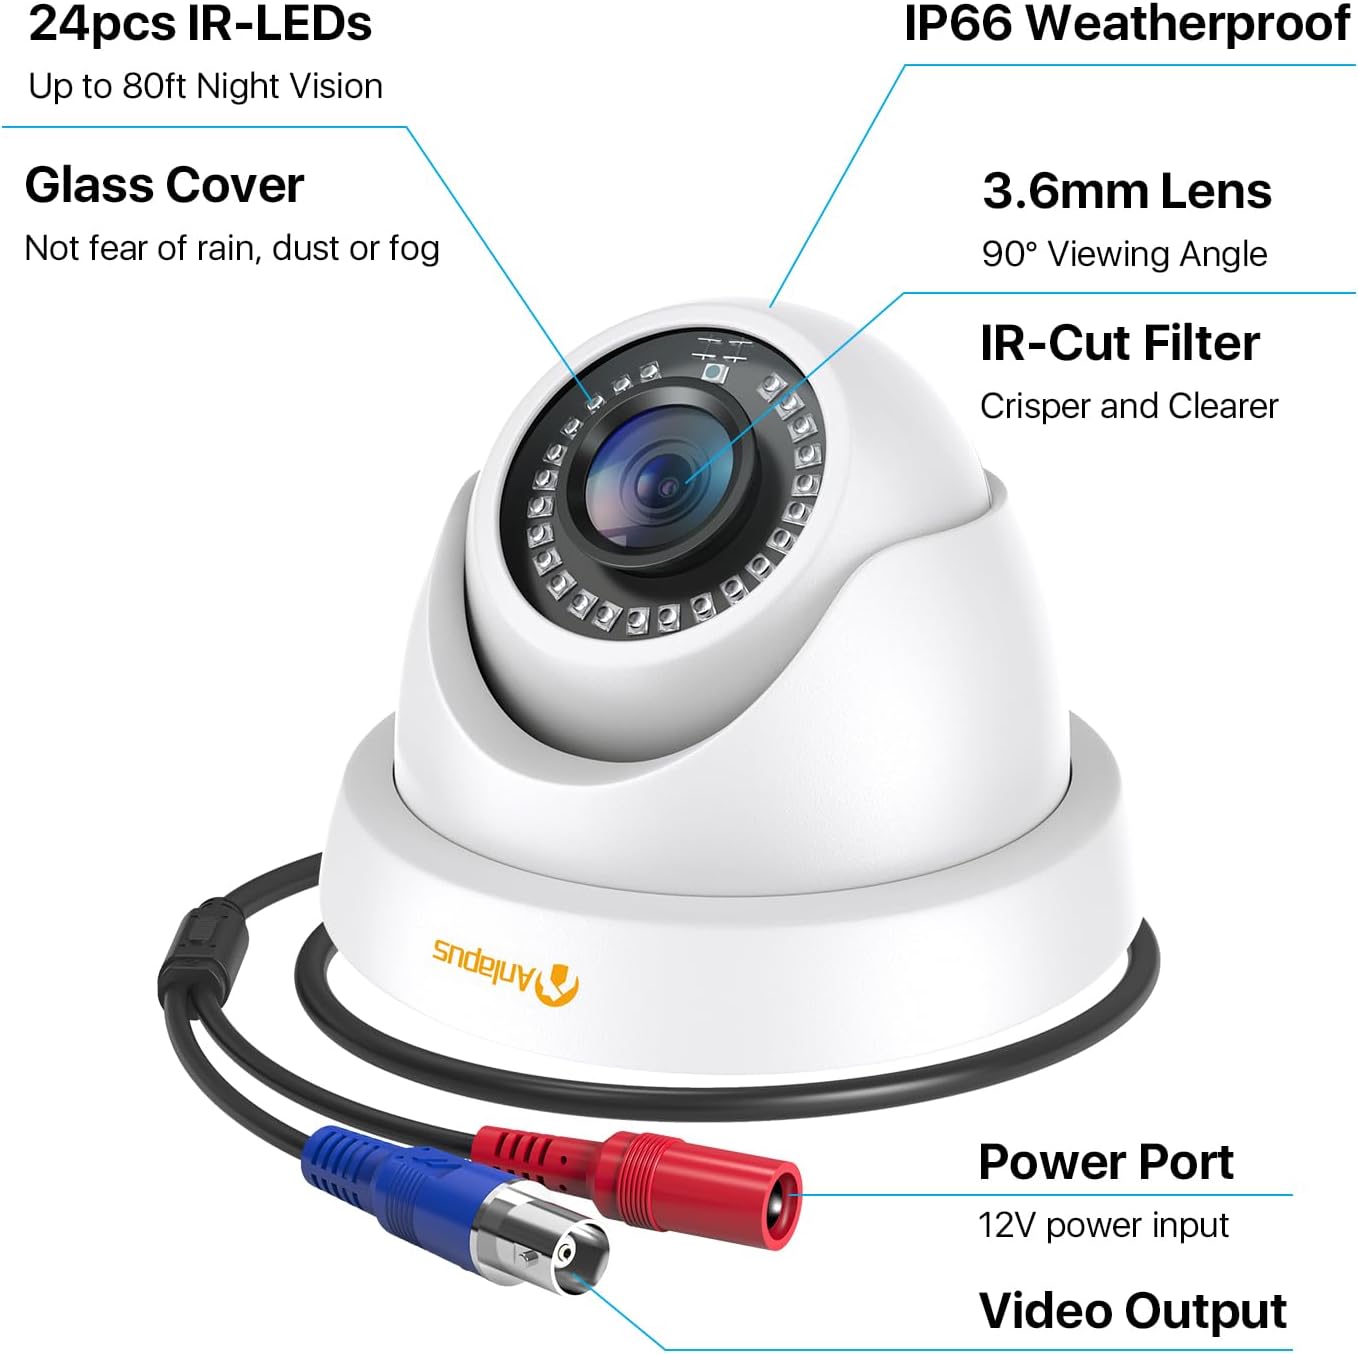
3. Feartan toraidh
- Fuasgladh HD 1080p: A ’toirt seachad foo bhidio soilleir agus mionaideachtage (1920x1080 pixels).
- Farsaing Viewann an ceàrn: Equipped with a 3.6mm lens, offering a 90-degree field of view.
- HD-TVI Compatibility: Designed to work with HD-TVI DVRs. Ensure your DVR supports HD-TVI technology.
- Sealladh oidhche adhartach: Features 24 IR-Cut LEDs for up to 24 meters (80 feet) of clear black and white night vision.
- Rangachadh dìon-sìde IP66: Robust metal housing ensures protection against dust and water, suitable for both indoor and outdoor use in various weather conditions.
- Stàladh sùbailte: Features a 3-axis adjustable bracket for ceiling or wall mounting, allowing 360-degree horizontal and 180-degree vertical adjustment.


4. Setup agus Stàladh
4.1 Liosta sgrùdaidh ro-stàlaidh
- Ensure your DVR is compatible with HD-TVI cameras.
- Plan the camera placement to cover desired surveillance areas.
- Ensure power outlets are accessible for the camera power supply.
- Gather necessary tools: drill, screwdriver, ladder (if mounting high).
4.2 A ’dìreadh a’ chamara
- Select a suitable mounting location (wall or ceiling) that provides the desired viewing angle and is within reach of the BNC cable and power supply.
- Use the provided mounting hole template to mark the drill points on the surface.
- Dril tuill pìleat aig na h-àiteachan comharraichte.
- Insert the wall plugs into the drilled holes (if mounting on masonry or drywall).
- Secure the camera base to the surface using the provided screws.
- Adjust the camera angle using the 3-axis bracket. The bracket allows for 360-degree horizontal rotation and 180-degree vertical tilt. Tighten the adjustment screws once the desired angle is achieved.
4.3 A’ ceangal a’ chamara
Refer to the connection diagram below for proper wiring.
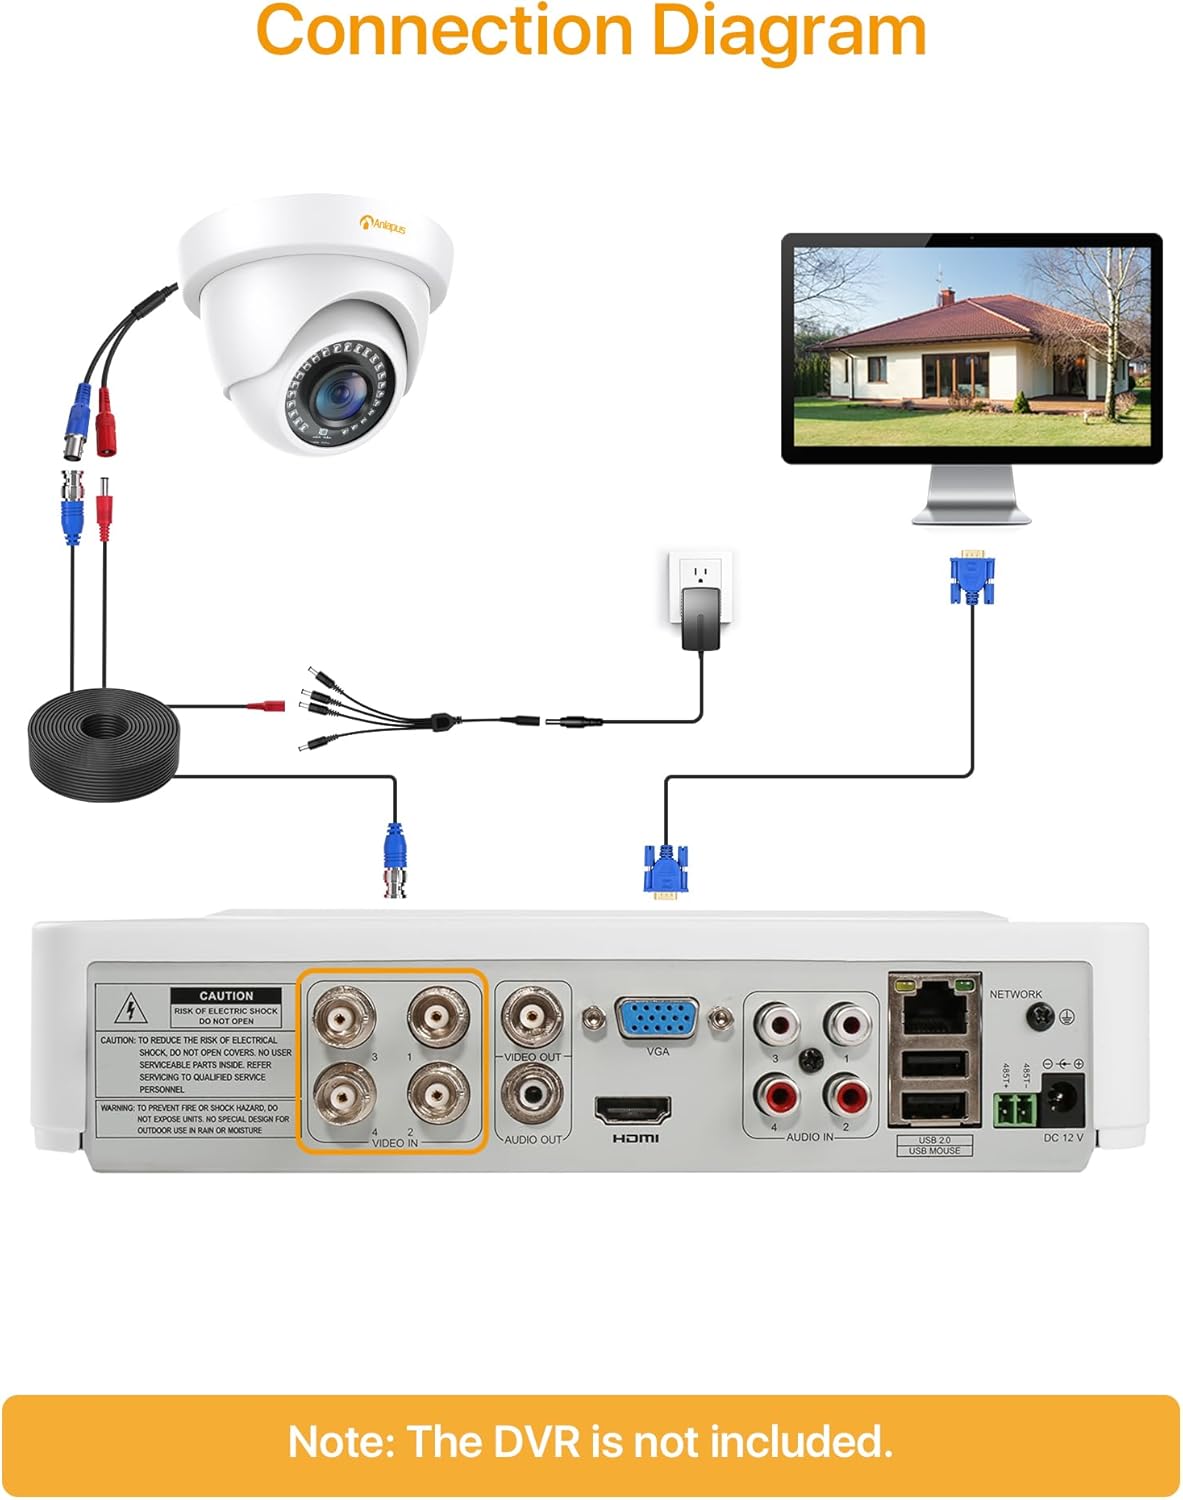
- Connect one end of the BNC video cable to the video output port of the camera.
- Connect the other end of the BNC video cable to a "VIDEO IN" port on your HD-TVI DVR.
- Connect the camera's power input to one of the outputs on the 1-to-4 power splitter cable.
- Connect the power supply to the 1-to-4 power splitter cable.
- Cuir an solar cumhachd a-steach do phuing dealain àbhaisteach.
- Repeat these steps for all cameras.
Cudromach: Dèan cinnteach gu bheil a h-uile ceangal tèarainte mus cuir thu cumhachd air an t-siostam.
5. Stiùireadh Obrachaidh
Once the cameras are properly installed and connected to your HD-TVI DVR, refer to your DVR's instruction manual for specific operating procedures, including:
- Viewa' fuireach footage bho na camarathan.
- Recording and playback of video.
- Configuring motion detection and alerts.
- Accessing the system remotely via mobile app or web eadar-aghaidh.
- Adjusting camera settings (if supported by your DVR).
The Anlapus camera provides a continuous video feed to the DVR. Its night vision capabilities activate automatically in low-light conditions.
6. Cumail suas
- Glanadh: Glan lionsa is taigheadas a’ chamara bho àm gu àm le clò bog, tioram.amp clò. Seachain innealan-glanaidh sgrìobach no fuasglaidhean.
- Sgrùdadh càball: Regularly check all cables for signs of wear, damage, or loose connections.
- Ùrachaidhean firmware: While the camera itself does not typically require firmware updates, ensure your DVR's firmware is up-to-date for optimal performance and compatibility.
- Dìon Àrainneachdail: Although the camera is IP66 weatherproof, extreme weather conditions (e.g., heavy snow, ice) may temporarily affect performance. Ensure the camera is securely mounted to withstand strong winds.
7. A ’dèanamh trioblaid
| Trioblaid | Adhbhar a dh’fhaodadh a bhith ann | Fuasgladh |
|---|---|---|
| No image on DVR screen |
|
|
| Droch chàileachd ìomhaigh / bhidio neo-shoilleir |
|
|
| Sealladh oidhche nach eil ag obair |
|
|
If you encounter issues not covered here, please contact Anlapus customer support.
8. Sònrachaidhean
| Modail Àireamh | AJ-A4K-202T4-WPES |
| Fuasgladh bhidio | 1080p (1920 x 1080 piogsail) |
| Lionsa | 3.6mm |
| Viewann an Ceàrn | 90 ceum |
| Raon Lèirsinn Oidhche | Suas ri 24 meatairean (80 troigh) |
| LEDan IR | 24 pcs IR-Cut LEDs |
| Rangachadh dìon-aimsir | IP66 |
| Stuth | Meatailt |
| Teicneòlas ceangail | Wired (BNC) |
| Cuir a-steach cumhachd | 12 Volt |
| Caitheamh cumhachd | 12 watt |
| Meudan (L x W x H) | 42.9 x 27 x 8.71 cm |
| Cuideam | 2.61 kilograms (for the package) |
| Cleachdadh air a mholadh | Faireachas |
| Innealan co-fhreagarrach | Clàraiche Bhidio Digiteach (DVR) |
9. Barantas agus Taic
Anlapus products are designed for reliability and performance. For warranty information and technical support, please refer to the warranty card included in your package or visit the official Anlapus weblàrach.
If you require assistance with installation, troubleshooting, or have any questions regarding your Anlapus surveillance camera, please contact our customer support team. Contact details can typically be found on the Anlapus brand store page or in the quick start guide.