1. Ro-ràdh
Thank you for choosing the Walfront LCD Digital Programmable Weekly Timer Switch. This device is designed for automatic control of various electrical appliances based on user-defined schedules. Please read this manual carefully before installation and operation to ensure proper use and to prevent damage.
2. Fiosrachadh Sàbhailteachd
Rabhadh: Electrical installation should only be performed by qualified personnel. Disconnect power before installation or maintenance to prevent electric shock.
- Dèan cinnteach gu bheil an cuir a-steach voltage matches the timer's specifications (24V for this model).
- Do not exceed the maximum load capacity of 16A 250VAC (resistive load).
- Cùm an inneal air falbh bho uisge agus cus taiseachd.
- Do not attempt to disassemble or repair the unit yourself. Contact support if issues arise.
3. Toradh thallview
The Walfront LCD Digital Programmable Weekly Timer Switch is a high-precision device built with durable, moisture-resistant, and corrosion-protected materials. It features a clear LCD display and supports up to 16 ON/OFF programs daily and weekly.
3.1 Prìomh fheartan
- High-quality construction for long lifespan.
- Automatic ON/OFF control for various electrical devices.
- Built-in 1.2V/40mA rechargeable battery for memory retention.
- Industrial-grade chip for high precision and strong anti-interference.
- Up to 16 ON and 16 OFF programming settings per day/week.
- LCD display showing real-time, hour, minute, and ON/AUTO/OFF status.
- DIN rail mounting design.
3.2 Co-phàirtean

Dealbh 1: Aghaidh view of the Walfront LCD Digital Programmable Weekly Timer Switch. Shows the LCD display and control buttons.

Dealbh 2: Air ais view of the timer switch, illustrating the wiring terminals and basic electrical specifications printed on the unit.
4. Suidheachadh & Stàladh
This timer is designed for DIN rail mounting. Ensure the DIN rail is securely installed before attaching the timer.
4.1 Diagram uèiridh

Dealbh 3: Wiring diagrams showing direct connection (left) and connection with an AC contactor (right). The direct connection illustrates neutral and live wire inputs and load output. The AC contactor diagram shows 220V power input and output to the load device.
Uèirleadh Dìreach: Connect the neutral and live wires to the designated input terminals (L and N). Connect the load to the output terminals (typically 3 and 4 for normally open, or 3 and 5 for normally closed, as indicated on the device). Refer to the diagram on the device for exact terminal numbering.
Wiring with AC Contactor: For higher loads, connect the timer to control an AC contactor. The timer's output will switch the coil of the contactor, which in turn controls the main power to the load. This setup is shown on the right side of Image 3.
4.2 Initial Power-Up and Battery Charging
Upon first use, connect the timer to power. The internal 1.2V/40mA rechargeable battery will begin charging. If the display is blank or shows incorrect time, allow it to charge for a few minutes. Press the "Reset" button (often labeled with a small 'R' or 'C' and requires a pointed object) to clear all settings and start fresh.
5. Stiùireadh Obrachaidh
5.1 A’ suidheachadh an Ùine Làithreach
- Brùth an "CLOCK" button (often labeled with a clock icon) and hold it.
- Fhad 'sa tha e a' cumail "CLOCK", brùth an "D+" putan gus latha gnàthach na seachdain a shuidheachadh.
- Fhad 'sa tha e a' cumail "CLOCK", brùth an "H+" putan gus an uair làithreach a shuidheachadh.
- Fhad 'sa tha e a' cumail "CLOCK", brùth an "M+" putan gus a’ mhionaid làithreach a shuidheachadh.
- Sgaoil an "CLOCK" putan. Tha an t-àm air a shuidheachadh a-nis.
5.2 Setting 12/24 Hour Mode
By default, the timer operates in 24-hour mode. To switch between 12-hour (AM/PM) and 24-hour modes, press and hold the "CLOCK" button for approximately 5 seconds. The display will show "AM" for 12-hour mode or switch back to 24-hour format.
5.3 Programming ON/OFF Schedules
The timer supports up to 16 ON and 16 OFF programs. Each program consists of an ON time and an OFF time.
- Brùth an "PROG" putan aon uair. Seallaidh an taisbeanadh “1 ON”.
- Brùth "D+" to select the day(s) for this ON program (e.g., Mon-Fri, Sat-Sun, or specific days).
- Brùth "H+" gus an uair ON a tha thu ag iarraidh a shuidheachadh.
- Brùth "M+" gus am mionaid ON a tha thu ag iarraidh a shuidheachadh.
- Brùth "PROG" a-rithist. Seallaidh an taisbeanadh “1 OFF”.
- Dèan ceumannan 2-4 a-rithist gus an ùine OFF a shuidheachadh airson a’ chiad phrògram.
- Lean air adhart a 'bruthadh "PROG" to cycle through "2 ON", "2 OFF", up to "16 ON", "16 OFF", setting each as needed.
- Às dèidh dhut na prògraman uile a tha thu ag iarraidh a shuidheachadh, brùth air a’ phutan "CLOCK" button to exit programming mode and return to real-time display.
Thoir an aire: If you need to cancel a program, press the "PROG" button to select the program, then press the "LÀIMHE" button until "----" appears on the display for that program's time slot.
5.4 Manual Override (ON/AUTO/OFF)
Brùth an "LÀIMHE" putan gus gluasad tro na modhan obrachaidh:
- AIR: The output is continuously ON, ignoring all programs.
- AUTO: The timer operates according to the programmed ON/OFF schedules.
- OFF: The output is continuously OFF, ignoring all programs.
Dèan cinnteach gu bheil an timer a-staigh "AUTO" mode for programmed operation.
5.5 Gnìomh glas prìomh
To prevent accidental changes to settings, the timer features a key lock function.

Dealbh 4: The timer display showing the key lock symbol, indicating that the buttons are locked.
- To lock the keys: Press and hold the "C/R" (Cancel/Reset) button for approximately 4 seconds until a lock symbol appears on the LCD.
- To unlock the keys: Press and hold the "C/R" button again for approximately 4 seconds until the lock symbol disappears.
6. Sònrachaidhean
| Paramadair | Luach |
|---|---|
| Input Voltage | AC/DC 24V (This model) |
| Contact Rated Voltage | AC 180V~264V (50/60Hz) |
| Comas luchdaidh | 16A 250VAC (Resistive Load) |
| Obrachaidhean AIR / OFF | 16 ON / 16 OFF (Manual/Auto) |
| Taisbeanadh | LCD |
| Caitheamh cumhachd | 4.5VA (Max) |
| Mearachd | ≤2 seconds/day (at 25℃) |
| Modh stàladh | DIN Rail (sold separately) |
| Raon-ama | 1 mionaid gu 168 uairean a thìde |
| Eadar-ama as ìsle | 1 mhionaid |
| Teòthachd Obrachaidh | -10 ℃ gu 55 ℃ |
| Taiseachd obrachaidh | 35-85% RH |
| Meudan (L x W x H) | 86 x 36 x 65mm |
| Bataraidh a-staigh | 1.2V/40mA rechargeable, >15 days backup |
| Àireamh de Chuairtean | Changeover switch (SPDT) |
| Beatha seirbheis | Mechanical: 107, Electrical: 105 |
| Cuideam | 125g |
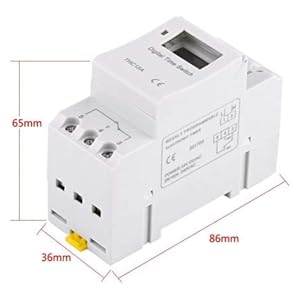
Dealbh 5: Diagram illustrating the dimensions of the timer switch: 86mm length, 36mm width, and 65mm height.
7. Cumail suas
- Keep the timer clean and free from dust. Use a dry, soft cloth for cleaning.
- Na cleachd luchd-glanaidh sgudail no solventan.
- Periodically check wiring connections to ensure they are secure.
- The internal battery is designed for long life and typically does not require replacement. If the timer loses settings frequently after power outages, the battery may need servicing by a qualified technician.
8. A ’dèanamh trioblaid
| Trioblaid | Adhbhar a dh’fhaodadh a bhith ann | Fuasgladh |
|---|---|---|
| Tha an taisbeanadh falamh. | No power supply or internal battery discharged. | Check power connections. Allow the timer to charge for a few minutes after connecting to power. |
| Timer does not switch ON/OFF as programmed. | Timer is not in "AUTO" mode, programs are incorrect, or key lock is active. | Press "MANUAL" until "AUTO" is displayed. Review and correct programs. Unlock keys if necessary. |
| Tha na putanan neo-fhreagairt. | Tha gnìomh glasaidh iuchrach gnìomhach. | Press and hold "C/R" for 4 seconds to unlock the keys. |
| Tha an ùine mearachdach. | Minor drift (within specifications) or internal battery issue. | Reset and re-set the time. If inaccuracy persists or settings are lost frequently, contact support. |
9. Barantas agus Taic
Walfront strives to provide high-quality products. If you encounter any issues with your product, please contact us for prompt assistance. We offer return and refund services for product defects.
For support, please refer to the contact information provided with your purchase or visit the Walfront store on Amazon: Walfront Amazon Store.