Ro-ràdh
Thank you for choosing the Atlanta Digital LCD Radio Alarm Clock, Model 1882-0. This compact and easy-to-use alarm clock features a clear LCD display, temperature indication, and a radio-controlled time function for automatic synchronization. This manual provides detailed instructions for setup, operation, and maintenance to ensure optimal performance.
Fiosrachadh Sàbhailteachd
- Sàbhailteachd bataraidh: Use only the specified battery type. Ensure correct polarity (+/-) when inserting batteries. Do not mix old and new batteries, or different types of batteries. Remove batteries if the device will not be used for an extended period. Dispose of used batteries responsibly according to local regulations.
- Suidheachadh: Place the clock on a stable, flat surface. Avoid direct sunlight, extreme temperatures, high humidity, or dusty environments.
- Glanadh: Do not use abrasive cleaners or solvents. Wipe with a soft, dry cloth.
- Taisbeanadh uisge: This device is not waterproof. Avoid exposure to water or other liquids.
Susbaint pacaid
- Atlanta Digital LCD Radio Alarm Clock (Model 1882-0)
- Leabhar-stiùiridh (an sgrìobhainn seo)
- (Mar as trice chan eil bataraidhean air an toirt a-steach agus feumar an ceannach air leth)
Bathar seachadview
Dèan eòlas ort fhèin air prìomh phàirtean agus smachdan do chloc-rabhaidh.

Figear 1: Aghaidh View. This image displays the front of the Atlanta Digital LCD Radio Alarm Clock. The large LCD screen shows the current time (10:40), radio control signal indicator, DST indicator, alarm time (6:00), and temperature (24.6°C). Below the screen are three buttons: "TIME", "ALARM", and "+ / -". A red snooze/light button is visible on the top edge.
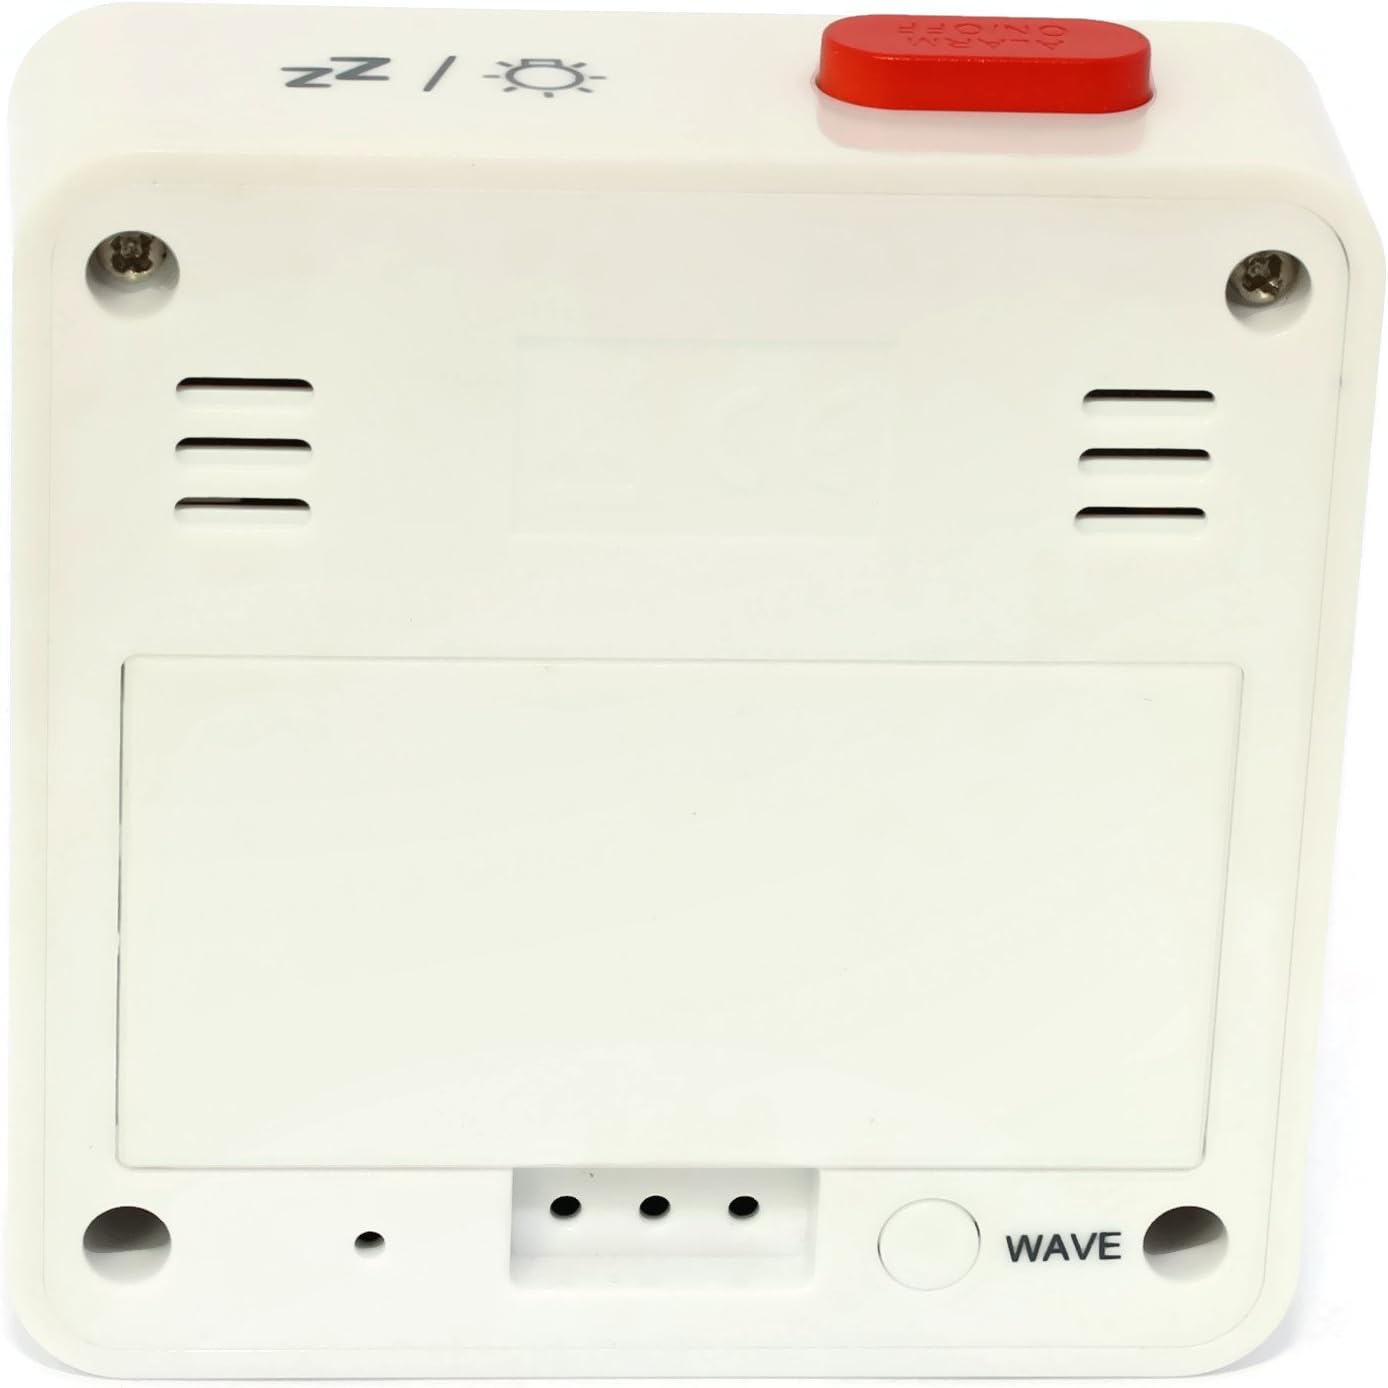
Figear 2: Air ais View. This image shows the back of the Atlanta Digital LCD Radio Alarm Clock. The large rectangular cover for the battery compartment is prominent. Below it, a circular "WAVE" button is visible, used for manual radio signal reception. Ventilation slots are present on both sides of the upper back panel.
Controls and Display Elements:
- Taisbeanadh LCD: Shows time, alarm time, temperature, and radio control status.
- Putan TÒRR: Used to set the current time manually.
- Putan ALARM: Used to set and activate/deactivate the alarm.
- + / - Putanan: Used to adjust values (time, alarm) and potentially toggle settings.
- SNOOZE / LIGHT Button (Top): Activates snooze function during an alarm; illuminates the display backlight.
- WAVE Button (Back): Initiates manual radio signal reception for time synchronization.
- Battery Compartment (Back): A’ cumail na bataraidhean a tha a dhìth.
Suidhich
1. Stàladh bataraidh
- Fosgail còmhdach roinn a’ bhataraidh a tha suidhichte air cùl a’ chloca (faic Figear 2).
- Insert the required batteries (e.g., 2x AAA, not included) according to the polarity markings (+ and -) inside the compartment.
- Dùin an còmhdach roinn bataraidh gu tèarainte.
- The clock will power on and attempt to receive the radio-controlled time signal.
2. Initial Time Synchronization (Radio Control)
Upon battery insertion, the clock will automatically search for the radio time signal. This process may take several minutes. During this time, a signal icon (e.g., ((()))) a’ lasadh air an taisbeanadh.
- For best reception, place the clock near a window and away from electronic devices that may cause interference.
- Once the signal is successfully received, the time will be set automatically, and the signal icon will appear solid.
- If the signal is not received after a few minutes, press the TAOBH button on the back of the clock to initiate a manual search.
3. Manual Time Setting (If Radio Control is Unavailable)
- Brùth agus cùm an AM FEAR-CIUIL button for approximately 3 seconds until the hour digits begin to flash.
- Cleachd an + or - putanan gus an uair a rèiteachadh.
- Brùth an AM FEAR-CIUIL button again to confirm the hour and move to the minute setting.
- Cleachd an + or - putanan gus na geàrr-chunntasan atharrachadh.
- Brùth an AM FEAR-CIUIL putan a-rithist gus dearbhadh agus modh suidheachadh ùine fhàgail.
Stiùireadh Obrachaidh
1. A ’suidheachadh an inneal-rabhaidh
- Brùth agus cùm an ALARM button for approximately 3 seconds until the alarm hour digits begin to flash.
- Cleachd an + or - putanan gus an uair rabhaidh a tha thu ag iarraidh atharrachadh.
- Brùth an ALARM button again to confirm the hour and move to the alarm minute setting.
- Cleachd an + or - putanan gus na mionaidean rabhaidh a tha thu ag iarraidh atharrachadh.
- Brùth an ALARM putan a-rithist gus dearbhadh agus modh suidheachadh an rabhaidh fhàgail.
2. A’ cur an inneal-rabhaidh an gnìomh/dì-ghnìomhachadh
- Brùth goirid air an ALARM button to toggle the alarm on or off.
- When the alarm is active, an alarm icon (e.g., a bell symbol) will appear on the display.
- Nuair a chluinneas an inneal-rabhaidh, brùth air an SNOOZE / SOLAS button on top to activate the snooze function. The alarm will sound again after a few minutes.
- Gus an inneal-rabhaidh a chuir dheth gu tur, brùth putan sam bith eile (m.e., AM FEAR-CIUIL, ALARM, +, -) or let it sound for its full duration.
3. Gnìomh an t-Solais Chùil
Brùth an SNOOZE / SOLAS button on the top of the clock to illuminate the display for a few seconds, allowing for easy viewing ann an suidheachaidhean aotrom ìosal.
4. Taisbeanadh teothachd
The clock continuously displays the ambient temperature. The unit of temperature (Celsius or Fahrenheit) may be switchable by a dedicated button or a combination of existing buttons (refer to specific model variations if applicable, otherwise it defaults to Celsius as shown in the image).
Cumail suas
Glanadh
- Wipe the clock's exterior with a soft, dry, lint-free cloth.
- Do not use liquid cleaners, aerosol sprays, or abrasive materials, as these can damage the finish or internal components.
Ath-nuadhachadh bataraidh
- When the display becomes dim or the clock functions erratically, it is time to replace the batteries.
- Lean na ceumannan stàlaidh bataraidh a tha air am mìneachadh san earrann “Suidheachadh”.
- Ensure proper disposal of old batteries.
Fuasgladh thrioblaidean
| Trioblaid | Adhbhar a dh’fhaodadh a bhith ann | Fuasgladh |
|---|---|---|
| Tha an taisbeanadh bàn no dorcha. | Tha bataraidhean marbh no air an cur a-steach gu ceàrr. | Cuir bataraidhean nan àite, a’ dèanamh cinnteach gu bheil iad a’ freagairt gu ceart. |
| Tha an t-àm ceàrr. | Poor radio signal reception or manual time not set. | Move the clock to a location with better reception (near a window). Press the TAOBH button for manual synchronization. If still incorrect, set the time manually. |
| Chan eil an inneal-rabhaidh a’ fuaimeachadh. | Chan eil an inneal-rabhaidh air a ghnìomhachadh no air a shuidheachadh gu ceàrr. | Ensure the alarm icon is visible on the display. Recheck alarm time settings. |
| Chan eil an gnìomh snooze ag obair. | Alarm was turned off instead of snoozed. | Dèan cinnteach gun brùth thu air a’ SNOOZE / SOLAS button when the alarm sounds, not other buttons. |
Sònrachaidhean
- Modail: 1882-0
- Brand: Atlantaig
- Dath: Geal
- Stuth: Plastaig
- Seòrsa taisbeanaidh: LCD didseatach
- Meudan (L x W x H): 6.5 x 2.1 x 6.5 cm (mu 2.56 x 0.83 x 2.56 òirleach)
- Cuideam: 65 gram (timcheall air 2.29 unnsa)
- Stòr cumhachd: Battery powered (e.g., 2x AAA, not included)
- Feartan sònraichte: Temperature Display, Alarm, Radio-Controlled Time, Backlight, Snooze
- Cleachdadh an dùil: A-staigh
Barantas agus Taic
Specific warranty information for your Atlanta product may vary by region and retailer. Please refer to the documentation provided at the time of purchase or visit the official Atlanta weblàrach-lìn airson teirmichean is cumhaichean barantais mionaideach.
For technical support or inquiries, please contact your retailer or the manufacturer's customer service department. Contact information can typically be found on the product packaging or the official brand weblàrach.
Note: Information regarding spare parts availability is not provided by the manufacturer.