1. Ro-ràdh
This manual provides detailed instructions for the installation, operation, and maintenance of your SpeaKa Professional DL-1117 In-Wall/Ceiling Speaker. Please read this manual thoroughly before installation and use to ensure proper function and safety. Keep this manual for future reference.
2. Toradh thallview
The SpeaKa Professional DL-1117 is a high-quality in-wall/ceiling speaker designed for various audio applications in both residential and industrial environments. Its robust metallic construction ensures durability and reliable performance.

Figear 2.1: Aghaidh view of the SpeaKa Professional DL-1117 In-Wall/Ceiling Speaker. This image shows the speaker's front grille and mounting frame.
Prìomh fheartan:
- Ideal for wall and ceiling mounting.
- Suitable for industrial and residential spaces.
- Solid metallic construction for enhanced durability.
3. Sònrachaidhean
| Sònrachadh | Luach |
|---|---|
| Brand | SpeaKa Professional |
| Ainm Modail | DL-1117 |
| Àireamh Modail Nì | SP-1207908 |
| Seòrsa neach-labhairt | In-Wall/Ceiling Speaker |
| Meud neach-labhairt | 8 Inches (77mm INWALL SPEAKER as per label) |
| bacadh | 8 Ach |
| Power (Nominal) | 15 watt |
| Cumhachd Toraidh Luchd-labhairt as Motha | 25 watt |
| Freagairt Tricead | 90Hz - 17,000Hz (as per label) |
| Seòrsa stàladh | Ceiling Mount (also suitable for wall mount) |
| Meudan toraidh (L x W x H) | 11 x 11 x 7 cm |
| Cuideam nì | 520 gram |
| Dath | Dubh |
| Àireamh de dh'Aonadan | 1 aonad |
| Cleachdaidhean Molta | For computer (audio output), general audio systems |
| Innealan co-fhreagarrach | Desktop computer, Laptop (via amplifier/receiver) |

Figear 3.1: Dimensional drawing of the SpeaKa Professional DL-1117 speaker. This diagram illustrates the speaker's diameter (Ø100mm), depth (49mm), and cutout dimensions (Ø74mm, Ø81mm).
Figear 3.2: Air ais view of the SpeaKa Professional DL-1117 speaker, showing the product label with model number DL-1117BK8, frequency response, power rating, and impedance.
4. Stiùireadh Sàbhailteachd
Feuch an lean thu na ceumannan sàbhailteachd a leanas gus casg a chuir air dochann no milleadh air an toradh:
- Sàbhailteachd dealain: Ensure all power to the audio system is disconnected before making any connections or performing installation. Incorrect wiring can cause damage to the speaker or amplosgadair.
- Stàladh: Installation should be performed by a qualified professional if you are unsure about electrical wiring or structural integrity. Ensure the mounting surface (wall or ceiling) can safely support the weight of the speaker.
- Àrainneachd: Do not expose the speaker to excessive moisture, extreme temperatures, or direct sunlight.
- Glanadh: Cleachd clò bog, tioram airson glanadh. Na cleachd innealan-glanaidh leaghaidh no aerosols.
- Disassembly: Do not attempt to disassemble or modify the speaker. This will void the warranty and may cause damage or injury.
5. Setup agus Stàladh
Follow these steps for proper installation of your in-wall/ceiling speaker:
5.1 Innealan a dhìth
- Drile
- Hole saw (matching cutout diameter, approx. Ø74-81mm)
- Sgrobhadair
- Stiallan uèir
- Speaker wire (appropriate gauge for your amplifier and cable length)
5.2 Àite sreap
Choose a suitable location in your wall or ceiling. Ensure there are no electrical wires, plumbing, or structural elements behind the chosen area. Use a stud finder if necessary.
5.3 Gearradh an Fhosglaidh
- Carefully mark the desired cutout diameter on the wall or ceiling. Refer to the dimensions in Figure 3.1.
- Using a hole saw, carefully cut the opening.
5.4 Uèir
- Ruith uèir luchd-labhairt bhon amplifier/receiver to the cutout opening.
- Strip approximately 1/2 inch (12mm) of insulation from the ends of the speaker wire.
- Connect the speaker wires to the terminals on the back of the DL-1117 speaker. Ensure correct polarity (+ to + and - to -) from the amplifier to the speaker. The terminals are typically screw-type or spring-loaded.
5.5 Installing the Speaker
- Carefully insert the speaker into the cutout opening.
- Secure the speaker using the integrated mounting clips or screws, if applicable. For this model, the design suggests it is inserted and then secured from the front.

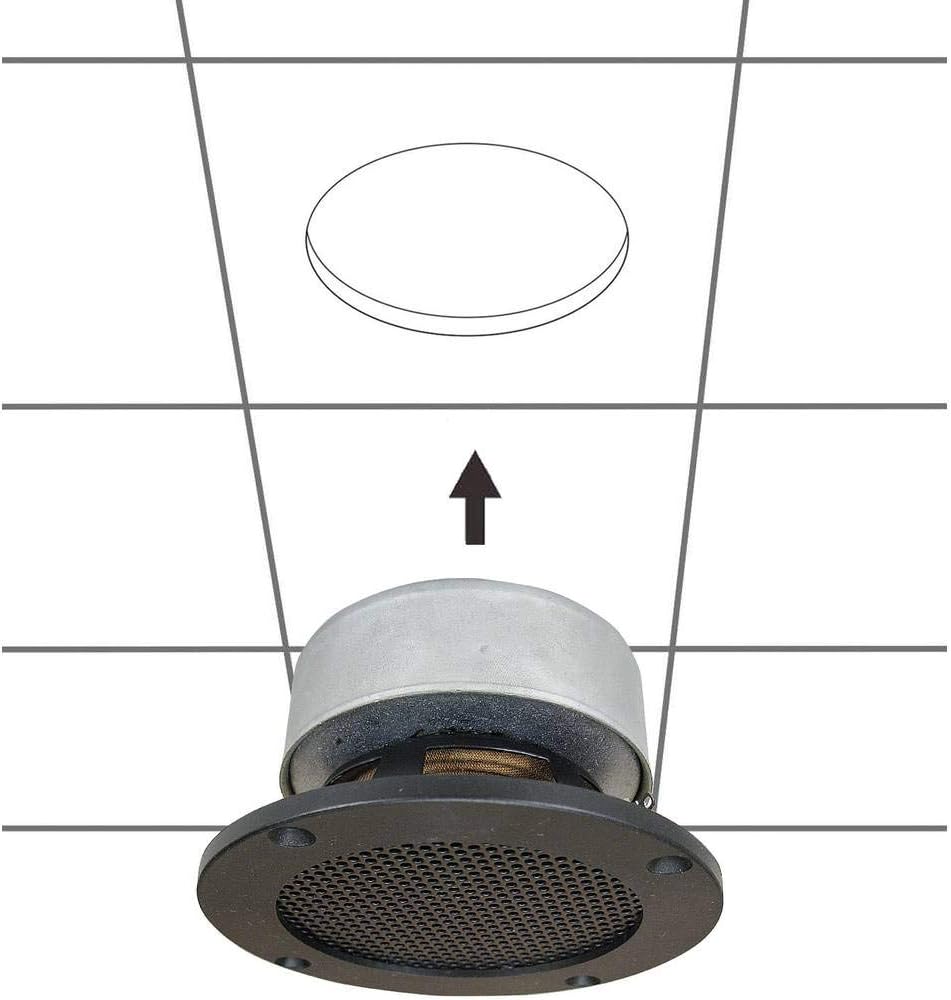
Figear 5.1: Diagram illustrating the installation process of the SpeaKa Professional DL-1117 speaker into a ceiling opening. The speaker is inserted from below into the pre-cut hole.
6. Stiùireadh Obrachaidh
Once the speaker is correctly installed and wired to your ampneach-sgaoilidh no neach-gabhail:
- Dèan cinnteach gu bheil a h-uile ceangal tèarainte.
- Tionndaidh air do amplifier / cuidhteas.
- Start playing audio through your connected source.
- Atharraich an tomhas-lìonaidh air do shon amplifier/receiver to a comfortable listening level. Avoid excessively high volumes that could distort the sound or damage the speaker.
7. Cumail suas
The SpeaKa Professional DL-1117 speaker requires minimal maintenance:
- Glanadh: Periodically wipe the speaker grille and frame with a soft, dry cloth to remove dust. Do not use abrasive cleaners or solvents.
- Sgrùdadh: Occasionally check the speaker for any visible damage or loose connections.
8. A ’dèanamh trioblaid
Ma thachras tu ri duilgheadasan leis an neach-labhairt agad, thoir sùil air na duilgheadasan agus na fuasglaidhean cumanta a leanas:
| Trioblaid | Adhbhar a dh’fhaodadh a bhith ann | Fuasgladh |
|---|---|---|
| Gun fhuaim bhon neach-labhairt | Uèirleadh sgaoilte no ceàrr Amplifier/receiver off or muted Inneal tùsail nach eil a’ cluich claisneachd | Thoir sùil air a h-uile ceangal uèir luchd-labhairt airson polarity agus teannachd cheart. Dèan cinnteach amplifier/receiver is on and not muted, and volume is up. Verify audio is playing from the source device. |
| Fuaim air a mhilleadh | Leabhar gu math àrd Stòr claisneachd de dhroch chàileachd Uèir labhairt millte | Lùghdaich an tomhas-lìonaidh air do amplifier / cuidhteas. Feuch stòr claisneachd eadar-dhealaichte gus cùisean leis an stòr a dhiùltadh. Inspect speaker wires for fraying or damage and replace if necessary. |
| Fuaim eadar-amail | Ceanglaichean sgaoilte Sgàinteach ampsianal lasachaidh | Thoir sùil air agus daingnich a h-uile ceangal uèir luchd-labhairt. Test the speaker with a different amplifier channel or a known working amplosgadair. |
If the problem persists after trying these solutions, please contact SpeaKa Professional customer support.
9. Barantas agus Taic
For warranty information and customer support, please refer to the documentation provided with your purchase or visit the official SpeaKa Professional weblàrach. Cùm dearbhadh ceannach airson tagraidhean barantais.
Dèanadair: SpeaKa Professional
ASIN: B00CS2V1AQ