1. Ro-ràdh
The SPL 2Control is a compact and user-friendly stereo monitor controller designed to provide comprehensive control over your digital audio workstation's (DAW) monitoring functions. It ensures high-quality audio reproduction through both studio monitors and headphones, allowing you to hear every detail of your mix. Key features include a precise speaker volume potentiometer, active circuitry for sound integrity, and a unique Crossfeed control for accurate headphone monitoring that simulates a stereo speaker image.
2. Stiùireadh Sàbhailteachd
- Leugh na stiùiridhean seo gu mionaideach mus cleachd thu an inneal.
- Cùm an leabhran seo airson iomradh san àm ri teachd.
- Na cuir an aonad fosgailte do uisge no taiseachd gus casg a chur air teine no clisgeadh dealain.
- Dèan cinnteach gu bheil fionnarachadh ceart ann; na cuir bacadh air fosglaidhean fionnarachaidh sam bith.
- Na cleachd ach ceanglachan / goireasan a chaidh a shònrachadh leis an neach-dèanamh.
- Dì-cheangail an càball cumhachd rè stoirmean dealanaich no nuair nach eilear ga chleachdadh airson ùine mhòr.
- Thoir iomradh air a h-uile seirbheis gu luchd-seirbheis le teisteanas.
- Seachain an aonad a chur faisg air stòran teas leithid rèididheatoran, clàran teas, stòbhaichean, no innealan eile (a’ gabhail a-steach ampliifiers) a bheir teas.
3. Pasgan-susbaint
Nuair a bhios tu a’ fosgladh a’ phacaid, dèan cinnteach gu bheil na nithean a leanas air an toirt a-steach:
- 1 x SPL 2Control Module
- Cord cumhachd 1 x
- An Leabhar-làimhe Cleachdaiche seo
4. Toradh thallview
4.1 Smachdan Pannal Aghaidh agus Comharran
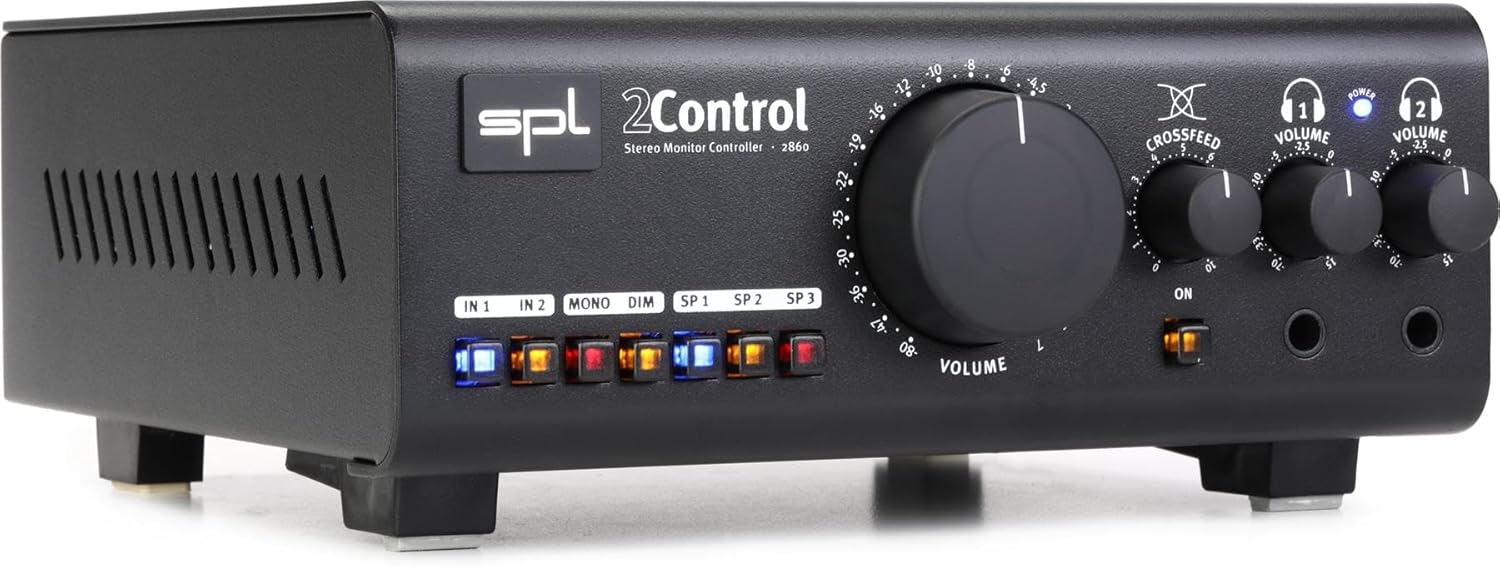
Figear 1: Front Panel of the SPL 2Control Stereo Monitor Controller.
This image displays the front panel of the SPL 2Control. From left to right, it features input selection buttons (IN 1, IN 2), function buttons (MONO, DIM), speaker output selection buttons (SP 1, SP 2, SP 3), a large central master VOLUME knob, a CROSSFEED knob, and two individual headphone VOLUME knobs with corresponding headphone output jacks. A power indicator LED is visible above the headphone controls.
- IN 1 / IN 2 Buttons: Selects the active stereo input source.
- Putan MONO: Sums the stereo signal to mono for compatibility checking.
- Putan DIM: Reduces the output volume by a fixed amount (e.g., -20dB) for temporary level reduction.
- SP 1 / SP 2 / SP 3 Buttons: Selects the active stereo speaker output pair.
- Knob VOLUME: Master volume control for selected speaker outputs.
- CROSSFEED Knob: Adjusts the stereo panorama for headphone monitoring to simulate a speaker listening environment.
- HEADPHONE VOLUME 1 / 2 Knobs: Independent volume controls for the two headphone outputs.
- HEADPHONE 1 / 2 Jacks: 1/4-inch stereo headphone outputs.
- CUMHACHD LED: A’ comharrachadh gu bheil an aonad air a chumhachdachadh.
4.2 Rear Panel Connections (Inferred)
The rear panel typically houses the audio input and output connections, as well as the power input. Based on common audio equipment and product specifications, you can expect:
- Toraidhean analog: Balanced XLR or TRS inputs for connecting your audio interface or mixer.
- Toraidhean neach-labhairt: Multiple sets of balanced XLR or TRS outputs for connecting up to three pairs of studio monitors.
- Cur a-steach cumhachd: Connector for the included power cord.
5. Suidhich
- Suidheachadh: Position the SPL 2Control on a stable, flat surface, ensuring adequate ventilation around the unit.
- Ceangal cumhachd: Connect the provided power cord to the power input on the rear panel of the 2Control and then to a suitable AC power outlet.
- Ceanglaichean a-steach: Connect the stereo outputs of your audio interface, mixer, or other audio source to the IN 1 and/or IN 2 inputs on the rear panel using balanced XLR or TRS cables.
- Ceanglaichean luchd-labhairt: Connect your studio monitors to the SP 1, SP 2, and/or SP 3 outputs on the rear panel using balanced XLR or TRS cables. Ensure correct left and right channel connections.
- Headphone Connections: Plug your headphones into the HEADPHONE 1 and/or HEADPHONE 2 jacks on the front panel.
- Cumhachd tùsail air adhart: Ensure all volume controls are set to their minimum positions before powering on the unit. Then, connect the power cord to the wall outlet. The POWER LED on the front panel will illuminate.
6. Stiùireadh Obrachaidh
- Taghadh a-steach: Brùth an dàrna cuid an Ann an 1 or Ann an 2 button to select your desired audio source. The active button will illuminate.
- Selecting Speaker Outputs: Brùth an SP 1, SP 2, or SP 3 button to route the audio to the corresponding pair of studio monitors. Only one speaker output can be active at a time.
- Adjusting Master Volume: Slowly turn the large LUACHMHOR knob clockwise to increase the listening level for the selected speaker outputs. Turn counter-clockwise to decrease.
- Suimeachadh Mono: Brùth an MONO button to sum the stereo signal to mono. This is useful for checking phase compatibility and mix balance. Press again to return to stereo.
- Gnìomh Dim: Brùth an DIM button to temporarily reduce the output volume. This is useful for quick conversations or when you need to lower the volume without losing your main volume setting. Press again to restore the original volume.
- Sùil air Fòn-cluaise:
- Plug your headphones into the desired headphone jack (HEADPHONE 1 or 2).
- Adjust the individual HEADPHONE VOLUME 1 or 2 knob to set the listening level for your headphones.
- Cleachd an CROSSFEACHADH knob to adjust the stereo image for headphone listening. Turning it clockwise increases the crossfeed, simulating a more natural speaker-like stereo field by blending the left and right channels slightly.
7. Cumail suas
- Glanadh: Cleachd clò bog, tioram gus taobh a-muigh an aonaid a ghlanadh. Na cleachd innealan-glanaidh leaghaidh no fuasglaidhean.
- Fionnarachadh: Ensure that the ventilation slots are kept clear of dust and debris to prevent overheating.
- Stòradh: Ma tha thu a’ stòradh an aonaid airson ùine mhòr, dì-cheangail e bhon chumhachd agus stòraich e ann an àite fionnar, tioram.
8. A ’dèanamh trioblaid
| Trioblaid | Adhbhar a dh’fhaodadh a bhith ann | Fuasgladh |
|---|---|---|
| Gun fhuaim bho luchd-labhairt. |
|
|
| Gun fhuaim bho chluas-cinn. |
|
|
| Fuaim air a thionndadh. |
|
|
9. Sònrachaidhean
| Feart | Mion-fhiosrachadh |
|---|---|
| Ainm Modail | 2 Control (also known as 2860) |
| Brand | SPL |
| Seòrsa neach-labhairt | Cumail sùil |
| Cleachdaidhean Molta | Control, Volume for Monitors |
| Innealan co-fhreagarrach | Monitors, Speakers |
| Rèiteachadh Sianal Fuaim timcheall | 2.0 |
| Dath | Dubh |
| Co-phàirtean air an toirt a-steach | 1 x SPL Control Module |
| Meudan toraidh (D x W x H) | 8.66" x 8.46" x 3.15" |
| Cuideam nì | 7.06 notaichean (timcheall air 3.2 kg) |
| Stòr cumhachd | Electric Corded |
| Teicneòlas ceangail | TRS, XLR |
| Modh Toraidh Fuaim | Stereo |
| Seòrsa stàladh | Sliabh clàr-bùird |
| Dèanadair | Sound Performance Lab |
10. Barantas agus Taic
The SPL 2Control Monitor Controller comes with a limited warranty. For specific warranty terms, duration, and conditions, please refer to the documentation provided with your purchase or visit the official SPL website. For technical support, service, or inquiries, please contact the manufacturer, Sound Performance Lab, or your authorized dealer.
Dèanadair: Sound Performance Lab